Introduction

The AvayaECHI tool captures ECHI data from CMS, then imports the data to database and Splunk. The raw data file is moved to archive directory once the data is sent to database or Splunk. Since the tool uses ODBC, database such as MySQL and MSSQL are supported. The AvayaECHI supports the following features:
- Archives ECHI raw data file to archive directory
- Writes ECHI data to MySQL or MSSQL database
- Writes ECHI data to Splunk
- Imports ECHI data from local file or local directory
- Uploads ECHI files to sftp site for backup or other purpose
- Uploads ECHI files in JSON format to AWS Cloud and trigger Lambda function
- Deletes ECHI archive files over certain period of time
- Supports different format of ECHI file
The AvayaECHI tool uses the following converter which converts ECHI raw data to CSV format
- echi-decode created by Alex Tokarev
- echi-decode updated by Artem
- upinget converter which is created by UPINGET Technologies
Planned New Features
- Implement a charge module that calculate the charge of each call so charging by calls in call center can be implemented
Installation (CMS side)
- The following steps are ONLY required if you want to using the ECHI converter developed by Alex Tokarev / Artem
- Before installation of the package, login as root and enter the following commands to backup the original files
-
cp /cms/dc/chr/uucp_copy /cms/dc/chr/uucp_copy.orig
-
cp /cms/dc/chr/uucp_check /cms/dc/chr/uucp_check.orig
- Download the echi-decode package, then upload the file echi-decode.pl to CMS /cms/dc/chr/ directory
- Artem fixed some bugs of the echi-decode package and add support for CMS R19. Here is the updated echi-decode package.
- Download the modified version of uucp_copy file, then upload the file to CMS /cms/dc/chr/ directory
- Change the files permission
-
chmod +x uucp_copy
-
chmod +x echi_decode.pl
- Create the required directory and modified the access right
-
mkdir /cms/dc/chr/processed
-
mkdir /cms/dc/chr/queue
-
chmod o+w /cms/dc/chr/queue
- Follow this guide (Chapter 5) to install CMS ECHI package. On step 7, enter the /cms/dc/chr/uucp_copy as the script to transmit the file
Testing using Docker Image
Please follow this guide to test AvayaECHI using Docker Container.
OVA File for Testing using OVA File

We have created a OVA file which you can deploy it to VirtualBox or VMware Workstation or Player for testing. After deploying the OVA file, please modify the following for your own environment
- Reference this guide to delete the file /etc/udev/rules.d/70-persistent-net.rules
- Change the MAC address and IP address of the VM in the file /etc/sysconfig/network-scripts/ifcfg-eth0
- Telnet to AvayaECHI console port 14016, update the program parameters for your environment
- Once the changes are completed, reboot the VM
The username and password of the OVA VM is
- OS : root/P@ssw0rd
- MySQL: root/P@ssw0rd
- AvayaECHI console: tcpgate/tcpgate01
- Splunk URL: http://newIP:8000/
Installation (AvayaECHI)
- I have recorded a video for Windows 2012 64bit OS, please watch this video for installation and Splunk Logging and this video for Database Logging
- Download the Avaya ECHI Capturing Tool zip file here.
- Follow the steps below to install the software.
- Extract all the files into directory c:\program files\avayaechi
- Open Windows Command Prompt (run as System Administrator if you are using Windows 7 or above), enter the following commands to register the program as Windows Service
- cd c:\program files\avayaechi
- avayaechi -i
- sc description avayaechi “Captures ECH files from CMS and uploads the records to database”
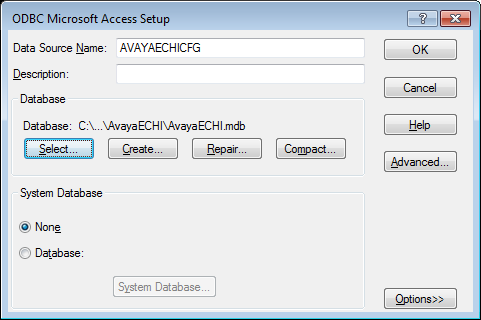
- Open ODBC Data Source Administrator, create a System DSN called AVAYAECHICFG for Microsoft Access Driver (*.mdb) and select avayaechi.mdb which is located in the directory c:\program files\avayaechi
- Hint: make sure to create a System DSN instead of User DSN, otherwise the program will startup without proper parameters
- If you are using 64 bit Windows OS, please use 32 bit ODBC Data Source Administrator

- Open the Access file, edit the value of parameters echi_archive_dirsftp, that is the location for archived files. E.g. c:\\avayaechi\\
- Hint: for the archive directory, make sure the format of double backslash (\\) is used because back slash is escape character in c++ and I’m lazy to modify it in my code.
- You can edit the value of this parameter via the telnet console, the command is
- update echi_archive_dirsftp c:\\avayaechi\\
- Start the Windows Service avayaechi
- Telnet to localhost and port number 14016, enter username tcpgate and password tcpgate01 to access the program console
- Enter the following command in the program console to add CMS sftp information
- add sftp 10.10.1.100 22 username encrypted_password /cms/dc/chr/queue/
- Hint: The tool will connect CMS 10.10.1.100 via SSH by username and encrypted_password
- Hint: The ECHI raw data is located at /cms/dc/chr/queue/ directory
- If you are using converter by Avaya Professional Service, update the parameter called echi_converter as follow
- up to R17 version
- update parameter echi_converter aps
- reload
- R18 or later
- update parameter echi_converter apsr18
- reload
- up to R17 version
- Enter the following command, you will receive debug information
- trace on asc
- Enter the following command, you will get the help message
- help
Uninstallation
- Stop the Window Service avayaechi
- Open Windows Command Prompt, enter the following commands to uninstall the program from Windows Service
- cd c:\program files\avayaechi
- avayaechi -u
Import ECHI via SFTP interface
- This tool uses sftp to get ECHI raw data from Avaya CMS directory
- Open the Access file, edit the following parameters
- echi_archive_dirsftp
- Hint: The archive directory for ECHI raw files. The default value is c:\\avayaechi\\
- echi_sftpdir
- Hint: The remote directory that contains the ECHI files. The default value is /cms/dc/chr/queue/
- echi_sftpfilenameprefix
- Hint: The filename prefix for ECHI files. The default value is chr
- echi_sftplicensekey
- Hint: The license key to activate this feature and Splunk logging
- echi_archive_dirsftp
- Open the program console, add your sftp host by the following command
- add sftp host port username password dir
- Hint: host can be hostname or IP address
- Hint: default port of SSH is 22
- Hint: username that created by your administrator for ECHI retrieval over sftp protocol
- Hint: encrypted password for sftp user. Use genpass command to generate an encrypted password
- Hint: if dir is empty, the program uses the directory that specified in echi_sftpdir
- add sftp host port username password dir
- Input the following command to test the connectivity of sftp
- sftptest
- Hint: Test sftp login using the parameters provided by the add sftp command
- sftptest
- The program will connect to your sftp hosts by every 30 seconds and imports the data to database and Splunk
Import ECHI from a Local File or Directory
- Enter the following command to import ECHI files from a local directory and archive them to archive directory at predefined interval
- add scandir c:\\tmp\\ c:\\tmp\\archivedir\\
- Hint: The import directory should not be the archived directory
- Enter the following command to import ECHI file at once
- import echifile c:\\tmp\\chr396.254
- Hint: The import file should be prefixed by characters “chr”
- Enter the following command to import all ECHI files in a directory at once
- import echidir c:\\tmp\\
- Hint:The import directory should not be the archived directory
Upload ECHI files to SFTP site
- Enter the following command to upload ECHI files to remote sftp site
- add uploadsftp c:\\echi\\ c:\\echi\\archive\\ 192.168.1.101 22 username encryptpasswd description
- Hint: upload ECHI files from c:\\echi\\ and backup the files in c:\\echi\\archive\\, the sftp site is 192.168.1.101, login using username and encryptpasswd
Delete ECHI Archive Files
- Enter the following command to delete ECHI archive files over certain period of time
- add retentiondir c:\\echi\\archive\\ 90 over90days
- Hint: delete the files in directory c:\echi\archive\ which the last modified day over 90 days
The Manual Procedure to Re-import ECH files
- First, disable the AvayaECHI sftp and scandir functions
- sftp disable
- scandir disable
- The instruct CMS to ftp the archived ech files to AvayaECHI server
- Create a folder called reinput in the AvayaECHI sever, copy all the ech files to the folder
- Concat all the echi files into a single file called totalchr.txt
- Excuete the following command to delete records in the ECH database for the ech file
- deletesql AVAYAECHIDBCFG tcpgate totalchr.txt
- Execute the following command in the AvayaECHI console
- import echifile totalchr.txt
- Hint: enter the exact path of the totalchr.txt file
- Enable the sftp and scandir functions
- sftp enable
- scandir enable
64 bit Windows System
- For 64 bit Windows system, please follow the steps below
- Please download and install the Microsoft Visual C++ 2008 Service Pack 1 Redistributable Package MFC Security Update http://www.microsoft.com/en-hk/download/details.aspx?id=26368, choose x86 version
- Configure ODBC System DSN using
C:\Windows\SysWOW64\odbcad32.exe - Stop the Windows firewall because it enables by default and I don’t have time to figure out what ports are required to open, you need to find it out yourself. AvayaECHI uses 14016 for telnet port.
Database Logging
- The following SQL commands and screen dump are example for MySQL
- Create database and user on the database server, use your own username and password please. The following is for example only
-
mysql -u root -p
-
create database echi;
-
create user 'tcpgate'@'localhost' identified by 'tcpgate';
-
create user 'tcpgate'@'%' identified by 'tcpgate';
-
grant all on echi.* to 'tcpgate'@'localhost';
-
grant all on echi.* to 'tcpgate'@'%';
-
flush privileges;
-
quit;
-
mysql -h localhost -u tcpgate -p echi < echi.sql
- Define the following parameters for database logging feature
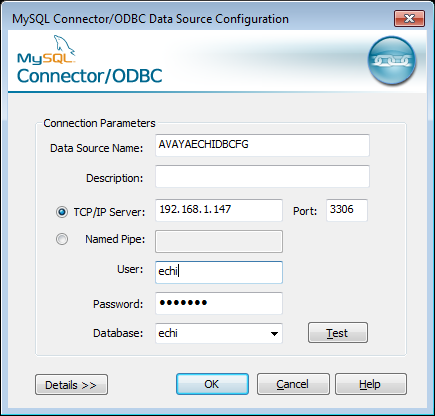
- update parameter echi_remotedb_dsn AVAYAECHIDBCFG
- Hint: the string AVAYAECHIDBCFG is the system DSN for the remote ECHI database
- Hint: the following screen dump is an example for MySQL system DSN

- update parameter echi_remotedb_dsn AVAYAECHIDBCFG
-
- update parameter echi_remotedb_username echi
- Hint: the string echi is the username used to access the ECHI database
- genpass
- Hint: use this command to generate an encrypted password
- update parameter echi_remotedb_passwd encrypted-password
- Hint: copy the encrypted password from the genpass command
- update parameter echi_remotedb_table tECHI
- Hint: the string tECHI is the table name of the ECHI database that stored the ECHI data
- update parameter echi_remotedb_username echi
- You can find the ECHI data in tECHI table


Splunk Logging
- Create index for AvayaECHI

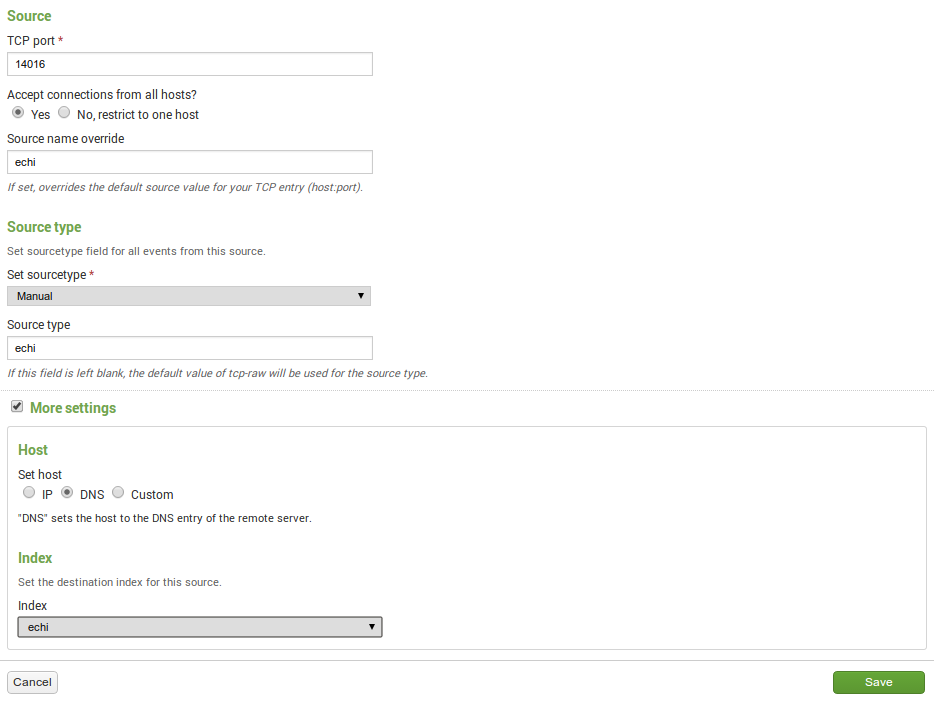
- Create TCP input for AvayaECHI

- Update parameter “echi_splunkhost”, for example
- update parameter echi_splunk_host 192.168.1.100
- Update parameter “echi_splunkport”, for example
- update parameter echi_splunk_port 14016
- Reload the configuration
- reload
- Search the ECHI data in Splunk


Splunk Integration using HTTP Event Collector
- Follow this guide to enable HTTP Event Collector in Splunk
- Create a token specific for AvayaECHI application, copy the token after its creation, it is suggested to create a token for each specific application and link the token to it’s index
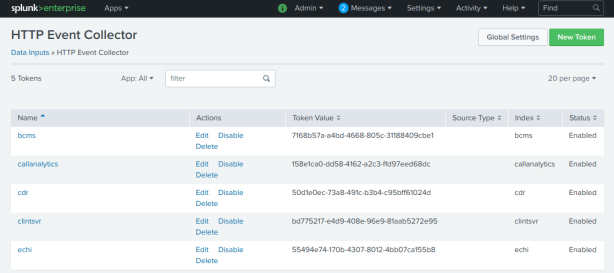
- Update the parameter echi_splunk_hectoken using the newly created token
- update parameter echi_splunk_hectoken new_created_token
- Update the parameter echi_splunk_hecurl using your site specific Splunk url
- update parameter echi_splunk_hecurl https://input-SPLUNKCLOUDHOST:PORT/services/collector
- Hint: Reference this guide to find out the Splunk HEC url
- Update the parameter echi_splunk_protocol to use HTTP Event Collector
- update parameter echi_splunk_protocol hec
- Update the parameter echi_splunk_hecchannel using the newly create token
- update parameter echi_splunk_hecchannel new_created_token
- Update the parameter echi_splunk_dataformat to use JSON format
- update parameter echi_splunk_dataformat json
- Reload the configuration
- reload
- If insert to Splunk failure, the data will be written to a local file called splunk_err.txt. You can upload the data to Splunk manually using curl command
- curl -k https://input-SPLNKCLOUDHOST:8088/services/collector/event -H “Authorization: Splunk token_generated_from_Splunk” -H “X-Splunk-Request-Channel: token_generated_from_Splunk” -H “Content-Type: application/json” –data-binary “@splunk_err.txt”
CentOS 6.x Installation Guide
- The following is for CentOS 6 only
- The executable file of 32bit version is “avayaECHI”, the 64bit version is “avayaECHI64”
- Install the following packages
-
yum install mysql-server mysql libssh2
-
yum install mysql-connector-odbc unixODBC
-
wget http://download.fedoraproject.org/pub/epel/6/x86_64/epel-release-6-8.noarch.rpm
-
rpm -ivh epel-release-6-8.noarch.rpm
-
yum install libssh
- Config and start MySQL
-
chkconfig mysqld on
-
service mysqld start
- Create database and user
-
mysql -u root -p
-
create database echi;
-
create user 'tcpgate'@'localhost' identified by 'tcpgate';
-
grant all on echi.* to 'tcpgate'@'localhost';
-
flush privileges;
-
quit
-
mysql -h localhost -u tcpgate -p echi < echi.sql
- Copy the following to /etc/odbc.ini file
- [AVAYAECHICFG]
Description = MySQL connection to AvayaECHI
Driver = MySQL
Server = localhost
Port = 3306
Database = echi - [AVAYAECHIDBCFG]
Description = MySQL connection to AvayaECHI DB
Driver = MySQL
Server = localhost
Port = 3306
Database = echi
- [AVAYAECHICFG]
- Create user and copy files
-
useradd avayaechi
-
mkdir /usr/local/avayaechi
-
cp AvayaECHI /usr/local/avayaechi
-
cp AvayaECHI64 /usr/local/avayaechi
-
chmod +x /usr/local/avayaechi/AvayaECHI
-
chmod +x /usr/local/avayaechi/AvayaECHI64
-
chown -R avayaechi.avayaechi /usr/local/avayaechi
-
mkdir -p /var/log/avayaechi/archive/
-
chown -R avayaechi.avayaechi /var/log/avayaechi
- Auto start the daemon after server reboot for 32bit OS
-
echo "rm -f /tmp/avayaechi.log" >> /etc/rc.local
-
echo "su avayaechi -c '/usr/local/avayaechi/AvayaECHI'" >> /etc/rc.local
- Auto start the daemon after server reboot for 64bit OS
-
echo "rm -f /tmp/avayaechi.log" >> /etc/rc.local
-
echo "su avayaechi -c '/usr/local/avayaechi/AvayaECHI64'" >> /etc/rc.local
CentOS 7.x Installation Guide
- The following is for RedHat/CentOS 7 64 bit OS only, other Linux distribution is similar
- Login as root and execute the following commands
- Disable SELINUX and stop firewall
-
sed -i 's/\(^SELINUX=\).*/\SELINUX=disabled/' /etc/selinux/config
-
systemctl disable firewalld
-
systemctl stop firewalld
-
reboot
- Install the MySQL 8.x
-
sudo rpm -Uvh https://dev.mysql.com/get/mysql80-community-release-el7-1.noarch.rpm sudo yum --enablerepo=mysql80-community install mysql-community-server sudo service mysqld start grep "A temporary password" /var/log/mysqld.log mysql_secure_installation - Install the following packages
-
yum install telnet libssh2 libssh
-
yum install mysql-connector-odbc unixODBC
- Config and start MySQL
-
systemctl enable mysqld
-
systemctl start mysqld
- Create database and user
-
mysql -u root -p
-
create database echi;
-
create user 'tcpgate'@'localhost' identified by 'P@ssw0rd';
-
grant all on echi.* to 'tcpgate'@'localhost';
-
flush privileges;
-
quit
-
mysql -h localhost -u tcpgate -p echi < echi.sql
- Copy the following to /etc/odbc.ini file
- [AVAYAECHICFG]
Description = MySQL connection to AvayaECHI
Driver =MySQL ODBC 8.0 ANSI Driver
Server = localhost
Port = 3306
Database = echi - [AVAYAECHIDBCFG]
Description = MySQL connection to AvayaECHI
Driver =MySQL ODBC 8.0 ANSI Driver
Server = localhost
Port = 3306
Database = echi
- [AVAYAECHICFG]
- Create user and copy files
-
useradd avayaechi
-
mkdir /usr/local/avayaechi
-
cp AvayaECHI64 /usr/local/avayaechi
-
chmod +x /usr/local/avayaechi/AvayaECHI64
-
chown -R avayaechi.avayaechi /usr/local/avayaechi
-
mkdir -p /var/log/avayaechi/archive
-
chown -R avayaechi.avayaechi /var/log/avayaechi
- Auto start the daemon after server reboot
-
echo "rm -f /tmp/avayaechi.log" >> /etc/rc.local
-
echo "su avayaechi -c '/usr/local/avayaechi/AvayaECHI64 -u tcpgate -p 40UIt9O3PqtwsSn+Wx6pig=='" >> /etc/rc.local
-
chmod +x /etc/rc.local
Support and License
- Please contact upinget.com for support and license

very good Information. Thanks
Hi, this post is very good, pleases, one question, for access telnet localhost 14016, not working, but telnet localhost 14001 is true port for coneccion, only user and pass not work (tcpgate / tcpgate01) please help me with true user and password.
Please make sure you created the system DSN using 32bit ODBC tool because the AvayaECHI is a 32bit program.
Hi, Do I need the license to sftp from the cms to avayaechi or is suppose to work without it?
Hi, you need a license in order to make it works.
HI There!
Do you have an updated copy of the echi-decoder.pl file? It is not working on CMS R19.
thank you!
check this.
https://github.com/artemkosenko/echi-decode/blob/master/echi-decode.pl
Thank you – works a charm!!