Introduction
See Also: DMCCLogger Supports Real-Time Speech to Text Transcription
The Avaya DMCC Logger (DMCCLogger) is a server program that uses Avaya DMCC API to implement call recording for Avaya Aura Communication Manager. DMCCLogger supports Multiple Registration (MR) and Single Step Conference (SSC) recording methods. DMCCLogger receives RTP streams from Avaya Aura CM directly and converts the RTP data to WAV or MP3 file using conversion tool such as ffmpeg. Call details information is stored in MySQL database, a web based software called DMCCLoggerWeb is developed for searching of call records based on information such as calling number, called number, agent ID, etc. DMCCLogger is an ideal tool for contact centers when call recording is necessary in the daily operation because it is reliable and the cost is very competitive.
Prerequisites
Please make sure you have the following Avaya features and systems installed for the DMCCLogger installation.
- Avaya AES with DMCC licenses
- Avaya AES with TSAPI license for third party device monitoring
- Avaya phantom extensions configured with IP software feature
- CentOS / Ubuntu 64bit OS with MySQL
System Architecture
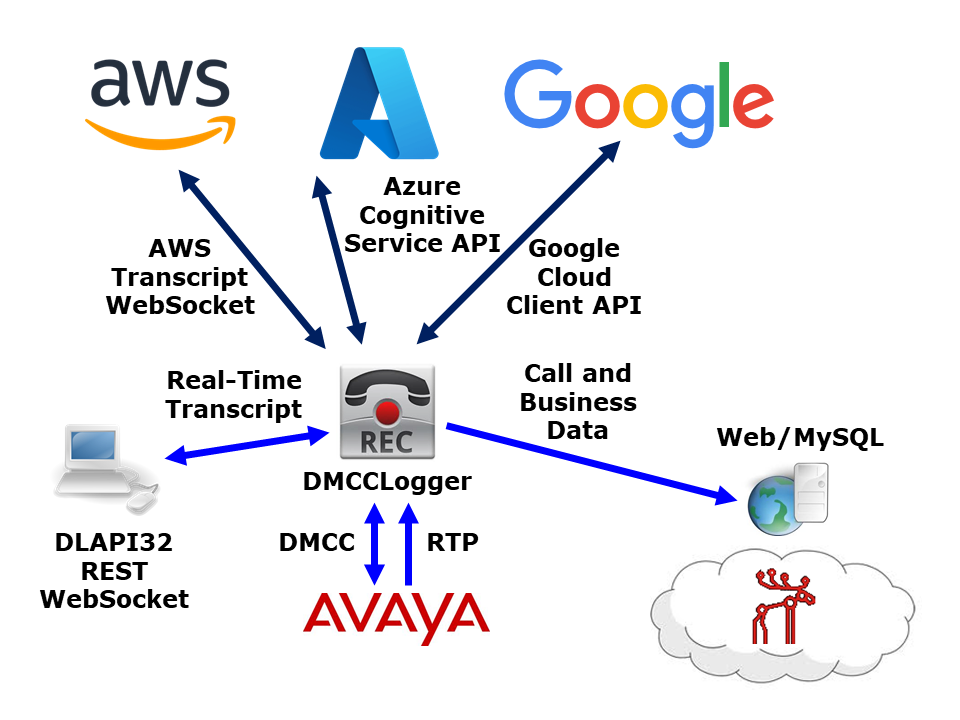
- DMCCLogger monitors Avaya extensions and triggers recording by multiple registration or single step conference recording methods.
- Avaya sends RTP streams to DMCCLogger.
- DMCCLogger writes all voice files to a distributed network file system such as MooseFS so voice files can be consolidated in one place such as data center and the files can be shared among different applications. For example, DMCCLoggerWeb.
- DMCCLogger writes call details information and business data (via DMCCLogger API) to MySQL database.
- DMCCLoggerWeb retrieves call records based on user provided data such as calling number, called number, agent ID, etc.
- The architecture supports multiple DMCCLogger servers with one centralized database.
Pricing Details
Check the pricing from this URL
OVA File for Testing

We have created a OVA file which you can deploy it to VirtualBox or VMware for testing. After deploying the OVA file, please modify the following for your own environment.
- IP address of the VM
- Telnet to DMCCLogger console port 14005
- Update parameters such as dmcc_dlink_01, dmcc_licensekey, dmcc_rtpbindingaddress, etc
- Add agent extensions by command “add extension”
- Add phantom devices by command “add phantom”
- Hint: Referring to the following section “DMCCLogger Parameter Configuration” for detail information
- Once the changes are completed, reboot the VM
The username and password of the OVA VM is
- OS : root/P@ssw0rd
- MySQL: root/P@ssw0rd
- DMCCLogger console: tcpgate/tcpgate01
- alarchived console: tcpgate/tcpgate01
DMCCLogger Parameter Configuration
- After the software is installed, telnet DMCCLogger program console to configure necessary parameters
- The port number of DMCCLogger program console is 14005, default username tcpgate and password tcpgate01
- update parameter dmcc_dlink_01 AESIP#4721#CTIUSER#ENCRYPTEDPASSWD#false#6#SWITCHNAME
- Hint: AESIP is the IP address of AES
- Hint: 4721 is the AES DMCC listening port, 4722 is listening port with encryption
- Hint: CTIUSER is the AES cti user login
- Hint: ENCRYPTEDPASSWD is the encrypted password of the AES cti user login, you can use console command genpass to generate an encrypted password
- Hint: false means not to use encryption for the communication between DMCCLogger and AES
- Hint: protocol version 6 is used
- Hint: SWITCHNAME is the switch name configured in AES
- update parameter dmcc_licensekey encrypted_license_key
- Hint: Please obtain a valid license key from upinget.com
- update parameter dmcc_rtpbindingaddress 192.168.1.123
- Hint: Use the IP address of the DMCCLogger as RTP binding address
- add extension 10001 default oKd75RltJLcf+uXkp2CYHA==
- Hint: add the extension 10001 using default (multiple registration) method, the password is in encrypted format
- Hint: to get encrypted password, please use command “genpass” in tcpgate console
- add phantom 20001 oKd75RltJLcf+uXkp2CYHA==
- Hint: add phantom device 2001 with encrypted password, the phantom device is used in single step conferencing recording mode
RedHat/Rocky 8.x Installation Procedure


- The following is for RedHat/Rocky 8.x 64 bit OS only, other Linux distribution is similar
- Login as root and execute the following commands
- Disable SELINUX and stop firewall
-
sed -i 's/\(^SELINUX=\).*/\SELINUX=disabled/' /etc/selinux/config systemctl disable firewalld systemctl stop firewalld reboot - The DMCCLogger uses ffmpeg for audio conversion, you can download the precompiled version by this URL https://www.vultr.com/docs/how-to-install-ffmpeg-on-centos
-
dnf install dnf-plugins-core
dnf install epel-release
dnf config-manager --add-repo=https://negativo17.org/repos/epel-multimedia.repo
dnf config-manager --set-enabled powertools
dnf install ffmpeg
- Install and config MySQL 8.x
-
dnf install mysql-server systemctl start mysqld.service sudo systemctl enable mysqld.service mysql_secure_installation - Install the following packages
-
sudo rpm -Uvh https://dev.mysql.com/get/mysql84-community-release-el8-1.noarch.rpm yum install telnet chrony yum install mysql-connector-odbc unixODBC - Config time synchronisation
-
systemctl enable --now chronyd systemctl restart chronyd - Copy timezone from tzselect
-
tzselect - Example:
-
ln -sf /usr/share/zoneinfo/America/Vancouver /etc/localtime - Create database and user
-
mysql -u root -p create database dmcclogger; create database alarchived; create user 'dmcclogger'@'localhost' identified by 'P@ssw0rd'; ALTER USER 'dmcclogger'@'localhost' IDENTIFIED WITH mysql_native_password BY 'P@ssw0rd'; grant all on dmcclogger.* to 'dmcclogger'@'localhost'; grant all on alarchived.* to 'dmcclogger'@'localhost'; flush privileges; quit mkdir ~/dmcclogger cd ~/dmcclogger // get the latest copy of DMCCLogger software from UPINGET // extract the software by tar command. For example, tar xzvf dmcclogger-1.0.7.tar.gz cd redhat8 mysql -h localhost -u dmcclogger -p dmcclogger < dmcclogger.sql mysql -h localhost -u dmcclogger -p alarchived < alarchived.sql - Copy the following to /etc/odbc.ini file
- [DMCCLOGGERCFG]
Description = MySQL connection to DMCCLogger
Driver = MySQL ODBC 9.0 ANSI Driver
Server = localhost
Port = 3306
Database = dmcclogger - [DMCCLOGGERCINFOCFG]
Description = MySQL connection to DMCCLogger
Driver = MySQL ODBC 9.0 ANSI Driver
Server = localhost
Port = 3306
Database = dmcclogger - [ALARCHIVEDCFG]
Description = MySQL connection to DMCCLogger Archive Daemon
Driver = MySQL ODBC 9.0 ANSI Driver
Server = localhost
Port = 3306
Database = alarchived
- [DMCCLOGGERCFG]
- Create user and copy files
-
adduser dmcclogger -M -c "DMCCLogger User" yum install httpd php php-mysqlnd echo "Options -Indexes" > /var/www/html/.htaccess chown -R dmcclogger.dmcclogger /var/www/ chown -R dmcclogger.dmcclogger /var/lib/php/session/ sed -i 's/^\(User\|Group\).*/\1 dmcclogger/' /etc/httpd/conf/httpd.conf sed -i 's/AllowOverride None/AllowOverride All/' /etc/httpd/conf/httpd.conf // modify the config file /etc/php-fpm.d // change user and group to dmcclogger // change listen.owner and listen.group to dmcclogger // comment the listen.acl_users line service httpd restart systemctl enable httpd service php-fpm restart systemctl enable php-fpm - Copy files and change permission for 64 bit OS
-
mkdir /usr/local/dmcclogger cp DMCCLogger64 /usr/local/dmcclogger cp alarchived64 /usr/local/dmcclogger cp *.sh /usr/local/dmcclogger chmod +x /usr/local/dmcclogger/DMCCLogger64 chmod +x /usr/local/dmcclogger/alarchived64 chmod +x /usr/local/dmcclogger/*.sh - Create working directories
-
chown -R dmcclogger.dmcclogger /usr/local/dmcclogger mkdir -p /var/log/dmcclogger mkdir -p /mnt/dmcclogger/tmp mkdir -p /var/log/alarchived chown -R dmcclogger.dmcclogger /var/log/dmcclogger chown -R dmcclogger.dmcclogger /mnt/dmcclogger chown -R dmcclogger.dmcclogger /var/log/alarchived cd /tmp mkdir speechsdk wget -O SpeechSDK-Linux.tar.gz https://aka.ms/csspeech/linuxbinary tar --strip 1 -xzf SpeechSDK-Linux.tar.gz -C speechsdk mv speechsdk/lib/x64/* /usr/local/lib ldconfig - Install DMCCLoggerWeb
-
cd ~/dmcclogger
cp dmccloggerweb-1.0.7.tar.gz /var/www/html
cd /var/www/html
tar xzvf dmccloggerweb-1.0.7.tar.gz
rm dmccloggerweb-1.0.7.tar.gz
cd /var/www/html/dmcclogger
ln -sf /mnt .
chown -R dmcclogger.dmcclogger /var/www/html/dmcclogger
Change your timezone setting in /etc/php.ini, the parameter is called "date.timezone"
Change your mysql socket default setting in /etc/php.ini when required. For example mysql.default_socket = /var/run/mysqld/mysqlx.sock
- Auto start the daemon after server reboot for 64 bit OS
-
cp dmcclogger.timer /etc/systemd/system
cp dmcclogger.service /etc/systemd/system
systemctl enable dmcclogger.timer
systemctl start dmcclogger.timer
Ubuntu 22.04/24.04 Installation Procedure

- The following is for Ubuntu 22.04/24.04 64 bit OS only, other Linux distribution is similar
- Change to root and execute the following commands
-
sudo su - Install the MySQL 8.x
-
wget https://dev.mysql.com/get/mysql-apt-config_0.8.33-1_all.deb dpkg -i mysql-apt-config_*.deb apt update apt install mysql-server apt install mysql-connector-odbc - Install the following packages
-
apt-get install ffmpeg unixodbc apache2 php php-mysql telnet ntp - Create database and user
-
mysql create database dmcclogger; create database alarchived; create user 'dmcclogger'@'localhost' identified by 'P@ssw0rd'; grant all on dmcclogger.* to 'dmcclogger'@'localhost'; grant all on alarchived.* to 'dmcclogger'@'localhost'; flush privileges; quit mysql -u dmcclogger -p dmcclogger < dmcclogger.sql mysql -u dmcclogger -p alarchived < alarchived.sql - Copy the following to /etc/odbc.ini file
- [DMCCLOGGERCFG]
Description = MySQL connection to DMCCLogger
Driver = MySQL ODBC 9.2 ANSI Driver
Server = localhost
Port = 3306
Database = dmcclogger - [DMCCLOGGERCINFOCFG]
Description = MySQL connection to DMCCLogger
Driver = MySQL ODBC 9.2 ANSI Driver
Server = localhost
Port = 3306
Database = dmcclogger - [ALARCHIVEDCFG]
Description = MySQL connection to DMCCLogger Archive Daemon
Driver = MySQL ODBC 9.2 ANSI Driver
Server = localhost
Port = 3306
Database = alarchived
- [DMCCLOGGERCFG]
- Create user and copy files
-
useradd dmcclogger mkdir /usr/local/dmcclogger cp ubuntu22/*.sh /usr/local/dmcclogger cp DMCCLogger64 /usr/local/dmcclogger/ cp alarchived64 /usr/local/dmcclogger/ chmod +x /usr/local/dmcclogger/*.sh chmod +x /usr/local/dmcclogger/DMCCLogger64 chmod +x /usr/local/dmcclogger/alarchived64 chown -R dmcclogger:dmcclogger /usr/local/dmcclogger mkdir -p /var/log/dmcclogger mkdir -p /mnt/dmcclogger/tmp mkdir -p /var/log/alarchived chown -R dmcclogger:dmcclogger /var/log/dmcclogger chown -R dmcclogger:dmcclogger /mnt/dmcclogger chown -R dmcclogger:dmcclogger /var/log/alarchived cd /tmp mkdir speechsdk wget -O SpeechSDK-Linux.tar.gz https://aka.ms/csspeech/linuxbinary tar --strip 1 -xzf SpeechSDK-Linux.tar.gz -C speechsdk mv speechsdk/lib/x64/* /usr/local/lib ldconfig - Install DMCCLoggerWeb
-
cd /var/www/html
echo "Options -Indexes" >> .htaccess
chown -R dmcclogger:dmcclogger /var/www/
chown -R dmcclogger:dmcclogger /var/lib/php/sessions/
cd /etc/apache2/
sudo vi envvars
Change APACHE_RUN_USER=dmcclogger
Change APACHE_RUN_GROUP=dmcclogger
sed -i 's/AllowOverride None/AllowOverride All/' apache2.conf
service apache2 restart
tar xzvf dmccloggerweb-1.0.7.tar.gz
mv dmcclogger /var/www/html
cd /var/www/html/dmcclogger
ln -sf /mnt .
chown -R dmcclogger:dmcclogger /var/www/html/dmcclogger
- Auto start the daemon after server reboot for 64 bit OS
-
cp ubuntu22/*.sh /usr/local/dmcclogger
cp dmcclogger.timer /etc/systemd/system
cp dmcclogger.service /etc/systemd/system
systemctl enable dmcclogger.timer
systemctl start dmcclogger.timer
DMCCLogger Web
- DMCCLogger Web is a web based application for searching of call recording based on parameters such as date time, extension number, agent ID, calling number, etc.

- Follow the steps below for the installation and configuration of DMCCLogger Web for CentOS. The steps for other Linux distribution are similar.
- yum install httpd
- chkconfig httpd on
- service httpd start
- Hint: if you do not install httpd before
- cp dmccloggerweb-1.0.4.tar.gz /var/www/html
- Hint: the dmccloggerweb-1.0.4.tar.gz is in the dmcclogger-x.x.x.tar.gz file
- cd /var/www/html
- tar xzvf dmccloggerweb-1.0.4.tar.gz
- rm dmccloggerweb-1.0.4.tar.gz
- cd /var/www/html/dmcclogger
- ln -sf /mnt .
- Hint: to symbolic link voice record directory to DMCCLogger Web directory
- chown -R dmcclogger.dmcclogger /var/www/html/dmcclogger
- Hint: change the ownership to dmcclogger
- yum install php
- yum install php-mysql ntp
- Change your timezone setting in /etc/php.ini, the parameter is called “date.timezone“
- chmod 777 /var/lib/php/session
- service httpd restart
- vi config.php
- Hint: change the $mysqlHost in config.php to the ip address of your sql server
- http://ip-of-dmcclogger-web/dmcclogger/
- Hint: default admin username is admin and password P@ssw0rd
Trace / System Real Time Monitoring
- You can turn on the trace and see the real time system status by telnet to the DMCCLogger port 14005, entering username tcpgate and password tcpgate01
- Enter the following in the console prompt
- trace on asc
DMCCLogger API
- DMCCLogger API is for logging of application data related to its voice record, 10 data fields are supported. API is provided as OCX and DLL formats, the library files and sample applications are provided in the zip file.
- To enable API support, enter the following command in the program console
- add tcp 5002 * * custom dlapi
- Hint: API server will be listened on port 5002.
- Call info record will be deleted immediately after agent call hangup, to enable agent can write application data after call end, edit the parameter dmcc_recorddeletedelay. If you want agent can write record in 30 seconds after call hangup, set the value to 30.
DMCCLogger REST interface
- DMCCLogger REST interface is for Web application integration
- To enable HTTP header with username and password, please change parameter “dmcc_credentialrest” to “true”
- To add REST interface port, enter the following command
-
add tcp 5003 * * custom dlrest
-
- The URL for querying of device status is
-
http://server:port/extstatus?extension=12345
-
- The URL for listing of all device status is
-
http://server:port/listextstatus
-
- The URL for saving application data is
-
http://server:port/savedata?extension=12345&recordkey=12345.6789&data0=hello&data9=world
-
- The URL for supervisor silent monitoring is
-
http://server.port/silentmonitor?agentextension=12345&supervisorextension=12346
-
- The URL for pause recording
-
http://server.port/pauserecording?extension=12345
-
- The URL for unpause recording
-
http://server.port/unpauserecording?extension=12345
-
- The URL for adding agent extension
-
http://server.port/addextension?extension=12345&mode=default&password=123456&info=Pos124
-
- The URL for delete of agent extension
-
http://server.port/deleteextension?extension=12345
-
- The URL for listing of agent extension
-
http://server.port/listextension
-
- The URL for adding phantom extension
-
http://server.port/addphantom?extension=12345&password=123456
-
- The URL for delete of phantom extension
-
http://server.port/deletephantom?extension=12345
-
- The URL for listing of phantom extension
-
http://server.port/listphantom
-
- The URL for adding acd extension
-
http://server.port/addacd?extension=12345
-
- The URL for delete of acd extension
-
http://server.port/deleteacd?extension=12345
-
- The URL for listing of acd extension
-
http://server.port/listacd
-
- The URL for adding of api user
-
http://server.port/addapiuser?username=api&password=Lorlyurr3Hol&fullname=WEB
-
- The URL for delete of api user
-
http://server.port/deleteapiuser?username=api
-
- The URL for listing of api user
-
http://server.port/listapiuser
-
- The URL for adding of encryption key
-
http://server.port/addencryptionkey?key=Piep9siwenod
-
- The URL for listing of encryption key
-
http://server.port/listencryptionkey
-
- The URL for adding of record path
-
http://server.port/addrecordpath?extension=12345&path=/mnt/dmcclogger/projectA/
-
- The URL for delete of record path
-
http://server.port/deleterecordpath?extension=12345
-
- The URL for listing of record path
-
http://server.port/listrecordpath
-
- The URL for adding of email notification
-
http://server.port/addemail?mail=abc@example.com
-
- The URL for delete of email notification
-
http://server.port/deleteemail?email=abc@example.com
-
- The URL for listing of email notification
-
http://server.port/listemail
-
- The URL for update email configuration
-
http://server.port/emailconfig?emailauth=yes&emailssl=yes&emailserver=10.0.0.1&emailport=25&emailusername=abc&emailpassword=123456&emailsenderaddress=abc@example.com&emailsenderdisplay=dmcclogger
-
- The URL for test email configuration
-
http://server.port/testemail
-
- The URL for encryption configuration
-
http://server.port/encryption?enable=yes
-
- The URL for RTP binding address configuration
-
http://server.port/rtpbindingaddress?ip=10.10.10.1
-
- The URL for displaying of license
-
http://server.port/displaylicense
-
- The URL for updating of license, URLEncode the license to avoid any confusing characters
-
http://server.port/updatelicense?key=Bbshtj3sohqSKqqY41wM%2Fv7aHG%2FKPvH5N%2B950sE0Nvnu0gP6lJNpoyswC0OUZVudrTw89lS%2B9b9tjw9xOAo8Ww%3D%3D
-
- The URL for adding parameter
-
http://server.port/addparameter?variable=bcms_hello&value=world
-
- The URL for updating parameter
-
http://server.port/updateparameter?variable=bcms_hello&value=world2
-
- The URL for delete of parameter
-
http://server.port/deleteparameter?variable=bcms_hello
-
- The URL for listing of parameter
-
http://server.port/listparameter
-
- The URL for reload parameter
-
http://server.port/reload
-
- The URL for updating DMCC link parameter
-
http://server.port/updateparameter?variable=dmcc_dlink_01&value=AESIP#4721#CTIUSER#ENCRYPTEDPASSWD#false#6#SWITCHNAME
-
- The URL for checking of link status
-
http://server.port/linkstatus
-
DMCCLogger WebSocket interface
- DMCCLogger WebSocket interface is for Web application integration
- To add WebSocket interface port, enter the following command
- add tcp 9090 * * custom dlws
- WebSocket interface accepts JSON request, returns JSON response and delivers unsolicited JSON evens
- The JSON strings for Connect request and response are
- {id: “1”, request: “connect”, extension: “12345”, agentid: “56789”}
- {msgtype: “response”, id: “1”, result: “success”}
- The JSON strings for Disconnect request and response are
- {id: “2”, request: “disconnect”}
- {msgtype: “response”, id: “2”, result: “success”}
- The JSON strings for SaveData request and response are
- {id: “3”, request: “savedata”, extension: “12345”, recordkey: “12345.6789”, data0: “hello”, data9: “world”}
- {msgtype: “response”, id: “3”, result: “success”}
- The JSON string for RecordStart event is
- {msgtype: “event”, eventtype: “recordstart”, extension: “12345”, recordkey: “12345.6789”, ucid: “00001094861421138402”, calling: “12345”, called: “12346”}
- The JSON string for RecordEnd event is
- {msgtype: “event”, eventtype: “recordend”, extension: “12345”, recordkey: “12345.6789”}
DMCCLogger Desktop
- Follow this link to find the details of the application
Monitor DMCCLogger Status
- Monitoring of DMCCLogger status is supported via the DMCCLogger Web
- In the program console of DMCCLogger, enter the following command to enable this feature
- add tcp 5004 * * custom dlxml
- From the DMCCLogger Web, select the Add Logger and enter the logger’s IP address and listening port
- After the logger is added, select the Logger Status from menu to view the logger status
DMCCLogger Archive Daemon
- The DMCCLogger Archive Daemon is for archiving of voice files to backup directory and deletion of voice files which over retention period set by the program.
- Telnet to the program console, the console port number is 14020, enter username tcpgate and password tcpgate01.
- If your archive directory mount point is /archive/, execute the following command to add archive directory.
- add archivepath /archive/
- Hint: make sure the /archive/ directory is writable by user dmcclogger
- Hint: archiving interval can be fine tuned by a parameter called al_archiveschedulerinterval which the default value is 30 seconds.
- The program monitors the recordpath usage and deletes voice files in the record paths automatically when the usage reached a defined level. The threshold parameter is called al_hddthreshold, by default it it set to 90 percent, meaning of deletion old files when the usage level reached 90%. The monitor interval can be fine tuned by a parameter called al_hddcleanerinterval which the default value is 10 seconds. Also, a parameter called al_purgewithoutarchive to control file deletion can be performed without archiving, the default value is “no”.
- If you have retention period requuirement on recordpath or archivepath, execute the following command to add retention rule. Please pay attention to this command because voice files may be deleted before they are archived when the archiving function is failed.
- add retentiondir /mnt/ 90 90DaysRetentionPeriod
- Hint: the program deletes files in directory /mnt/ when its creation time is over 90 days
- Hint: retention thread execution interval can be fine tuned by a parameter called al_retentionschedulerinterval, the default value is 30 seconds.
Alarm Notification
- Alarm notification via email is supported, you need to config the following parameters
- tg_emailserverip, this is the IP address of your email server.
- tg_emailsmtpport, this is the SMTP port of email server, default value is 25.
- tg_emailusername, the username to login the email server.
- tg_emailpasswd, the encrypted password. The database only store encrypted password due to security reason, to generate an encrypted password, enter the following command in the program console and paste the encrypted password for the parameter tg_emailpasswd.
- genpass
- tg_emailsenderaddress, the email address used to send notification emails.
- tg_emailsenderdisplay, the display name used to send notification emails.
- tg_emailauth, if authentication is required, set the value to “yes“. The default value is “no” when your mail server trust your DMCCLogger server.
- tg_emailssl, if SSL is required, set the value to “yes“. The default value is “no“.
- Enter the following command to add email address for the receive of alarm notification, e.g.
- add email service@upinget.com
Known Issues
Support and License
- Please contact upinget.com for support and license
