Introduction
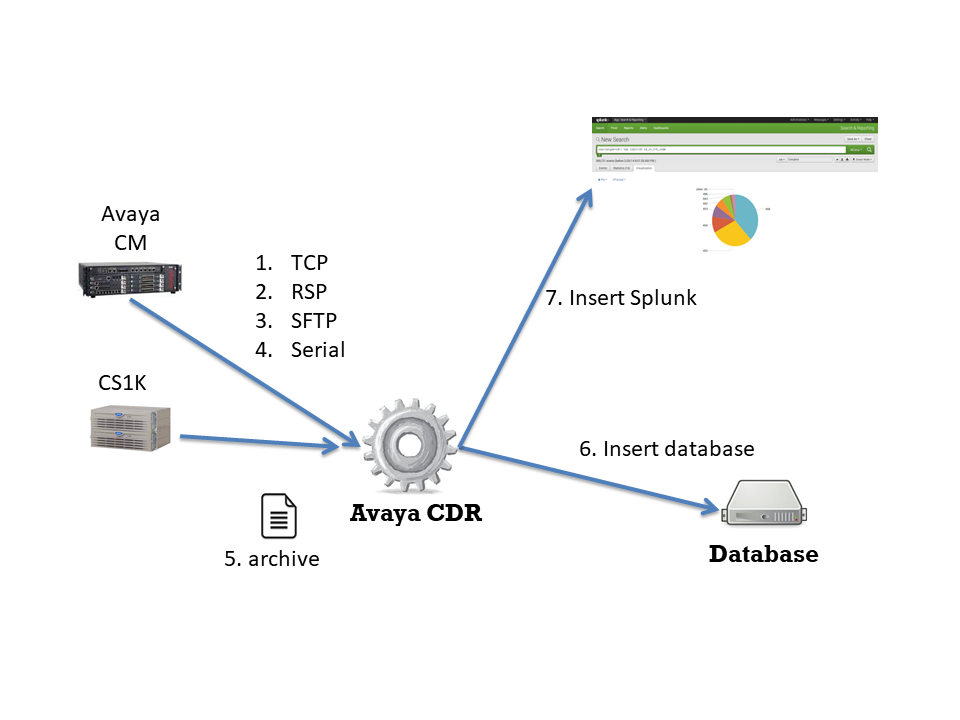
The AvayaCDR tool captures Avaya CDR data over a TCP/IP connection or a serial port (for CS1K) and stores the data in a file. Then the data file is daily archived and moved to a directory at a time that is defined by you. The program can convert the CDR data into CSV format or import them into the database. Since the tool uses ODBC, databases such as MySQL, PostgreSQL, MariaDB and MSSQL are supported. Moreover, the program can send the CDR data to Splunk which enables you to search CDR records by specific field name and generate reports and dashboards very easily. AvayaCDR supports the following features:
- Writes CDR data to a local file, rotates to a new file by daily or monthly
- Writes CDR data to MySQL, PostgreSQL, MariaDB and MSSQL database
- Writes CDR data to a CSV file, rotates to a new file every day
- Writes CDR data to Splunk
- Writes charge information for each CDR record
- Supports Names Lookup and logging
- Supports TCP and Reliable Session Protocol (RSP) connections
- Downloads and Imports CDR data via Communication Manager or Session Manager SFTP interface
- Imports archived CDR data files and send the data to the database or Splunk
- Sends alert email to the administrator when CDR link up down, DB up down or Splunk up down events
- Sends alert email to the administrator when a blacklisted number or country code is found in the CDR data
- Sends alert email to the administrator when CDR data is received after office hour
- Acts as System Printer for Avaya Aura
- Supports Avaya Aura and IP Office
- Supports the latest version of Windows, CentOS, RedHat, Ubuntu, Debian
See Also: CloudCDR for Avaya CM/Aura and IP Office
See Also: ECHI Capturing Tool for Avaya
See Also: Call Analytics
See Als: Splunk App AvayaCDR

Pricing Details
Check the pricing from this URL
Testing using Docker Image
Please follow this guide to test the AvayaCDR using Docker container.
Testing using OVA File

We have created an OVA file which you can deploy to VirtualBox or VMware Workstation or Player for testing. After deploying the OVA file, please modify the following for your own environment.
- Reference this guide to delete the file /etc/udev/rules.d/70-persistent-net.rules
- Change the MAC address and IP address of the VM in the file /etc/sysconfig/network-scripts/ifcfg-eth0
- Telnet to AvayaCDR console port 14004, update the program parameters for your environment
- Once the changes are completed, reboot the VM
The username and password of the OVA VM is
- OS: root/P@ssw0rd
- MySQL: root/P@ssw0rd
- AvayaCDR console: tcpgate/tcpgate01
- Splunk URL: http://newIP:8000/
Windows Installation
- We have recorded a video for Windows 2012 and Windows 7, please watch the video for Windows 2012 (64-bit) and Windows 7 (32-bit) before the installation
- Download the Avaya CDR Capturing Tool zip file here or backup site.
- Follow the steps below to install the software.
- Extract all the files into the directory c:\program files\avayacdr
- Open Windows Command Prompt (run as System Administrator if you are using Windows 7 or above), enter the following commands to register the program as Windows Service
- cd c:\program files\avayacdr
- avayacdr -i
- sc description avayacdr “Captures CDR data for Avaya CM”
- Open ODBC Data Source Administrator, create a System DSN called AVAYACDRCFG for Microsoft Access Driver (*.mdb) and select avayacdr.mdb which is located in the directory c:\program files\avayacdr
- Hint: make sure to create a System DSN instead of a User DSN, otherwise the program will startup without proper parameters
- If you are using 64-bit Windows OS, please use 32-bit ODBC Data Source Administrator

- Open the Access file, and edit the value of parameter cdr_archive_dir, which is the location for archived files. E.g. c:\\avayacdr\\
- Hint: for the archive directory, make sure the format of double backslash (\\) is used because the backslash is an escape character in C++.
- You can also edit the value of this parameter via the telnet console, the command is
- update cdr_archive_dir c:\\avayacdr\\
- Edit the value of parameter cdr_archive_time to specify the time for the file archive. E.g. 01:00
- Hint: you can edit the value of this parameter via the telnet console, the command is
- update cdr_archive_time 01:00
- Hint: you can edit the value of this parameter via the telnet console, the command is
- Start the Windows Service avayacdr
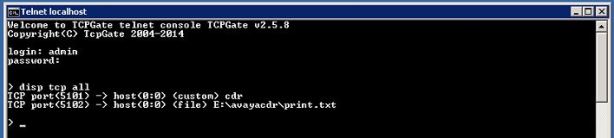
- Telnet to localhost and port number 14004, enter username tcpgate and password tcpgate01 to access the program console
- Enter the following command in the program console to add a listening port for Avaya CDR. E.g. add port 5001
- add tcp 5001 * * custom cdr
- Hint: You need to configure Avaya to send CDR to this host and port number 5001
- Hint: If your Avaya sends data by Reliable Session Protocol, enter the following command
- add tcp 5001 * * custom rsp
- Enter the following command, and you will receive debug information
- trace on asc
- Enter the following command, and you will get the help message
- help
- Enter the following command, and you can perform the file archive immediately
- archive now

Install Multiple Instances of AvayaCDR on the Same Windows Server
- Follow the steps below if you want to install multiple copies of AvayaCDR on the same Windows server
- Copy the AvayaCDR files to a different directory
- Rename the AvayaCDR.exe file to a different name, say AvayaCDR2.exe
- Create a new DSN for the local Access MDB file
- Create a new DSN for remote DB
- Open Windows Command Prompt, enter the following command to register the program as a Windows service with a startup argument
- AvayaCDR2 -i -a AVAYACDRCFG2
- sc description avayacdr2 “Captures CDR data for Avaya CM”
- Hint: register AvayaCDR2 as a Windows service and use AVAYACDRCFG2 DSN
- Stop all instances of AvayaCDR and start the new AvayaCDR instance
- Telnet to localhost and port number 14004, enter username tcpgate and password tcpgate01 to access the program console
- Change the telnet port by the following command
- update telnetport 14005
- Restart the new AvayaCDR instance and update other parameters accordingly to your environment
- The following parameters must be changed for the new instance of AvayaCDR to work properly
- cdr_archive_dir
- cdr_remotedb_dsn
- Hint: if you want to store CDR data in another DB, you need to modify the cdr_remotedb_dsn
64-bit Windows System
- For 64 bit of Windows system, please follow the steps below
- Configure ODBC System DSN using
C:\Windows\SysWOW64\odbcad32.exe - Stop the Windows firewall because it enables by default. AvayaCDR uses 14004 for telnet port. If you defined 5001 for CDR data, you need to open this port in firewall as well.
- Configure ODBC System DSN using
Windows Uninstallation
- Stop the Window Service avayacdr
- Open Windows Command Prompt, enter the following commands to uninstall the program from Windows Service
- cd c:\program files\avayacdr
- avayacdr -u
Import CDR via SFTP interface
- Open the Access file, edit the following parameters
- cdr_archive_dirsftp
- Hint: The archive directory for sftp CDR files. The default value is c:\\avayacdrsftp\\
- cdr_sftpdir
- Hint: The remote directory contains the CDR files. The default value is /var/home/ftp/CDR/
- Hint: For a chroot sftp directory, the value is ./
- cdr_sftpfilenameprefix (depreciated)
- Hint: The filename prefix for CDR files. The default value is S
- cdr_sftplicensekey
- Hint: The license key to activate this feature
- cdr_archive_dirsftp
- Open the program console, add your SFTP host by the following command
- add sftp host port username password dir
- Hint: host can be a hostname or IP address
- Hint: default port of SSH is 22
- Hint: the username that created by your administrator for CDR retrieval over SFTP protocol
- Hint: encrypted password for the SFTP user. Use genpass command to generate an encrypted password
- Hint: if the dir is empty, the program uses the directory specified in cdr_sftpdir
- add sftp host port username password dir
- Input the following command to test the connectivity of SFTP
- sftptest
- Hint: Test SFTP login using the parameters provided by the add sftp command
- sftptest
- The program will connect to your SFTP hosts by every 30 seconds and import the data to a file or database
Writes CDR Data to MySQL or MSSQL Database
- We have recorded a video for this section, please watch this video for the setup on the AvayaCDR side and this for the database side
- The AvayaCDR is a 32-bit application, make sure you use a 32-bit ODBC driver and use 32-bit ODBC admin tool to create the DSN
- In order to store CDR data directly to MYSQL or MSSQL, you need to define the following parameters
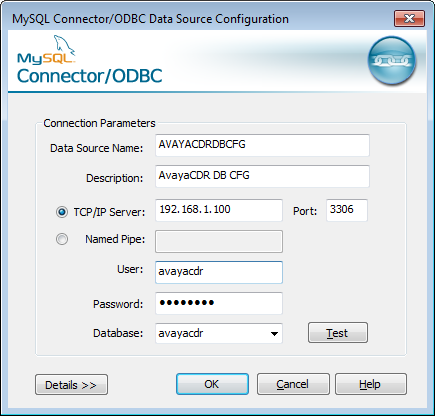
- update parameter cdr_remotedb_dsn AVAYACDRDBCFG
- Hint: the string AVAYACDRDBCFG is the system DSN for the remote CDR database
- Hint: the following screen dump is an example for MySQL system DSN

- update parameter cdr_remotedb_dsn AVAYACDRDBCFG
-
- update parameter cdr_remotedb_username avayacdr
- Hint: the string avayacdr is the username used to access the CDR database
- genpass
- Hint: use this command to generate an encrypted password
- update parameter cdr_remotedb_passwd encrypted-password-generated-from-genpass-command
- Hint: copy the encrypted password from the genpass command
- update parameter cdr_remotedb_table tAvayaCDR
- Hint: the string tAvayaCDR is the table name of the CDR database that stored the CDR data
- update parameter cdr_remotedb_username avayacdr
- You also need to define the mapping of CDR data items to the table column names of your database. If you use a “customized” CDR format, add paramcdr definitions according to your format. If you use the “unformatted” format, please refer to this document to define the paramcdr definitions.
- add paramcdr 1 date 6 id_date text
- Hint: this command maps Avaya CDR data item 1 (date) which is 6 characters long to CDR database table column name (id_date) and its data type is text
- Hint: use “mmddyy” or “ddmmyy” or “yymmdd” if you want to send the data to Splunk as well.
- add paramcdr 2 space 1
- Hint: this command maps Avaya CDR data item 2 (space) which is 1 character long, with no mapping between the CDR database table
- add paramcdr 3 time 4 id_time text
- Hint: use “hh:mm” if you want to send data to Splunk as well.
- add paramcdr 4 space 1
- add paramcdr 5 duration 4 id_duration number
- Hint: this command maps Avaya CDR data item 5 (duration) which is 4 characters long to CDR database table column name (id_duration) and its data type is integer
- Hint: use “seconds” or “minutes” or “6s” if you want to use the duration to calculate the telecom charge
- Hint: if your paramcdr is sec-dur, use “seconds” to convert the values to the number of seconds
- Hint: use “h:mm:ss” if you simply want to display a readable string to the user
- …
- Hint: use add paramcdr for other mappings.
- Hint: make sure the Avaya side end with line-feed because the program uses it as the terminator for each CDR record
- disp paramcdr
- Hint: this command shows the mapping table
- Hint: the following screen dump is my mapping, yours may be different.
- reload
- Hint: this command will reload the configuration and create the database connection according to the new parameters.
- trace on asc
- Hint: this command turns on debug messages for database logging
- add paramcdr 1 date 6 id_date text

Convert CDR data into CSV file format
- In order to parse the CDR data and convert each record to CSV format, paramcdr must be defined
- Use the console command add paramcdr to map your Avaya CDR data. For example,
- add paramcdr 1 date 6
- add paramcdr 2 space 1
- add paramcdr 3 time 4
- …
- Check if a parameter called “cdr_convertcsv” is set to “true” in the tParameter table. Or do it via program console
- update parameter cdr_convertcsv true
- reload
Splunk Integration
- We have created a video for Splunk Logging, you can watch the video before the configuration
- Use the console command paramcdr to map your Avaya CDR data. For example,
- update parameter cdr_dateformatseparator –
- Hint: Use the date format separator to separate day, month and year
- Hint: Splunk needs to know the date and time in order to index the CDR data
- add paramcdr 1 date 6 id_date mmddyy
- Hint: Tells AvayaCDR the date format of CDR data, when cdr_dateformatsepartor is defined, the value will become “mm-dd-yy” which Splunk can recognize and import into its supported format
- add paramcdr 2 space 1
- add paramcdr 3 time 4 id_time hh:mm
- Hint: Tells AvayaCDR to convert the time to hh:mm format which Splunk can recognize and import into its supported format
- …
- update parameter cdr_dateformatseparator –
- Update parameter “cdr_splunkhost”, for example
- update parameter cdr_splunkhost 192.168.1.100
- Update parameter “cdr_splunkport”, for example
- update parameter cdr_splunkport 5100
- Reload the configuration
- reload
- The latest version of AvayaCDR supports backup Splunk configuration, please edit the following parameters
- update parameter cdr_splunkbackuphost 192.168.1.101
- update parameter cdr_splunkbackupport 5200
- reload
Splunk Integration using HTTP Event Collector
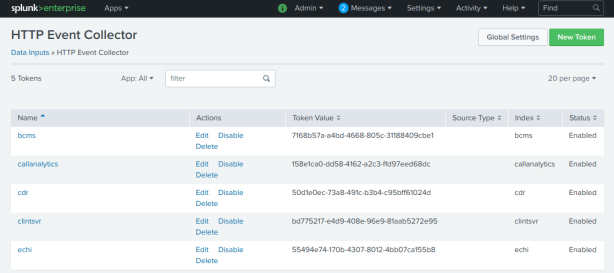
- Follow this guide to enable HTTP Event Collector in Splunk
- Create a token specific for the AvayaCDR application, and copy the token after its creation, it is suggested to create a token for each specific application and link the token to its index
- Update the parameter cdr_splunkhectoken using the newly created token
- update parameter cdr_splunkhectoken new_created_token
- Update the parameter cdr_splunkhecurl using your site-specific Splunk URL
- update parameter cdr_splunkhecurl https://input-SPLUNKCLOUDHOST:PORT/services/collector
- Hint: Reference this guide to find out the Splunk HEC URL
- Update the parameter cdr_splunkprotocol to use HTTP Event Collector
- update parameter cdr_splunkprotocol hec
- Update the parameter cdr_splunkhecchannel using the newly created token
- update parameter cdr_splunkhecchannel new_created_token
- Update the parameter cdr_splunkdataformat to use JSON format
- update parameter cdr_splunkdataformat json
- Reload the configuration
- reload
- If insert to Splunk failure, the data will be written to a local file called splunk_err.txt. You can upload the data to Splunk manually using curl command
- curl -k https://input-SPLNKCLOUDHOST:8088/services/collector/event -H “Authorization: Splunk token_generated_from_Splunk” -H “X-Splunk-Request-Channel: token_generated_from_Splunk” -H “Content-Type: application/json” –-data-binary “@splunk_err.txt”
Charge Logging
- To turn on Charge Logging, you should define the following parameters
- cdr_charge_ditem_duration
- Hint: this is the Avaya duration data item name in the CDR string
- cdr_charge_dbcol_subtotal
- Hint: this is the database column/field name for the charge total
- cdr_charge_dbcol_currency
- Hint: this is the database column/field name for the charge currency
- cdr_charge_dbcol_writetime
- Hint: this is the database column/field name for the time of the charge record
- cdr_charge_dbcol_description
- Hint: this is the database column/field name for the description of the charge rate
- cdr_charge_ditem_duration
- Add your rate one by one by the “add rate” command, for example
- add rate 186 dialed-num 0.1 usd minute mobile call
- Hint: if dialed-num matched pattern 186, calculate the charge by 0.1/minute
- add rate 354 code-used 186 dialed-num 0.3 usd minute fixed line
- Hint: multiple data items will be matched to calculate the charge
- add rate 186 dialed-num 0.1 usd minute mobile call
Names Lookup
- AvayaCDR can lookup CDR data items and logs the mapped names to the database and Splunk
- To enable names lookup, firstly define the mapping of the target data item name to the database or Splunk field name, and use the “add paramdict” command for the definition
- add paramdict calling-num calling_name
- add paramdict called-num called_name
- To define the mapping of a number to its naming, use the “add dict” command
- add dict * 52001 David
- add dict * 50002 John
Extended Logging
- Extended Logging is supported by the latest version of AvayaCDR, please add/update the following parameters to enable extended logging.
- update parameter cdr_extlog_sourceip pbxIP
- Hint: The IP address of PBX that sends the CDR will be logged and the field name id database or Splunk is called “pbxIP”
- update parameter cdr_extlog_timestamp timestamp
- Hint: The time at which the CDR data is received is logged to the database or Splunk. This parameter specifies the field name of the time stamp in the database or Splunk.
- Update parameter cdr_extlog_sourceinfo true
- Hint: Information in the remark field of the command “add tcp…” are sent to the database or Splunk.
- update parameter cdr_extlog_sourceip pbxIP
AvayaCDR as Avaya System Printer
- You can configure AvayaCDR as System Printer for Avaya, thanks Patrick Prevoo sharing the following screens

Imports CDR Data to Database or Splunk from Archived File or Directory
- Follow the section of Writes CDR Data to MySQL or MSSQL Database or Splunk Integration to define the necessary parameters first
- Open the program console and enter the following command to import archived data
- import cdrfile c:\\avayacdr\\cdr20141027001.txt
- Hint: import single file
- import cdrdir c:\\avayacdr\\
- Hint: import whole directory
- import cdrfile c:\\avayacdr\\cdr20141027001.txt
System Notification Email
- The program sends email notifications when an error occurred. Errors included CDR link down, remote DB down, etc.
- Edit the value of parameter tg_emailserverip to define the IP address of your email server.
- Edit the value of parameter tg_emailsmtpport to define the SMTP port number of your email server. The default value is 25.
- Edit the value of parameter tg_emailusername to define the username of the email agent which is responsible to send notification emails.
- Telnet to localhost and port number 14004, and enter username tcpgate and password tcpgate01 to access the program console. Type genpass in the program console to generate an encrypted password string for the email agent, and copy the string for later use.
- Edit the value of parameter tg_emailpasswd to define the password of the email agent. The password should be in an encrypted format, you can use the console command genpass to generate the encrypted password.
- Edit the value of parameter tg_emailsenderdisplay to define the display name of the email agent.
- Edit the value of parameter tg_emailauth to define whether authentication is required between your AvayaCDR machine and the email server. When your email server trust your machine, set it to false, otherwise set it to true.
- Edit the value of parameter tg_emailssl to define whether SSL communication is required for the SMTP session. The default value is false, set it to true when SSL is required.
- Enter the following command in the program console to add your email address
- add email service@upinget.com
- Hint: Replace my email address with yours
- Enter the following command to test the configuration
- test email
Email Alert for Blacklisted Number
- This feature is supported by AvayaCDR version >=1.3.1
- To define dialed number in the blacklist number pattern, enter the following command in the program console
- add blacklistnumber 911 dialed-num AlertWhoDial911
- Hint: The number 911 is the pattern that we defined as a blacklisted number
- Hint: The dialed-num is the data item name that we defined in the paramcdr table
- Hint: AlertWhoDial911 is the description text for this number pattern
- add blacklistnumber 911 dialed-num AlertWhoDial911
- To define calling number in the blacklist number pattern, enter the following command in the program console
- add blacklistnumber 24682468 calling-num Competitor
- Hint: The number 24682468 is defined as a blacklisted number
- Hint: The calling-num is the data item name that we defined in the paramcdr table
- Hint: Competitor is the description text for this number pattern
- add blacklistnumber 24682468 calling-num Competitor
- To add a blacklist country code, enter the following command
- add blacklistnumber +123 called-number Blacklist Country +123
- add dialprefix 001
- When country code is defined, the dial prefix will be compared
- You need to define email function parameters, please refer to the section “System Notification Email” for more information.
Email Alert for Non-Office Hour Calls
- To enable this feature, enter the following command in the program console
- update parameter cdr_nonofficehouralert true
- update parameter cdr_officehourstart 9
- update parameter cdr_officehourend 21
- reload
CentOS 7.x Installation Guide
- The following is for RedHat/CentOS 7 64-bit OS only, other Linux distribution is similar
- Login as root and execute the following commands
- Disable SELINUX and stop the firewall
-
sed -i 's/\(^SELINUX=\).*/\SELINUX=disabled/' /etc/selinux/config
-
systemctl disable firewalld
-
systemctl stop firewalld
-
reboot
- Install MySQL 8.x
-
sudo rpm -Uvh https://dev.mysql.com/get/mysql80-community-release-el7-1.noarch.rpm sudo yum --enablerepo=mysql80-community install mysql-community-server sudo service mysqld start grep "A temporary password" /var/log/mysqld.log mysql_secure_installation - Install the following packages
-
yum install telnet libssh2
-
yum install mysql-connector-odbc unixODBC
- Config and start MySQL
-
systemctl enable mysqld
-
systemctl start mysqld
- Create a database and user
-
mysql -u root -p
-
create database avayacdr;
-
create user 'tcpgate'@'localhost' identified by 'P@ssw0rd';
-
grant all on avayacdr.* to 'tcpgate'@'localhost';
-
flush privileges;
-
quit
-
mysql -h localhost -u tcpgate -p avayacdr < avayacdr.sql
- Copy the following to /etc/odbc.ini file
- [AVAYACDRCFG]
Description = MySQL connection to AvayaCDR
Driver =MySQL ODBC 8.0 ANSI Driver
Server = localhost
Port = 3306
Database = avayacdr - [AVAYACDRDBCFG]
Description = MySQL connection to AvayaCDR
Driver =MySQL ODBC 8.0 ANSI Driver
Server = localhost
Port = 3306
Database = avayacdr
- [AVAYACDRCFG]
- Create user and copy files
-
useradd avayacdr
-
mkdir /usr/local/avayacdr
-
cp AvayaCDR64 /usr/local/avayacdr
-
chmod +x /usr/local/avayacdr/AvayaCDR64 -
chown -R avayacdr.avayacdr /usr/local/avayacdr
-
mkdir -p /var/log/avayacdr/archive/sftp
-
chown -R avayacdr.avayacdr /var/log/avayacdr
- Enable auto startup script
-
sudo cp startupscript/*.sh /usr/local/avayacdr
sudo chmod +x /usr/local/avayacdr/*.sh
sudo cp cdr.* /etc/systemd/system
sudo systemctl enable cdr.timer
sudo systemctl start cdr.timer
Ubuntu 22.04 Installation Guide

- We have recorded a video for Ubuntu installation, you can watch the video before the installation
- Install the following packages
-
sudo apt install mysql-server telnet unixodbc
-
sudo systemctl start mysql.service
- download mysql-connector-odbc-8.0.32-linux-glibc2.28-x86-64bit.tar.gz from https://dev.mysql.com/downloads/connector/odbc/
-
gunzip mysql-connector-odbc-8.0.32-linux-glibc2.28-x86-64bit.tar.gz
tar xvf mysql-connector-odbc-8.0.32-linux-glibc2.28-x86-64bit.tar
cd mysql-connector-odbc-8.0.32-linux-glibc2.28-x86-64bit
sudo cp bin/* /usr/local/bin
sudo cp -R lib/* /usr/local/lib
sudo myodbc-installer -a -d -n "MySQL ODBC 8.0 Unicode Driver" -t "Driver=/usr/local/lib/libmyodbc8w.so"
sudo myodbc-installer -a -d -n "MySQL ODBC 8.0 ANSI Driver" -t "Driver=/usr/local/lib/libmyodbc8a.so"
myodbc-installer -d -l
- Create a database and user
-
mysql -u root -p
-
create database avayacdr;
-
create user 'tcpgate'@'localhost' identified by 'P@ssw0rd';
-
grant all on avayacdr.* to 'tcpgate'@'localhost';
-
flush privileges;
-
quit
-
mysql -h localhost -u tcpgate -p avayacdr < avayacdr.sql
- Copy the following to /etc/odbc.ini file
- [AVAYACDRCFG]
Description = MySQL connection to AvayaCDR
Driver = MySQL ODBC 8.0 ANSI Driver
Server = localhost
Port = 3306
Database = avayacdr - [AVAYACDRDBCFG]
Description = MySQL connection to AvayaCDR
Driver = MySQL ODBC 8.0 ANSI Driver
Server = localhost
Port = 3306
Database = avayacdr
- [AVAYACDRCFG]
- Create user and copy files
-
sudo useradd avayacdr
-
sudo mkdir /usr/local/avayacdr
-
sudo cp AvayaCDR64 /usr/local/avayacdr
-
sudo chmod +x /usr/local/avayacdr/AvayaCDR64
-
sudo chown -R avayacdr.avayacdr /usr/local/avayacdr
-
sudo mkdir -p /var/log/avayacdr/archive/sfp
-
sudo chown -R avayacdr.avayacdr /var/log/avayacdr
- Enable auto startup script
-
sudo cp startupscript/*.sh /usr/local/avayacdr
sudo chmod +x /usr/local/avayacdr/*.sh
sudo cp cdr.* /etc/systemd/system
sudo systemctl enable cdr.timer
sudo systemctl start cdr.timer
Debian 10.x Installation Guide

- The following is for Debian 10.x only
- Install the following packages
-
sudo apt-get install mariadb-server mariadb-client
-
sudo apt-get install unixodbc unixodbc-bin
-
sudo apt-get install libssh-4 libssh2-1 openssl
-
mkdir odbc_package
-
cd odbc_package
-
wget https://downloads.mariadb.com/Connectors/odbc/latest/mariadb-connector-odbc-3.1.9-debian-buster-amd64.tar.gz
-
tar xzvf mariadb-connector-odbc-3.1.9-debian-buster-amd64.tar.gz
-
cd mariadb-connector-odbc-3.1.9-debian-buster-amd64
-
sudo install lib/mariadb/libmaodbc.so /usr/lib64/
-
sudo install -d /usr/lib64/mariadb/
-
sudo install -d /usr/lib64/mariadb/plugin/
-
sudo install lib/mariadb/plugin/auth_gssapi_client.so /usr/lib64/mariadb/plugin/
-
sudo install lib/mariadb/plugin/caching_sha2_password.so /usr/lib64/mariadb/plugin/
-
sudo install lib/mariadb/plugin/client_ed25519.so /usr/lib64/mariadb/plugin/
-
sudo install lib/mariadb/plugin/dialog.so /usr/lib64/mariadb/plugin/
-
sudo install lib/mariadb/plugin/mysql_clear_password.so /usr/lib64/mariadb/plugin/
-
sudo install lib/mariadb/plugin/sha256_password.so /usr/lib64/mariadb/plugin/
- Create a database and user
-
sudo mysql -u root -p
-
create database avayacdr;
-
create user 'tcpgate'@'localhost' identified by 'tcpgate';
-
grant all on avayacdr.* to 'tcpgate'@'localhost';
-
flush privileges;
-
quit
-
mysql -h localhost -u tcpgate -p avayacdr < avayacdr.sql
- Create a template file MariaDB_odbc_driver_template.ini
- [MariaDB ODBC 3.0 Driver]
Description = MariaDB Connector/ODBC v.3.0
Driver = /usr/lib64/libmaodbc.so
- [MariaDB ODBC 3.0 Driver]
- Install the ODBC driver
-
sudo odbcinst -i -d -f MariaDB_odbc_driver_template.ini
- Create a template file avayacdr_template.ini
- [AVAYACDRCFG]
Description = MariaDB connection to AvayaCDR configuration
Driver = MariaDB ODBC 3.0 Driver
Server = localhost
Port = 3306
Socket = /var/run/mysqld/mysqld.sock
Database = avayacdr
- [AVAYACDRCFG]
- Install your system DSN
-
sudo odbcinst -i -s -l -f avayacdr_template.ini
- Create user and copy files
-
sudo useradd avayacdr
-
sudo mkdir /usr/local/avayacdr
-
sudo cp AvayaCDR64 /usr/local/avayacdr
-
sudo chmod +x /usr/local/avayacdr/AvayaCDR64
-
sudo chown -R avayacdr.avayacdr /usr/local/avayacdr
-
sudo mkdir -p /var/log/avayacdr
-
sudo chown -R avayacdr.avayacdr /var/log/avayacdr
- Follow this guide to create /etc/rc.local file
- Auto start the daemon after a server reboot, add the following before ‘exit 0’ to /etc/rc.local file
-
rm -f /tmp/avayacdr.log
-
su avayacdr -c '/usr/local/avayacdr/AvayaCDR64'
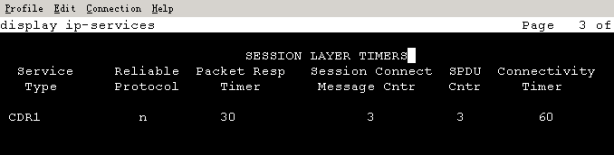
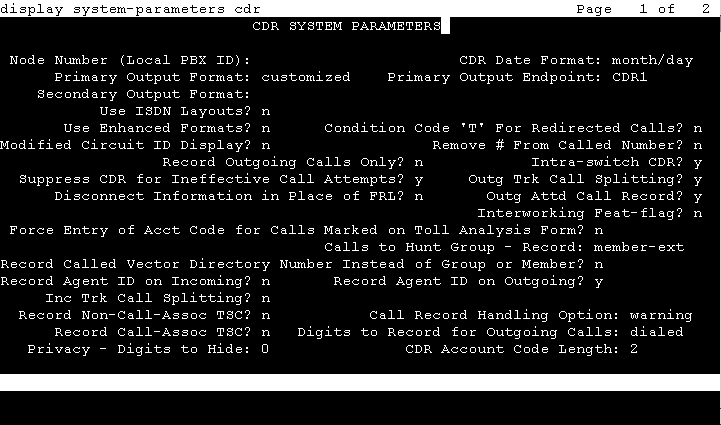
Avaya (PBX side) CDR System Parameters Screen (Reference ONLY)
- The following screen dumps are cdr configuration of my site, yours maybe different.


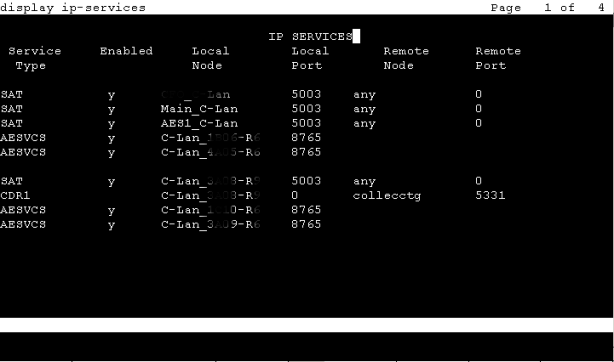
- Make sure Reliable Protocol is set to n if you simply use TCP to transmit CDR data
-
- I use standard 5331 port, so I enter the following command in the program console
- add tcp 5331 * * custom cdr
- If you want to use Reliable Session Protocol, enter the following command
- add tcp 5331 * * custom rsp


Support and License
- Please contact upinget.com for support and license

Can I install Avaya CDR on CentOS 7?
Just saw that I can, thank you
Following your guide video on how to install AvayaCDR. When I arrive at telnet to localhost 14004 I get connection refused.
What am I doing wrong?
[avayacdr@myhostname ~]$ telnet localhost 14004
Trying ::1…
telnet: connect to address ::1: Connection refused
Trying 127.0.0.1…
telnet: connect to address 127.0.0.1: Connection refused
I have a valid license key but I am now trying to move from CentOS 6 to 7, but stuck with not being able to telnet to port 14004
Turns out the process is listening on port 14001instead of 14004.
I can telnet now, however when entering login tcpgate and password tcpgate01 I get “Connection closed by foreign host” and can’t proceed.
What’s the password and where was it actually set?
tcp 0 0 0.0.0.0:14001 0.0.0.0:* LISTEN 3666/./avayacdr64
The guide is updated to include CentOS 7.x installation. You need the latest version of AvayaCDR files in order to work for CentOS 7.x.
This app used to work like a dream since 2014. All of a sudden since last week it has stopped automatically archiving the file daily. I have restarted, upgraded, checked DB entries, but still no luck. Any advise?
This app used to work like a dream since 2014. All of a sudden since last week it has stopped automatically archiving the file daily. I have restarted, upgraded, checked DB entries, but still no luck. Any advise?
You can ask support if you have purchased the “1 Year Email Support Services”. Please contact service@upinget.com.
Hi, i’v tryed to use the capture servise on RSP, and I got rejected. Please tell me the use of the Protocol is paid?
Hi, you need a license in order to capture data using RSP protocol. You can purchase the “1 Year Email Support Services” in order to get the permanent license key. If you want a trial, please send request to service@upinget.com
Nice explanation on Avaya products
Hello, Have you managed to get CDR records about missed calls (not answered) between internal extensions?
Hi,
The output of the missed calls (not answered) is not controlled by AvayaCDR. It is the controlled by Avaya.
If Avaya has not such feature, we can’t capture this kind of CDR records too.
Searched the google for very old post, it seems Avaya does not output CDR records for internal missed calls.
https://www.tek-tips.com/viewthread.cfm?qid=1701931
We have another product called CallAnalytics, it can monitor VDNs or stations and records all calls without answered. It uses TSAPI.