Introduction
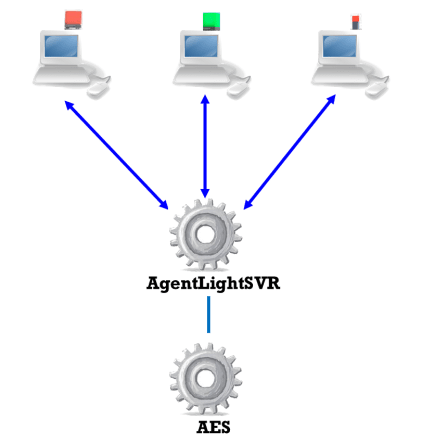
AgentLight is software for Avaya agent status notification. The software integrated with a USB lighting device and showing the agent status by turning on or flashing the device with different color. For example, the software can be configured to show agent idle with green color and on call with red color. The software is designed for the Avaya contact center environment; it integrated with Avaya AES to get the agent status with TSAPI library. The AgentLight has agent software installed on agent workstations and server software installed on server such as Windows 2008R2 or above. The AgentLight provides the following features:
- Agent presence with different color and flashing
- Identification of assist calls or hold calls
- Identification of shuffling among nearby agents
- Identification of short duration calls among nearby agents
- Identification of long ACW time
- Identification of long AUX time with specific reason
Supported USB lighting device
- Embrava
- Blynclight PLUS
- Blynclight Mini
- Plenom
- Kuando BUSYLIGHT UC Omega
- Kuando BUSYLIGHT UC Alpha
Supported platform
- AgentLight agent installed on
- Windows 7, Windows 8, Windows 10 or Windows 11
- AgentLight server installed on
The configuration is centrally managed on the AgentLight Server. The default configurations for agent on call and ACD state as follow:
Agent on Call
| Call State |
Color |
Flashing |
| alerting |
orange |
1 |
| connect |
red |
0 |
| fail |
orange |
1 |
| hold |
red |
1 |
| idle |
off |
0 |
| initiate |
orange |
1 |
| null |
off |
0 |
Agent ACD State
| State |
Reasoncode |
Color |
Threshold |
| acw |
0 |
white |
60 |
| auto |
0 |
green |
0 |
| aux |
0 |
blue |
0 |
| aux |
1 |
blue |
30 |
| aux |
2 |
blue |
30 |
| aux |
3 |
blue |
30 |
| aux |
4 |
blue |
30 |
| aux |
5 |
blue |
30 |
| aux |
6 |
blue |
30 |
| aux |
7 |
blue |
30 |
| aux |
8 |
blue |
30 |
| aux |
9 |
blue |
30 |
| manual |
0 |
green |
0 |
| null |
0 |
off |
0 |
Supported Color
- red
- green
- blue
- cyan
- magenta
- yellow
- white
- orange
- off
Preparation and Password Encryption
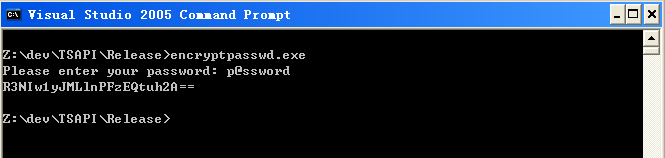
- The access MDB file stored the username and password of AE server. For security reason, a tool called encryptpasswd.exe is provided to generate an encrypted password for the installation and configuration of the software
- Execute the program, generate an encrypted passwords for the user of AE server, then paste the encrypted password to parameter ivr_tlink. For example, the encrypted password for “p@ssword” is “R3NIw1yJMLlnPFzEQtuh2A==”

64 bit Windows System
- For 64 bit Windows system, please follow the steps below
- Configure ODBC System DSN using
- C:\Windows\SysWOW64\odbcad32.exe
- Configure the Windows firewall for the application. By default telnet port 15012 and handler port 9002 are required on the AgentLightSVR
- If your system does not have the 64bit version of Access driver, please download and install Microsoft Access Database Engine 2016 Redistributable.
AgentLight Server Windows Installation
- Download and install the TSAPI client for Windows 64-bit from Avaya web site, it contains the library files.
- Download the AgentLightSVR zip file here.
- Follow the installation steps below to install the software.
- Extract all the files into directory c:\program files\AgentLightSVR
- Open Windows Command Prompt, enter the following commands to register the program as Windows Service
- cd c:\program files\AgentLightSVR
- AgentLightSVR64 -i
- sc description AgentLightSVR64 “Provides AgentLight Service For Avaya”
- Execute the package accessdatabaseengine_X64.exe to install Microsoft Access 64-bit driver.
- Open ODBC Setting, create a System DSN called AGENTLIGHTSVRCFG for Microsoft Access Driver and point to AgentLightSVR.mdb which is located in the directory c:\program files\AgentLightSVR
- The following is to edit the parameters manually
- Open the Access file, edit the value of parameters ivr_tlink_01 and ivr_tlink_02 to the TLINK of your AES servers in the tParameter table
- Start the Windows Service AgentLightSVR
- Telnet to localhost and port number 15012, enter username tcpgate and password tcpgate01 to access the program console
- Enter the following command to configure the parameters
- setup
- update parameter agentlight_licensekey xxxxyyyyyzzzzz
- Please contact us for the valid license key
- Enter the following command to add agentlight handler port if it doesn’t created before
- add tcp 9002 * * custom agentlightapi
- Enter the following command to add extension, the AgentLightSVR can control the extension once it is added to the database
- Enter the following command to map IP address with extension
- add ipextnmap 10.1.1.100 60123
- Enter the following command in the program console, you will receive debug information
- Enter the following command in the program console, you will get the help message
AgentLight Agent Windows Installation
- Download the AgentLight zip file here.
- The AgentLight software is installed on agent PC.
- Install the Microsoft Visual C++ 2010 Redistributable Package vcredist_x86.exe which is included in the package.
- Execute the following command to register the required DLL
- %windir%\Microsoft.NET\Framework\v4.0.30319\regasm.exe busylightsdk.dll /tlb:busylightsdk.tlb /codebase
- Follow the installation steps below to install the software.
- Extract all the files into directory c:\program files\AgentLight
- Open Windows Command Prompt, enter the following commands to register the program as Windows Service
- cd c:\program files\AgentLight
- AgentLight -i
- sc description AgentLight “Provides AgentLight Service For Avaya”
- Copy AgentLight.ini from the installation directory to c:\windows directory
- Edit the _server entry to point to the AgentLightSVR IP address
- Edit the _port entry to point to the AgentLightSVR agentlightapi handler port
- Edit the _extension entry to define extension number locally, this is useful when the PC is configured DHCP