Introduction
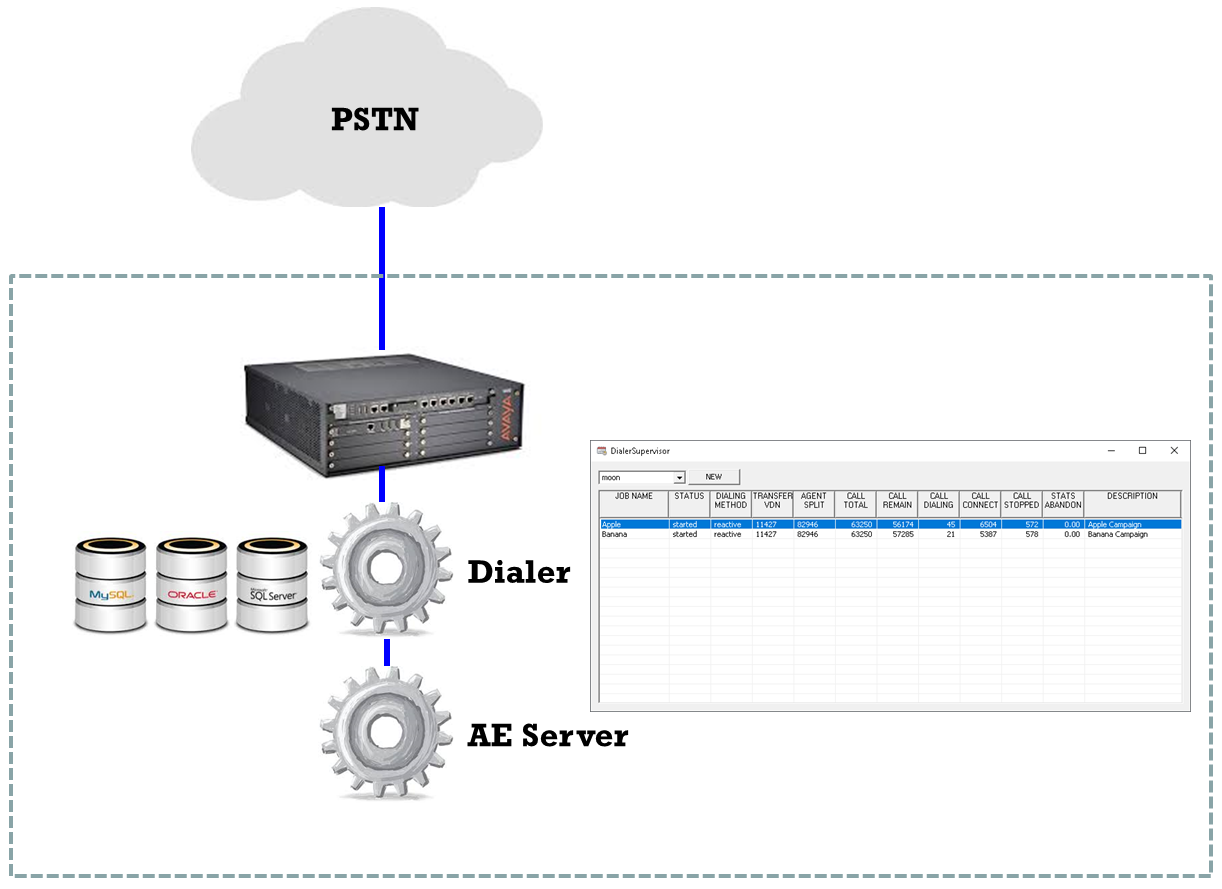
The UPINGET dialer is a simple outbound dialer solution developed for the Avaya contact center environment. It supports various dialing methods such as Reactive, Preview and Reminder algorithms. It can integrate with various dialing agent (technology), currently it supports dialing using basic and advanced TSAPI. When using the basic TSAPI dialing agent, phantom device is used to make call. TSAPI advanced API is used if your AE Server supports advanced TSAPI and answering machine detection is supported when your Avaya CM Outbound Call Management software license is enabled.
In the future version of the dialer software, the following features will be developed and supported:
- Predictive Dialing Method
- Integration with hardware cards for a higher accuracy rate of detection of answering machines
Testing using Docker Image
Please follow this guide to test UPDialer using Docker Container.
Windows Installation
- A license key is required for the dialer to work properly, please contact service@upinget.com for a trial license.
- Download the TSAPI client for Windows 32-bit from Avaya website, it contains the library files. DevConnect registration is required before you can access the download page.
- Download the updialer.zip file from here.
- Follow the installation steps below to install the software.
- Extract all the files into directory c:\program files\updialer
- Open Windows Command Prompt, enter the following commands to register the program as Windows Service
- cd c:\program files\updialer
- updialer -i
- sc description updialer “Provides CTI dialer functions for Avaya CM”
- Open ODBC Setting, create a System DSN called UPDIALERCFG for Microsoft Access Driver and point to updialer.mdb which is located in the directory c:\program files\updialer
- Open the Access file, edit the value of parameters dl_tlink_01 and dl_tlink_02 to the TLINK of your AES servers in the tParameter table
- To create a dialer database in MySQL or MSSQL, load the database script updialer_MySQL.sql or updialer_MSSQL.sql to create the tables.
- Create another ODBC System DSN called UPDIALERDBCFG and point to the newly created database.
- Edit the parameter dl_sqltype in tPrameter table of the updialer.mdb file, enter the value mysql for MySQL database or enter mssql for MSSQL database.
- Edit the parameter dl_dbdsn and assign the value UPDIALERDBCFG, the dialer will connect to your dialer database for the creation and control of dialer jobs.
- Edit the parameters dl_dbusername and dl_dbpasswd, and make sure the value of the dl_dbpasswd is an encrypted password. You can generate an encrypted password using the utility called encryptpasswd.exe.
- Start the Windows Service updialer
- Telnet to localhost and port number 14023, enter username tcpgate and password tcpgate01 to access the program console
- Enter the following command to add job vdn
- add vdn 60001
- Enter the following command to add a phantom device
- add phantom 50001
- Enter the following command in the program console, and you will receive debug information
- trace on asc
- Enter the following command in the program console, you will get the help message
- help
- To support the passing of user data between applications, please install uuiSVR. Then modify the dl_uuisvr parameter to have the IP address and port number of the uuiSVR. For example, the parameter value 10.10.1.2,5100 which the uuiSVR installed on server 10.10.1.2 and listening on port number 5100.
- The following is for the installation of uuiSVR
- Open Windows Command Prompt, enter the following commands to register the program as Windows Service
- cd c:\program files\updialer
- uuiSVR -i
- Open ODBC Setting, create System DSN called UUISVRCFG for Microsoft Access Driver and point to uuiSVR.mdb which is located in the directory c:\program files\updialer
- Start the service uuiSVR
- Open Windows Command Prompt, enter the following commands to register the program as Windows Service
DialeSupervisor

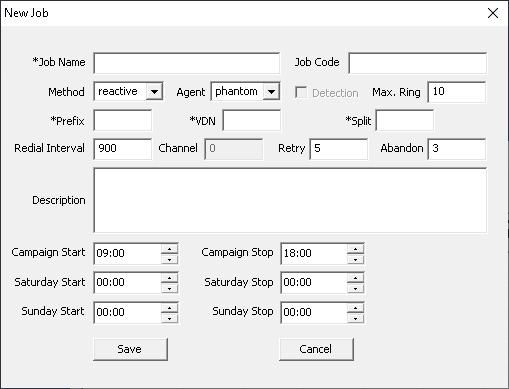
DialerSupervisor is a tool for call center supervisors to create outbound jobs and control the the status of these jobs. To create an outbound job is easy, simply click the New button and fill the required job information and then click the Save button, a new job will be created.
Once a job is created, you can set its status to Start, Pause or Stop state. The dialer on the server side will change the status accordingly.

You can edit outbound job details and save the changes when the job status is in Stopped state. You can delete an outbound job only if the job status is also in Stopped state

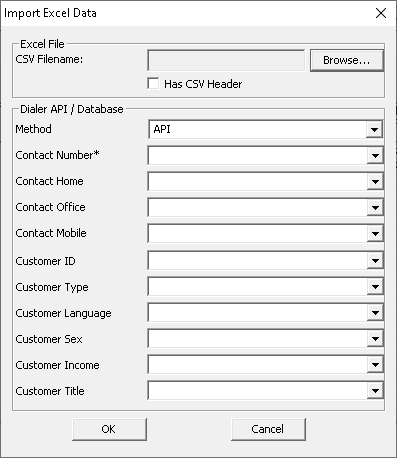
The DialerSupervisor supports the import of calling records from a CSV file or a database ODBC connection. For CSV data import, first select the CSV file and then have the fields mapping setup correctly, the data will be inserted into the dialer by API or database connection directly.
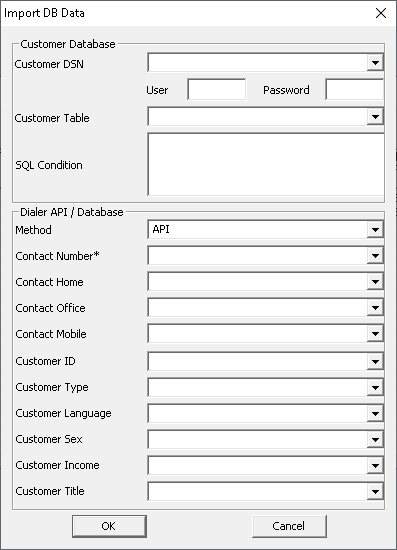
For database data import, first select the customer database DSN, provide the username and password and then have the field mapping setup correctly, the data will be inserted into the dialer by API or database connection directly.
REST API
To enable the REST interface for API integration, enter the following commands to add the listening port and the required token
- add tcp 9091 * * custom dlrest
- add token API
To check the newly created token, enter the following command
- disp token
List Job
-
http://IP:PORT/listjobs?payload=json&token=W8IJ5CncYZDQmhIW
Start Job
-
http://IP:PORT/startjob?jobname=MyJob&payload=json&token=W8IJ5CncYZDQmhIW
Pause Job
-
http://IP:PORT/pausejob?jobname=MyJob&payload=json&token=W8IJ5CncYZDQmhIW
Stop Job
-
http://IP:PORT/stopjob?jobname=MyJob&payload=json&token=W8IJ5CncYZDQmhIW
Delete Job
-
http://IP:PORT/deletejob?jobname=MyJob&payload=json&token=W8IJ5CncYZDQmhIW
Add Job
-
http://IP:PORT/addjob?jobname=MyJob&jobcode=A01&dialingmethod=preview&dialingagent=phantom&detection=false&prefix=9&vdn=11427&split=82946&contactinterval=900&maxchannel=0&&maxring=10&maxretry=5&maxabandonrate=3&"campaignstart=540&campaignstop=1080&saturdaystart=540&saturdaystop=1080&sundaystart=540&sundaystop=1080&description=MyDescription&payload=json&token=W8IJ5CncYZDQmhIW
Update Job
-
http://IP:PORT/updatejob?jobname=MyJob&detection=false&prefix=9&vdn=11427&split=82946&contactinterval=900&maxchannel=0&&maxring=10&maxretry=5&maxabandonrate=3&"campaignstart=540&campaignstop=1080&saturdaystart=540&saturdaystop=1080&sundaystart=540&sundaystop=1080&description=MyDescription&payload=json&token=W8IJ5CncYZDQmhIW
Add Call Item
- HTTP POST method with payload JSON data
-
http://IP:PORT/addcallitems?jobname=MyJob&payload=json&token=W8IJ5CncYZDQmhIW
{
"jobname: "MyJob",
"contactno": "12345678",
"contactnohome": "12345678",
"contactnooffice": "12345678",
"contactnomobile": "12345678",
"customerid": "001",
"customertype": "Premium",
"customerlang": "ENG",
"customersex": "M",
"customerincome": "High",
"customertitle": "Manager"
}
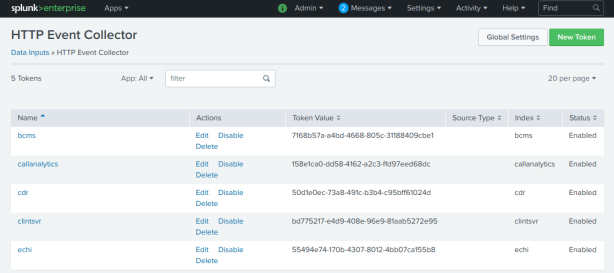
Splunk Integration using HTTP Event Collector
- Follow this guide to enable HTTP Event Collector in Splunk
- Create a token specific for UPDialer application, copy the token after its creation, it is suggested to create a token for each specific application and link the token to it’s index
- Update the parameter dl_splunkhectoken using the newly created token
- update parameter dl_splunkhectoken new_created_token
- Update the parameter dl_splunkhecurl using your site specific Splunk url
- update parameter dl_splunkhecurl https://input-SPLUNKCLOUDHOST:PORT/services/collector
- Hint: Reference this guide to find out the Splunk HEC url
- Update the parameter dl_splunkprotocol to use HTTP Event Collector
- update parameter dl_splunkprotocol hec
- Update the parameter dl_splunkhecchannel using the newly create token
- update parameter dl_splunkhecchannel new_created_token
- Update the parameter dl_splunkdataformat to use JSON format
- update parameter dl_splunkdataformat json
- Reload the configuration
- reload
- If insert to Splunk failure, the data will be written to a local file called dlsplunk_err.txt. You can upload the data to Splunk manually using curl command
- curl -k https://input-SPLNKCLOUDHOST:8088/services/collector/event -H “Authorization: Splunk token_generated_from_Splunk” -H “X-Splunk-Request-Channel: token_generated_from_Splunk” -H “Content-Type: application/json” –-data-binary “@dlsplunk_err.txt”
Limitation
- The dialer is designed for ANSI environment, currently UNICODE is not supported.
