Introduction
This tool uses Avaya TSAPI library and CM OSSI API, it monitors Avaya resources such as Trunk groups, Hunt groups and Test numbers. When default conditions such as Trunk group member, Hunt group member becomes ZERO or the Test number is unreachable, it sends notification emails to your administrators. Some triggers such as Skill Login or Logout can be executed right after such condition occurred. This tool also provides high level testers such as Line Tester and Recorder Tester for the contact center. The Line Tester is for testing of IVR circuits one by one. The Recorder Tester makes calls on behalf of agent extensions, voice recording will be triggered for these agent extensions so you can verify the healthiness of voice recording system before the operating hours of your call center. The tool can integrate with Nagios so you can monitor the Avaya resources in Nagios.
Testing using Docker Image
Please follow this guide test AvayaMonitor using Docker Container.
Preparation and Password Encryption
- The access MDB file stored the the username and password of Avaya AE server for this tool. For security reason, a tool called encryptpasswd.exe is provided to generate an encrypted password for the installation and configuration of the software
- Execute the program, generate the encrypted password for the user of Avaya AE server for this tool, then paste the encrypted password to a parameter called tm_tlink_01. For example, the encrypted password for “p@ssword” is “R3NIw1yJMLlnPFzEQtuh2A==”


64 bit Windows System
- For 64 bit Windows system, please follow the steps below
- Configure ODBC System DSN using ODBC Data Sources (64-bit)
- Configure the Windows firewall if you configure the tool to support Nagios monitoring
Windows Installation
- Download the TSAPI client for Windows 64-bit from Avaya web site, it contains the library files.
- Download the Avaya Monitoring Tool zip file here.
- Follow the installation steps below to install the software.
- Extract all the files into directory c:\program files\avayamonitor
- Open Windows Command Prompt using Administrator right, enter the following commands to register the program as Windows Service
- cd c:\program files\avayamonitor
- AvayaMonitor64 -i
- sc description AvayaMonitor64 “Provides monitoring function for Avaya CM using AES”
- Execute the accessdatabaseengine_X64.exe if the system has no 64-bit Access Database Driver installed
- Open 64-bit ODBC Setting, create System DSN called AVAYAMONITORCFG for Microsoft Access Driver and point the DB to avayamonitor.mdb which is located in the directory c:\program files\avayamonitor
- Start the Windows Service AvayaMonitor64
- Telnet to localhost and port number 14008, enter username tcpgate and password tcpgate01 to access the program console
- Enter the following command to run configuration setup
- setup
- setup ossi
- setup email
- After setup, restart the AvayaMonitor64 Service again
- Telnet to localhost and port number 14008, enter username tcpgate and password tcpgate01 to access the program console
- Enter the following command to add trunk group monitoring
- add trunk 412 24 name
- Hint: 412 is trunk access code (TAC), provide a name so you can identify it easily
- Hint: 24 is the number of member of the trunk
- Enter the following command to add IVR split monitoring
- add ivrsplit 12345 name
- Hint: 12345 is split number for IVR, provide a name so you can identify it easily
- Hint: when the number of login agent is ZERO, alert email will be sent
- Enter the following command to add Agent split monitoring
- add agentsplit 12346 name
- Hint: 12346 is split number for Agent, provide a name so you can identify it easily
- Hint: when the number of login agent is ZERO and there is call in QUEUE, alert email will be sent
- Enter the following command to monitor queue size of split
- add splitqueue 12345 10 name
- Hint: 12345 is split number for IVR or Agent
- Hint: when the call queue size > threshold value (e.g. 10), an alert email will be sent
- Enter the following command to add Emergency split (or called Control split) monitoring
- add emergencysplit 12347 name
- Hint: 12347 is Emergency split, provide a name so you can identify it easily
- Hint: when the number of login agent is > ZERO, alert email will be sent
- Enter the following commands for test number monitoring
- add phantom 12345
- Hint: 12345 is phantom device which is used for call dialing
- add testnumber 912345678 description
- Hint: phantom device 12345 will be used and the number 912345678 will be dialed at interval that specify by parameter tm_schedulerinterval
- Enter the following command in the program console to add your email address
- add email youremail@company.com
- Hint: replace your email address please
- Enter the following command in the program console, you will receive debug information.
- trace on asc
- Enter the following command in the program console, you will get the help message
- help
Uninstallation
- Stop the Window Service AvayaMonitor64
- Open Windows Command Prompt, enter the following commands to uninstall the program from Windows Service
- cd c:\program files\avayamonitor
- AvayaMonitor64 -u
RedHat/CentOS 7.x Installation Guide

- The following is for RedHat/CentOS 7 (64 bit only), other Linux distributions are not supported
- Avaya provides only 32bit version of TSAPI SDK, the AvayaMonitor executable is also a 32bit application
- Login as root and execute the following commands
-
yum update
-
reboot
- Install the MySQL 8.x
-
sudo rpm -Uvh https://dev.mysql.com/get/mysql80-community-release-el7-1.noarch.rpm sudo yum --enablerepo=mysql80-community install mysql-community-server sudo service mysqld start grep "A temporary password" /var/log/mysqld.log mysql_secure_installation - Install the following packages
-
yum install glibc.i686 libstdc++.i686 expat.i686 unixODBC.i686 openssl-libs.i686 telnet wget telnet
-
wget https://dev.mysql.com/get/Downloads/Connector-ODBC/8.0/mysql-connector-odbc-setup-8.0.22-1.el7.i686.rpm
wget https://dev.mysql.com/get/Downloads/Connector-ODBC/8.0/mysql-connector-odbc-8.0.22-1.el7.i686.rpm
yum install mysql-connector-odbc*
ln -s /usr/lib/libmyodbc8a.so /usr/lib/libmyodbc5.so
- Download Avaya Aura AE Services 8.1.3 TSAPI Client for RHEL 7 from DevConnect
- chmod +x tsapi-client-linux-8.1.3-25.i386.bin
- Execute the installation file tsapi-client-linux-8.1.3-25.i386.bin
- ./tsapi-client-linux-8.1.3-25.i386.bin
- Edit /usr/lib/tslibrc, change 127.0.0.1 to the IP address of your Avaya AES
- Config and start MySQL
-
chkconfig mysqld on -
service mysqld start - Create database and user
-
mysql -u root -p -
create database avayamonitor; -
create user 'tcpgate'@'localhost' identified by 'P@ssw0rd'; -
grant all on avayamonitor.* to 'tcpgate'@'localhost'; -
flush privileges; -
quit -
mysql -h localhost -u tcpgate -p avayamonitor <avayamonitor.sql - Copy the following to /etc/odbc.ini file
- [AVAYAMONITORCFG]
Description = MySQL connection to AvayaMonitor
Driver = MySQL
Server = localhost
Port = 3306
Database = avayamonitor
- [AVAYAMONITORCFG]
- Create user and copy files
-
useradd upinget -
mkdir /usr/local/avayamonitor -
cp AvayaMonitor /usr/local/avayamonitor -
chmod +x /usr/local/avayamonitor/AvayaMonitor -
chown -R upinget.upinget /usr/local/avayamonitor -
mkdir -p /var/log/avayamonitor -
chown -R upinget.upinget /var/log/avayamonitor - Auto Start the daemon after server reboot
-
echo "rm /tmp/avayamonitor.log" >> /etc/rc.local -
echo "su ctisvr -c '/usr/local/avayamonitor/AvayaMonitor -u tcpgate -p 40UIt9O3PqtwsSn+Wx6pig=='" >> /etc/rc.local -
chmod +x /etc/rc.local
Triggers ACD Login/Logout When Check Error
- Enter the following command to implement skill trigger for a monitored number
- genpass
- Hint: use the genpass command to generate an encrypted password for acd login
- add skilltrigger 912345678 66001 55001 oKd75RltJLcf+uXkp2CYHA== login
- Hint: 912345678 is the monitoring number resource, it can be trunk group, ivr split, agent split or test number
- Hint: 66001 is an extension number for ACD login or logout
- Hint: 55001 is an agnt ID for ACD login or logout
- Hint: oKd75RltJLcf+uXkp2CYHA== is encrypted password, use that one generated by genpass command
- Hint: login means ACD login when error occurred, logout means ACD logout when error occurred
- genpass
Triggers Call Transfer to Announcement Message When Check Error
- Enter the following command to implement transfer trigger for a monitored number
- add transfertrigger 912345678 987654321 10001 10002 Comment
- Hint: 912345678 is the monitoring number resources, it can be hunt group, ivr split, agent split or testing number
- Hint: 987654321 is the dialed number when error or resume happened
- Hint: 10001 is an announcement number for error condition
- Hint: 10002 is an announcement number for resume condition
- add transfertrigger 912345678 987654321 10001 10002 Comment
Triggers Make Call and Sends DTMF Pattern
- Enter the following command to implement dtmf trigger for a monitored number
- add dtmf 0 1 5 123
- add dtmf 0 2 6 999
- Hint: dtmf parttern 0 has two steps, step 1 wait 5 seconds and sends DTMF 123, step 2 waits 6 seconds and sends DTMF 999
- add dtmftrigger 912345678 987654321 0 1 Comment
- Hint: 912345678 is the monitoring number resources, it can be hunt group, ivr split, agent split or testing number
- Hint: 987654321 is the dialed number when error or resume happened
- Hint: 0 is the dtmf pattern for error condition
- Hint: 1 is the dtmf pattern for resume condition
Triggers RESTful API
- Enter the following command to implement restful trigger for a monitored number
- add restfultrigger 912345678 http://localhost/errortrigger?number=912345678 http://localhost/resumetrigger?number=912345678 Comment
- Hint: 912345678 is the monitoring number resources, it can be hunt group, ivr split, agent split or testing number
- Hint: The first URL will be invoked for error condition
- Hint: The second URL will be invoked for resume condition
- add restfultrigger 912345678 http://localhost/errortrigger?number=912345678 http://localhost/resumetrigger?number=912345678 Comment
Line Tester Feature
- Enter the following command to add a line tester job
- add ltjob 1 apple 7 8
- add a line tester job called apple, start dialing from 7:00am and end at 8:00am
- add ltjob 1 apple 7 8
- Enter the following command to add internal stations for testing
- add ltstation 1 12345
- add one station to the job
- bulkadd ltstation 1 12345 12350
- add the range of stations to the job
- add ltstation 1 12345
Recorder Tester Feature
- Enter the following command to add a recorder tester job
- add rtjob 1 orange 12345 5 6
- add a recorder test job called orange, start dialing announcement 12345 from 5:00am and end at 6:00am
- add rtjob 1 orange 12345 5 6
- Enter the following command to add agent stations for testing
- add rtstation 1 40001
- add one station to the job
- bulkadd rtstation 1 40001 40005
- add the range of stations to the job
- add rtstation 1 40001
Answer Call Tester Feature
- Enter the following command to add a answer call tester job
- add answerjob 1 orange 5 6 12345 54321
- add a answer call test job called orange, start the job from 5:00am to 6:00am, call number 12345 and expected answered by 54321
- add answerjob 1 orange 5 6 12345 54321
Nagios XI Integration
AvayaMonitor can integrate with Nagios by REST interface. Nagios XI is free when the number of monitoring host less than 7 and it is a good tool when using it to monitor Avaya objects such as Trunk, IVR splits, Agent splits and Hotline numbers. The following is the procedure to install and configure Nagios XI on the AvayaMonitor CentOS solution.
- Follow this guide to install Nagiox XI
- Install the following package on AvayaMonitor CentOS server
- yum install perl-JSON
- yum install perl-Nagios-Plugin
- For latest version of Nagios XI OVA image, to fix the missing of perl-Nagios-Plugin by the following command
- yum install nagios-plugins-perl
- For latest version of Nagios XI OVA image, to fix the missing of Monitoring::Plugin perl module by the following command
- cpan install Monitoring::Plugin
- For latest version of Nagios XI OVA image, to fix the missing of perl-Nagios-Plugin by the following command
- Follow this guide to install check_json.pl plugin
- Once the plugin is added, add the following commands in Nagios
- check_trunk
- Command Name
- check_trunk
- Command Line
-
$USER1$/check_json.pl --url 'http://$HOSTADDRESS$:5200/trunk?tac=$ARG1$' --attributes '{utilization}' --warning @$ARG2$ --critical @$ARG3$ --perfvars 'utilization' --outputvars 'message'
-
- Command Type
- check command
- Active
- checked
- Command Name
- check_ivrsplit
- Command Name
- check_ivrsplit
- Command Line
-
$USER1$/check_json.pl --url 'http://$HOSTADDRESS$:5200/ivrsplit?split=$ARG1$' --attributes '{utilization}' --warning @$ARG2$ --critical @$ARG3$ --perfvars 'utilization' --outputvars 'message'
-
- Command Type
- check command
- Active
- checked
- Command Name
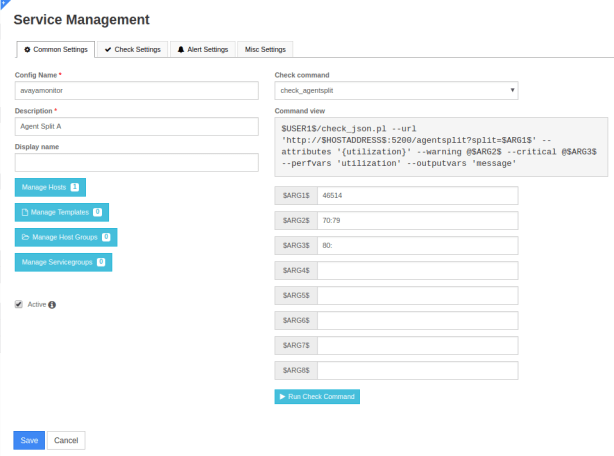
- check_agentsplit
- Command Name
- check_agentsplit
- Command Line
-
$USER1$/check_json.pl --url 'http://$HOSTADDRESS$:5200/agentsplit?split=$ARG1$' --attributes '{utilization}' --warning @$ARG2$ --critical @$ARG3$ --perfvars 'utilization' --outputvars 'message'
-
- Command Type
- check command
- Active
- checked
- Command Name
- check_number
- Command Name
- check_number
- Command Line
-
$USER1$/check_json.pl --url 'http://$HOSTADDRESS$:5200/testnumber?number=$ARG1$' --attributes '{failure}' --warning @$ARG2$ --critical @$ARG3$ --perfvars 'failure' --outputvars 'message'
-
- Command Type
- check command
- Active
- checked
- Command Name
- check_cmaesvcsctilink
- Command Name
- check_cmaesvcsctilink
- Command Line
-
$USER1$/check_json.pl --url 'http://$HOSTADDRESS$:5200/cmaesvcsctilink?ctilink=$ARG1$' --attributes '{alarmvalue}' --warning @$ARG2$ --critical @$ARG3$ --perfvars 'alarmvalue' --outputvars 'message'
-
- Command Type
- check command
- Active
- checked
- Command Name
- check_cmprocessorchannels
- Command Name
- check_cmprocessorchannels
- Command Line
-
$USER1$/check_json.pl --url 'http://$HOSTADDRESS$:5200/cmprocessorchannels?channelnumber=$ARG1$' --attributes '{alarmvalue}' --warning @$ARG2$ --critical @$ARG3$ --perfvars 'alarmvalue' --outputvars 'message'
-
- Command Type
- check command
- Active
- checked
- Command Name
- check_endpointregister
- Command Name
- check_endpointregister
- Command Line
-
$USER1$/check_json.pl --url 'http://$HOSTADDRESS$:5200/endpointregister?groupname=$ARG1$' --attributes '{percentoutofservice}' --warning @$ARG2$ --critical @$ARG3$ --perfvars 'percentoutofservice' --outputvars 'message'
-
- Command Type
- check command
- Active
- checked
- Command Name
- check_trunk
- Then add your services one by one, for example


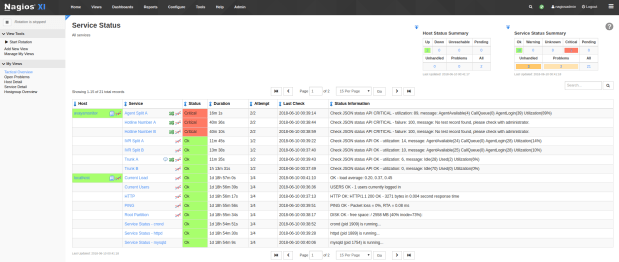
- After the services were added, you can see the status of the services in the Nagios view
License