Introduction
27 Feb 2015, ScreenPop 1.4.0 just released. This release supports WebSocket interface which enables the call control integration with web browser directly. We can develop JQuery softphone using this WebSocket interface.
2 Aug 2014, ScreenPop 1.3.7 just released. This release supports sending and retrieval of user data by provided DLL and fixed some bugs in acd login and acd auto answer features.
5 Feb 2014, ScreenPop 1.3.6 just released. This release provides OCX control for CTI application development, both call control and event notification are supported. Moreover, a data server called uuiSVR.exe is provided for passing of user data between applications. An API to query user’s extension is also provided.
3 January 2014, ScreenPop 1.3.5 just released. This release supports license management via a license server. Moreover, it supports Alternate call control and auto answer for one-x communicator when one-x has ACD logon.
16 Dec 2013, ScreenPop 1.3.4 just released. This release supports passing AGENTID to web application. Moreover, web application can perform call controls using CGI interface.
19 Nov 2013, 1.3.3 just released, this release supports ACD and DTMF functions. Moreover, a pass through prefix can be defined so ScreenPop will pass the number directly to PBX without any manipulation. The UI of calltoui is updated as follow:

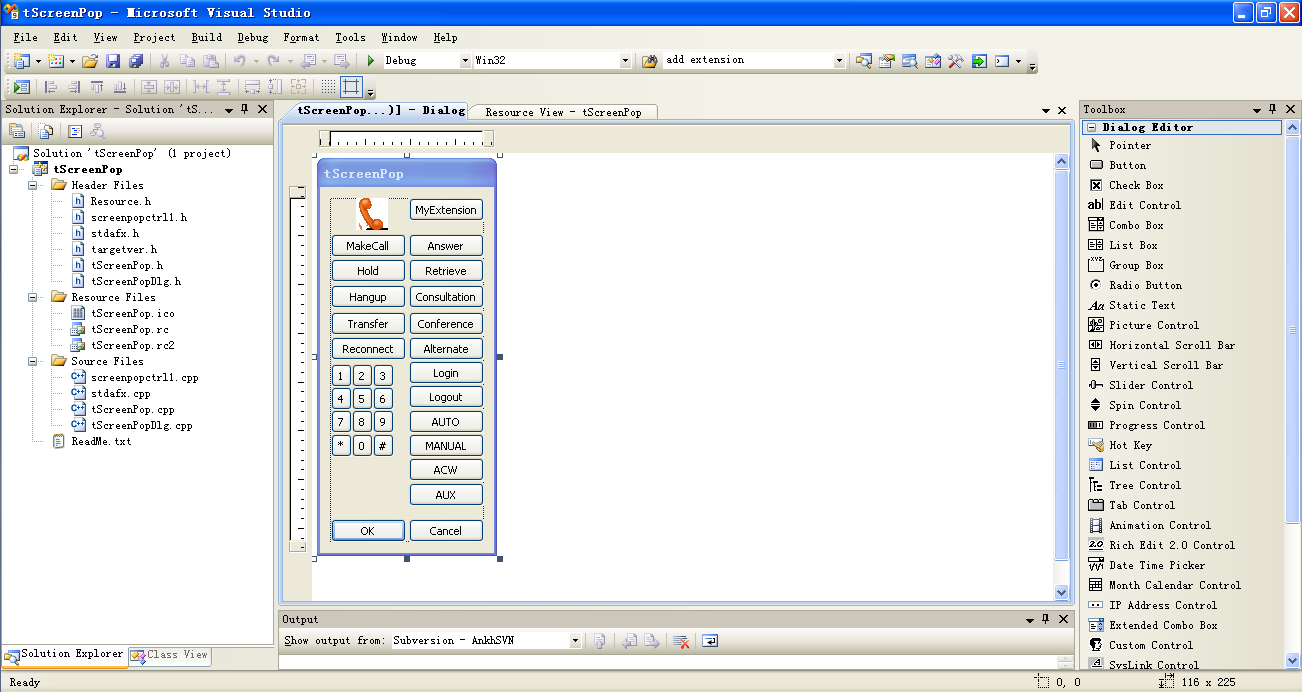
8 Jul 2013, 1.3.0 is released, this release supports callto with user interface and additional call controls such as hold, retrieve, answer, hangup, consultation, reconnect, transfer and conference. The user interface looks like this
17 Jun 2013, 1.2.0 is released, this release supports callto protocol so you can make call directly from web page. I reference this page and thanks WaiHung for the direction.
Background of ScreenPop
I attended OTRS training last week. OTRS is a ticketing system which is very useful for IT Service Desk. I think it would be very useful if the OTRS phone ticket can be created and popped up automatically with customer information when a call comes in, it will save a lot of time for Service Desk especially the time for searching customer information. It triggers me to implement this ScreenPop application. The ScreenPop application is a Windows service which is installed in agent’s PC, it monitors agent’s extension and do the screen pop when there is incoming call. The software supports screen pop of web application, of course telephony data such as CLI, DNIS, UCID, SPLIT and UED can be passed to the web application.
Preparation and Password Encryption
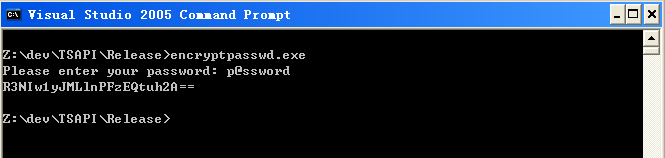
- A access MDB file called screenpop.mdb which stores the the username and password of AE server. For security reason, a tool called encryptpasswd.exe is provided to generate encrypted password for the installation and configuration of the software
- Execute the program, generate the encrypted password for the user of AE server, then paste the encrypted password to parameter ag_tlink. For example, the encrypted password for “p@ssword” is “R3NIw1yJMLlnPFzEQtuh2A==”

Installation
- Download the TSAPI client for Windows 32-bit from Avaya web site, it contains the library files. You need to register DevConnect before you can access the download page.
- Download the ScreenPop zip file here or backup site.
- Follow the installation steps below to install the software.
- Extract all the files into directory c:\program files\screenpop
- Open Windows Command Prompt, enter the following commands to register the program as Windows Service
- cd c:\program files\screenpop
- screenpop -i
- Open ODBC Setting, create System DSN called SCREENPOPCFG for Microsoft Access Driver and point to screenpop.mdb which is located in the directory c:\program files\screenpop
- Open the Access file, edit the value of parameters sp_tlink_01 and sp_tlink_02 to the TLINK of your AES servers in the tParameter table
- Edit the value of parameter sp_popmode to define screen pop in ACD or Extension mode. If agent login is required for screen pop, the value is “acd”, otherwise “extension”
- Start the Windows Service screenpop
- Telnet to localhost and port number 14010, enter username tcpgate and password tcpgate01 to access the program console
- Enter the following command in the program console to add extensions for screenpop
- add extension 61101
- Hint: 61101 is agent extension
- Enter the following command in the program console to add screen pop URL
- add vdnspliturl 10001 http://www.google.com
- Hint: 10001 is VDN or split number, when call comes in by this number, the web browser pops the specified URL
- Hint: Telephony data can be specified in the URL, they are:
- {CLI} Caller Line Identification
- {DNIS} Dialed Number Identification Service
- {UCID} Avaya UCID
- {SPLIT} Avaya split or hunt group number
- {UED} Avaya user entered digit
- {UUI} Avaya uui data, only ASCII data is supported now
- {AGENTID} Avaya Agent ID
- {CUSTDATA} user data which passing from other CTI application
- Enter the following command in the program console, you will receive debug information
- trace on asc
- Enter the following command in the program console, you will get the help message
- help
- The following is for installation of License Server
- Open Windows Command Prompt, enter the following commands to register the program as Windows Service
- cd c:\program files\screenpop
- licSVR -i
- Open ODBC Setting, create System DSN called LICSVRCFG for Microsoft Access Driver and point to licSVR.mdb which is located in the directory c:\program files\screenpop
- Edit the parameter ls_licensekey with your license key
- Start the service LicSVR
- Telnet to the program console with username tcpgate and password tcpgate01
- telnet localhost 14013
- Add your endpoint by the following command
- add endpoint 10.10.1.10
- Hint: 10.10.1.10 is authorized and will consume 1 license
- Open Windows Command Prompt, enter the following commands to register the program as Windows Service
- The following is for ScreenPop license server parameter configuration
- Edit the parameter called sp_licsvr, e.g. 10.10.1.2,5005
- Hint: The license server IP is 10.10.1.2 and port number 5005
- The following is for installation of uuiSVR
- Open Windows Command Prompt, enter the following commands to register the program as Windows Service
- cd c:\program files\screenpop
- uuiSVR -i
- Open ODBC Setting, create System DSN called UUISVRCFG for Microsoft Access Driver and point to uuiSVR.mdb which is located in the directory c:\program files\screenpop
- Start the service uuiSVR
- Open Windows Command Prompt, enter the following commands to register the program as Windows Service
- The following is for ScreenPop uuiSVR parameter configuration
- Edit the parameter called sp_uuisvr, e.g. 10.10.1.2,5100
- Hint: The uuiSVR server IP is 10.10.1.2 and port number is 5100
Installation for Click to Dial (callto URL)
- ScreenPop 1.2.0 supports callto:// URL make call
- License key is required to activate this feature, contact me for a FREE license key
- Once you have the license key, edit the following parameters in the screenpop.mdb file
- sp_calltolicensekey
- Hint: paste the license key for this parameter
- sp_dialoutlength
- Hint: the digit length of destination number will be compared to this value, sp_dialoutprefix will be inserted for outgoing call
- sp_dialoutprefix
- Hint: the dial out prefix inserted before the destination number, the default value is 9
- sp_plustreatment
- Hint: the treatment for the plus sign which normally represents international calling, you can specify the following treatment methods
- retain
- no treatment for the plus sign
- replace,00
- replace the plus sign by the number followed. E.g. replace the plus sign by 00
- remove
- remove the plus sign
- retain
- Hint: the treatment for the plus sign which normally represents international calling, you can specify the following treatment methods
- sp_calltolicensekey
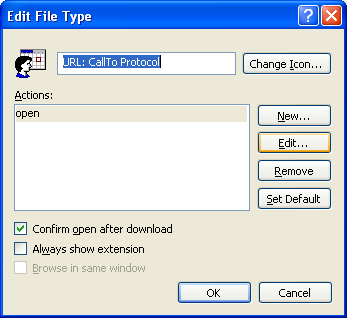
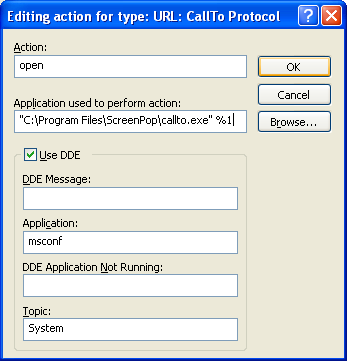
- A program called callto.exe is included in the zip file
- Follow the screen dumps below to change the calto URL file type mapping:
- Click “Folder Option” in Windows Explorer

- Click Advanced button

- Click Edit button

- Select the callto.exe from directory c:\Program files\screenpop\
- Select the calltoui.exe if you want to have user interface and additional call controls
- Click OK to finish the configuration
- For testing, you can install a firefox plugin called “Telify” which converts telephone numbers into clickable links for use with CTI applications.
- For Windows 8, please follow this link as workaround to create callto and tel protocol association.

Configuration for OTRS Screen Pop
- Follow the link to install Znuny4OTRS-CTI Add-On first
- Telnet the program console and add the vdnspliturl as follow
- add vdnspliturl 10001 http://otrs-serverip/otrs/index.pl?Action=AgentTicketPhoneCTI;CallerID={CLI}
- Hint: 10001 is VDN or split number
- For click to dial, modify the ZCTI.pm which is located at /opt/otrs/Kernel/Config/Files, this enable the phone and mobile numbers clickable, the code is follow:

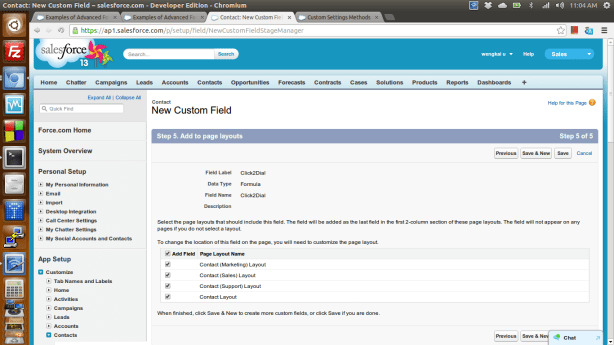
Configuration for SalesForce Screen Pop
- Telnet the program console and add the vdnspliturl as follow
- add vdnspliturl 10001 https://xxx.salesforce.com/_ui/search/ui/UnifiedSearchResults?searchType=2&str={CLI}
- Hint: 10001 is VDN or split number
- For click to dial, follow the steps below:
- Salesforce->Setup->Customize->Fields
- Click New under “Contact Custom Fields & Relationships”

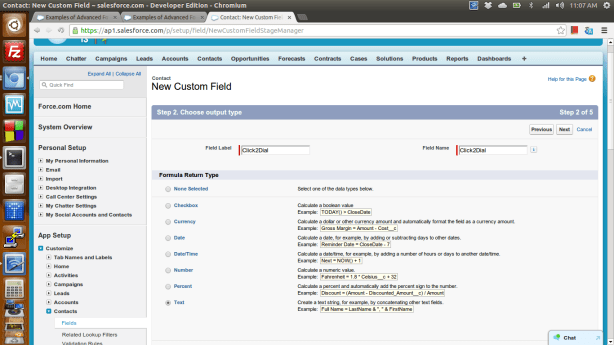

- If you don’t want popup another window, enter the following:


Installation for ScreenPop OCX interface
- The ScreenPop package provides an OCX for application development, you can use the OCX to perform call control for the ScreenPop extension
- Enter the following command in program console to add TCP port for ScreenPop OCX interface
- add tcp 5134 * * custom spocx
- Enter the following command in Windows Prompt to register the screenpop.ocx
- regsvr32 screenpop.ocx
- A sample c++ program is provided, you can program call control functions in just few lines of code

Installation for REST interface Call Control
- Enter the following command in program console to add REST interface port
- add tcp 80 * * custom spcgi
- The syntax to make call is
- The syntax to hold or retrieve call is
- The syntax to hangup call is
- The syntax to drop party is
- The syntax to answer call is
- The syntax to make consultation call is
- The syntax to reconnect call is
- The syntax to transfer call is
- The syntax to conference call is
- The syntax to send DTMF is
- The syntax to login ACD is
- The syntax to logout ACD is
- The syntax to set ACD state is
- http://localhost/setstate?state=manual|auto|acw|aux&reasoncode=[0-9]
- You can set reason code for AUX mode only
- http://localhost/setstate?state=manual|auto|acw|aux&reasoncode=[0-9]
Installation for WebSocket interface Call Control
- Enter the following command in program console to add a WebSocket interface port
- add tcp 9001 * * custom spws
- WebSocket interface accepts JSON request, and returns JSON response and delivers unsolicited JSON events
- The JSON strings for make call request and response are
- {id: “12345678”, request: “makecall”, destination: “67896789”, data: “hello world”}
- {msgtype: “response”, id: “12345678”, result: “success”, callid: “12345”}
- The JSON strings for hold or retrieve call request and response are
- {id: “12345678”, request: “holdretrieve”}
- {msgtype: “response”, id: “12345678”, result: “success”, error: “”}
- The JSON strings for hold call request and response are
- {id: “12345678”, request: “hold”}
- {msgtype: “response”, id: “12345678”, result: “success”, error: “”}
- The JSON strings for retrieve call request and response are
- {id: “12345678”, request: “retrieve”}
- {id: “12345678”, request: “retrieve”, destination: “T1234#1”}
- {msgtype: “response”, id: “12345678”, result: “success”, error: “”}
- The JSON strings for hangup call request and response are
- {id: “12345678”, request: “hangup”, data: “hello world”}
- {msgtype: “response”, id: “12345678”, result: “success”, error: “”}
- The JSON strings for drop party call request and response are
- {id: “12345678”, request: “dropparty”, party: “12345”, data: “hello world”}
- {msgtype: “response”, id: “12345678”, result: “success”, error: “”}
- The JSON strings for answer call request and response are
- {id: “12345678”, request: “answer”, destination: “67896789”}
- {msgtype: “response”, id: “12345678”, result: “success”, error: “”}
- The JSON strings for make consultation request and response are
- {id: “12345678”, request: “consultation”, destination: “67896789”, data: “hello world”}
- {msgtype: “response”, id: “12345678”, result: “success”, primarycallid: “123”, secondarycallid: “456”}
- The JSON strings for reconnect call request and response are
- {id: “12345678”, request: “reconnect”}
- {msgtype: “response”, id: “12345678”, result: “success”, error: “”}
- The JSON strings for transfer call request and response are
- {id: “12345678”, request: “transfer”, destination: “67896789”}
- {msgtype: “response”, id: “12345678”, result: “success”, error: “”}
- The JSON strings for conference call request and response are
- {id: “12345678”, request: “conference”, destination: “67896789”}
- {msgtype: “response”, id: “12345678”, result: “success”, error: “”}
- The JSON strings to send DTMF request and response are
- {id: “12345678”, request: “dtmf”, dtmf: “1”}
- {msgtype: “response”, id: “12345678”, result: “success”, error: “”}
- The JSON strings for ACD login request and response are
- {id: “12345678”, request: “login”, agentid: “12345”, passwd:”67890″}
- {msgtype: “response”, id: “12345678”, result: “success”, error: “”}
- The JSON strings for ACD logout request and response are
- {id: “12345678”, request: “logout”, agentid: “12345”, passwd:”67890″}
- {msgtype: “response”, id: “12345678”, result: “success”, error: “”}
- The JSON strings to set ACD state request and response are
- {id: “12345678”, request: “setstate”, state: “aux”, reasoncode:”1″}
- {id: “12345678”, request: “setstate”, state: “acw”}
- {id: “12345678”, request: “setstate”, state: “manual”}
- {id: “12345678”, request: “setstate”, state: “auto”}
- {msgtype: “response”, id: “12345678”, result: “success”, error: “”}
- The JSON string for incoming Call Offer event is
- {msgtype: “event”, eventtype: “offer”, origcalling: “101”, origcalled: “102”, calling: “101”, called: “102”, alerting: “102”, ucid: “00001094861421138402”, uui: “”, uec: “”, split: “”, custdata: “”, time:1424044800, trunkgroup: “10”, trunkmember: “12”, lastredirection: “”, callid: 123}
- The JSON string for outgoing Call Alert event is
- {msgtype: “event”, eventtype: “alert”, origcalling: “101”, origcalled: “102”, calling: “101”, called: “102”, alerting: “102”, ucid: “00001094861421138402”, uui: “”, custdata: “”, time:1424044800, trunkgroup: “10”, trunkmember: “12”, callid: 123}
- The JSON string for Call Connect event is
- {msgtype: “event”, eventtype: “connect”, origcalling: “101”, origcalled: “102”, calling: “101”, called: “102”, answering: “102”, ucid: “00001094861421138402”, uui: “”, uec: “”, split: “”, custdata: “”, time:1424044800, trunkgroup: “10”, trunkmember: “12”, lastredirection: “”, callid: 123}
- The JSON string for Call Fail event is
- {msgtype: “event”, eventtype: “fail”, failing: “101”, called: “102”, cause: 23, time:1424044800, callid: 123}
- The JSON string for Call Hold event is
- {msgtype: “event”, eventtype: “hold”, holding: “101”, time:1424044800, callid: 123}
- The JSON string for Call Retrieve event is
- {msgtype: “event”, eventtype: “retrieve”, retrieving: “101”, time:1424044800, callid: 123}
- The JSON string for Call Disconnect event is
- {msgtype: “event”, eventtype: “disconnect”, releasing: “101”, uui: “”, cusdata: “”, time:1424044800, callid: 123}
- The JSON string for Call Transfer event is
- {msgtype: “event”, eventtype: “transfer”, transferring: “101”, transferred: “102”, ucid: “00001094861421138402”, uui: “”, cusdata: “”, time:1424044800, trunkgroup: “10”, trunkmember: “12”, primarycallid: 123, secondarycallid: 124, party1: “101”, party2: “102”, party3: “”, party4: “”, party5: “”, party6: “”}
- The JSON string for Call Conference event is
- {msgtype: “event”, eventtype: “conference”, controller: “101”, addedparty: “102”, ucid: “00001094861421138402”, uui: “”, cusdata: “”, time:1424044800, trunkgroup: “10”, trunkmember: “12”, primarycallid: 123, secondarycallid: 124, party1: “101”, party2: “102”, party3: “”, party4: “”, party5: “”, party6: “”}
- The JSON string for Call Idle event is
- {msgtype: “event”, eventtype: “idle”, time: 1424044800}
Support and License
- Please contact upinget.com for support and license

The WebSocket interface integration with web browsers is a great advancement.