Introduction

The CloudCDR tool inherits all functions from AvayaCDR, it also has some specific features for cloud based CDR applications. For example, a cloud based CDR accounting software hosted on the internet, it accepts CDR data from different customers around the globe. Once the data for a customer is imported to the accounting software, the software can provide personalized functions and features for that particular customer. The CloudCDR tool enables this kind of application by the following features:
- On Customer Servers
- Receives CDR data from Avaya CM/Aura or IP Office and stores them as local CDR files at configurable interval such as 3 minutes
- Uploads the local CDR files to cloud server by Secured File Transfer Protocol
- Delete local CDR files which over certain period of time, for example 90 days
- On Cloud Server
- Scans each customer directory and imports CDR files to database or Splunk
- Appends additional fields to database or Splunk for identification of each particular customer
- Delete local CDR files which over certain period of time, for example 90 days
Testing using Docker Image
Please follow this guide to test CloudCDR using Docker container.
Windows Installation
- The installation of CloudCDR is similar to AvayaCDR, please refer to the AvayaCDR video files for detail instructions. I have recorded two videos for AvayaCDR installation, please watch the video for Windows 2012 (64 bit) and Windows 7 (32bit) installation.
- Download the CloudCDR file here or backup site.
- Follow the steps below to install the software.
- Extract all the files into directory c:\program files\cloudcdr
- Open Windows Command Prompt (run as System Administrator if you are using Windows 7 or above), enter the following commands to register the program as Windows Service
- cd c:\program files\cloudcdr
- cloudcdr -i
- sc description cloudcdr “Captures Avaya CM CDR and uploads the data to the cloud”
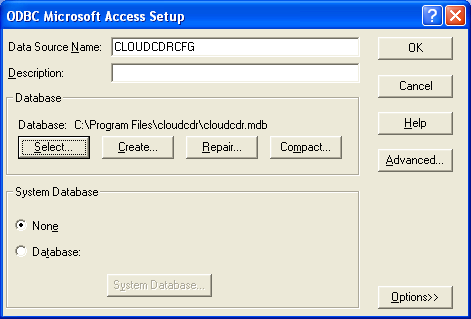
- Open ODBC Data Source Administrator, create a System DSN called CLOUDCDRCFG for Microsoft Access Driver (*.mdb) and select cloudcdr.mdb which is located in the directory c:\program files\cloudcdr
- Hint: make sure to create a System DSN instead of User DSN, otherwise the program will startup without proper parameters
- If you are using 64 bit Windows OS, please use 32 bit ODBC Data Source Administrator

- Open the Access file, edit the value of parameters cdr_archive_dir, that is the location for archived files. E.g. c:\\avayacdr\\
- Hint: for the archive directory, make sure the format of double backslash (\\) is used because back slash is escape character in c++.
- You can edit the value of this parameter via the telnet console, the command is
- update cdr_archive_dir c:\\avayacdr\\
- Edit the value of parameter cdr_archive_time to to specify the time for file archive. E.g. 01:00
- Hint: you can edit the value of this parameter via the telnet console, the command is
- update cdr_archive_time 01:00
- Hint: you can edit the value of this parameter via the telnet console, the command is
- Start the Windows Service cloudcdr
- Telnet to localhost and port number 14004, enter username tcpgate and password tcpgate01 to access the program console
- Enter the following command in the program console to add a listening port for Avaya CDR. E.g. add port 5001
- add tcp 5001 * * custom cdr
- Hint: You need to configure Avaya to send CDR to this host and port number 5001
- Hint: If your Avaya sends data by Reliable Session Protocol, enter the following command
- add tcp 5001 * * custom rsp
- Enter the following command, you will receive debug information
- trace on asc
- Enter the following command, you will get the help message
- help
- Enter the following command, you can perform the file archive immediately
- archive now
Upload Local CDR files to Cloud Server
- Enter the following tcpgate console command to upload local CDR files to cloud server
- add uploadsftp srcdir archivedir host port username passwd destdir description
- Hint: srcdir parameter is the location where local CDR files are stored
- Hint: once local CDR files are transferred to cloud server, the files are moved to the archive directory, the parameter archivedir is for this purpose
- Hint: host is the IP or hostname of the cloud server
- Hint: port is the sftp port number of the cloud server
- Hint: the username parameter is the username for sftp
- Hint: the passwd parameter is the encrypted password for sftp, use genpass command to generate an encrypted password
- Hint: the destdir parameter is where the CDR files are stored on the cloud server
- Hint: the description parameter is for comment of the entry
- add uploadsftp srcdir archivedir host port username passwd destdir description
- To change the file archive interval, change a global parameter in tcpgate console
- update parameter cdr_archive_interval 5
- reload
- Hint: the unit of interval is in minute, minimum interval is 1 minute
- To change the file upload interval, change a global parameter in tcpgate console
- update parameter cdr_upload_interval 5
- reload
- Hint: the unit of interval is in minute, minimum interval is 1 minute
Delete CDR Files over Retention Period
- Enter the following tcpgate command to delete CDR files over retention period
- add retentiondir archivedir day description
- Hint: archivedir parameter is the location where archived CDR files are stored
- Hint: the CDR files are deleted when last modified day over the day parameter compared to current system time
- Hint: the description parameter is for comment of the entry
- add retentiondir archivedir day description
- To change the checking interval, change a global parameter in tcpgate console
- update parameter cdr_retention_interval 5
- reload
- Hint: the unit of interval is in minute, minimum interval is 1 minute
Import CDR files on Cloud Server
- Enter the following tcpgate command to import CDR data to database or Splunk on the cloud server
- add importdir srcdir archivedir description
- Hint: the srcdir parameter is the location where CDR files are stored
- Hint: once the CDR files are imported, the files will be moved to the archive directory, the parameter archivedir is for this purpose
- Hint: the description parameter is for comment of the entry
- add importdir srcdir archivedir description
- To change the file import interval, change a global parameter in tcpgate console
- update parameter cdr_import_interval 5
- reload
- Hint: the unit of interval is in minute, minimum interval is 1 minute
CentOS 6.x Installation Guide
- The installation is similar to AvayaCDR, please refer the AvayaCDR installation video
- The following is for CentOS 6 only, the commands can be found in the centos6/installation.txt file
- The executable file of 32bit version is “cloudcdr”, the 64bit version is “cloudcdr64”
- Install the following packages
-
yum install mysql-server mysql libssh2
-
yum install mysql-connector-odbc unixODBC
- Config and start MySQL
-
chkconfig mysqld on
-
service mysqld start
- Create database and user
-
mysql -u root -p
-
create database cloudcdr;
-
create user 'tcpgate'@'localhost' identified by 'tcpgate';
-
grant all on cloudcdr.* to 'tcpgate'@'localhost';
-
flush privileges;
-
quit
-
mysql -h localhost -u tcpgate -p cloudcdr < cloudcdr.sql
- Copy the following to /etc/odbc.ini file
- [CLOUDCDRCFG]
Description = MySQL connection to CloudCDR
Driver = MySQL
Server = localhost
Port = 3306
Database = cloudcdr - [CLOUDCDRDBCFG]
Description = MySQL connection to CloudCDR
Driver = MySQL
Server = localhost
Port = 3306
Database = cloudcdr
- [CLOUDCDRCFG]
- Create user and copy files
-
useradd cloudcdr
-
mkdir /usr/local/cloudcdr
-
cp cloudcdr /usr/local/cloudcdr
-
chmod +x /usr/local/cloudcdr/cloudcdr -
chown -R cloudcdr.cloudcdr /usr/local/cloudcdr
-
mkdir -p /var/log/avayacdr/archive/sftp
-
chown -R cloudcdr.cloudcdr /var/log/avayacdr
- Auto start the daemon after server reboot
-
echo "rm -f /tmp/cloudcdr.log" >> /etc/rc.local
-
echo "su cloudcdr -c '/usr/local/cloudcdr/cloudcdr'" >> /etc/rc.local
CentOS 7.x Installation Notes
- Follow this guide to install MySQL on CentOS 7.x
- Check the MySQL ODBC link in /usr/lib64 directory
- ln -s libmyodbc5a.so libmyodbc5.so
- Check the MySQL socket link and add the following in the /etc/rc.local
- if [ ! -L /tmp/mysql.sock ]; then ln -s /var/lib/mysql/mysql.sock /tmp/mysql.sock ; fi
- Please note that you must run ‘chmod +x /etc/rc.d/rc.local’ to ensure that this script will be executed during boot.
Ubuntu 14.04 Installation Guide
- The installation is similar to AvayaCDR, please refer the AvayaCDR installation video
- The following is for Ubuntu 14.04 only, the commands can be found in the ubuntu/installation.txt file
- The executable file of 32bit version is “cloudcdr”, the 64bit version is “cloudcdr64”
- Install the following packages
-
sudo apt-get install mysql-server mysql-client
-
sudo apt-get install libmyodbc unixodbc unixodbc-bin
-
sudo apt-get install libssh2-1 openssl unrar
- Create database and user
-
mysql -u root -p
-
create database cloudcdr;
-
create user 'tcpgate'@'localhost' identified by 'tcpgate';
-
grant all on cloudcdr.* to 'tcpgate'@'localhost';
-
flush privileges;
-
quit
-
mysql -h localhost -u tcpgate -p cloudcdr < cloudcdr.sql
- Copy the following to /etc/odbcinst.ini file for Ubunt 64bit
- [MySQL]
Description = ODBC for MySQL
Driver = /usr/lib/x86_64-linux-gnu/odbc/libmyodbc.so
Setup = /usr/lib/x86_64-linux-gnu/odbc/libodbcmyS.so
UsageCount = 1
- [MySQL]
- Copy the following to /etc/odbcinst.ini file for Ubunt 32bit
- [MySQL]
Description = ODBC for MySQL
Driver = /usr/lib/i386-linux-gnu/odbc/libmyodbc.so
Setup = /usr/lib/i386-linux-gnu/odbc/libodbcmyS.so
UsageCount = 1
- [MySQL]
- Install the ODBC driver
-
sudo odbcinst -i -d -f /etc/odbcinst.ini
- Copy the following to /etc/odbc.ini file
- [CLOUDCDRCFG]
Description = MySQL connection to CloudCDR
Driver = MySQL
Server = localhost
Port = 3306
Socket = /var/run/mysqld/mysqld.sock
Database = cloudcdr - [CLOUDCDRDBCFG]
Description = MySQL connection to CloudCDR
Driver = MySQL
Server = localhost
Port = 3306
Socket = /var/run/mysqld/mysqld.sock
Database = cloudcdr
- [CLOUDCDRCFG]
- Install your system DSN
-
sudo odbcinst -i -s -l -f /etc/odbc.ini
- Create user and copy files
-
sudo useradd cloudcdr
-
sudo mkdir /usr/local/cloudcdr
-
sudo cp cloudcdr /usr/local/cloudcdr
-
sudo chmod +x /usr/local/cloudcdr/cloudcdr
-
sudo chown -R cloudcdr.cloudcdr /usr/local/cloudcdr
-
sudo mkdir -p /var/log/avayacdr/archive/sfp
-
sudo chown -R cloudcdr.cloudcdr /var/log/avayacdr
- Auto start the daemon after server reboot, add the following before ‘exit 0’ to /etc/rc.local file
-
rm -f /tmp/cloudcdr.log
-
su cloudcdr -c '/usr/local/cloudcdr/cloudcdr'
Ubuntu 16.04 Installation Notes
- Follow this guide to install MySQL ODBC driver “libmyodbc” on Ubuntu 16.04
Ubuntu 18.04 Installation Notes
- Follow this guide to install MySQL ODBC driver “libmyodbc” on Ubuntu 18.04
- Follow this guide to create the /etc/rc.local file
Scans and Import CDR files by Linux Cloud Server
- When the cloud server is a CentOS or Ubuntu server, it is recommended to run the daemon using root account because it can scan the CDR files in different home directory. If you don’t want to run the daemon as run, set the ACL to allow user cloudcdr can access the CDR files in different home directory
Support and License
- Please contact upinget.com for support and license
 UPINGET