Archive for the ‘TSAPI’ Category

Twilio WhatsApp Using Avaya CallBack

Posted: December 10, 2019 in News, TSAPI

Introduction

Using Twilio WhatsApp API to create a chat application is easy and powerful. In some scenarios, we need to enable the contact center to callback a customer using company’s hotline number with specific skillset of agent who has login to Avaya. The UPINGET ctiSVR has REST API which can integrate Twilio with Avaya for that particular callback scenario.

When you programming your WhatsApp chat application using the Twilio Studio, you can add a HTTP Request Widget and enter the REQUEST URL and parameters as following to integrate the ctiSVR which implements the callback function on the Avaya platform.

    • http://server:port/makecallbackcall?
    • With parameters
      • extension=xxxxx
      • destination={{trigger.message.From}}
      • callto=true
      • payload=json
      • duration=5
      • ctiToken=xxxxxxxxxx
    • The extension can be vdn, hunt group extension, agent extension or agent id
    • The destination is the mobile number which triggers the WhatsApp messages
    • The callto=true parameter tells ctiSVR to parse the destination number by configuration rules
    • The payload=json parameter tells ctiSVR to return HTTP payload in JSON format
    • The duration=5 parameter tells ctiSVR must return result in 5 seconds because it is function requirement of the Twilio HTTP Request
    • The ctiToken=xxxxxxxxxx enhance the security of ctiSVR because ctiSVR only makes call by valid token
    • Output variables
      • widgets.MY_WIDGET_NAME.parsed.result
        • The possible result is success or error
      • widgets.MY_WIDGET_NAME.parsed.error
        • The error message of the HTTP Request when the result is error
      • widgets.MY_WIDGET_NAME.parsed.callid
        • The call id of the call
      • widgets.MY_WIDGET_NAME.parsed.ucid
        • The UCID of the call
      • widgets.MY_WIDGET_NAME.parsed.phantom
        • The phantom device which makes the call
      • widgets.MY_WIDGET_NAME.parsed.answering
        • The Avaya answering device which the call is connected
      • widgets.MY_WIDGET_NAME.parsed.destination
        • The destination number after parsed by the ctiSVR

Introduction

The AutoBridge enables Home Agent solution for Avaya contact center. The tool monitors a pool of Avaya extensions in the contact center, it bridges Avaya and Asterisk extension/Mobile phone together whenever any of the Avaya extension has incoming or outgoing call. This enables home agent who is work from home can operate his/her CRM application via a VPN connection and speak to his/her customer using an Internet SIP phone/Mobile phone.

If you are using SIP phone, this solution required SIP trunks setup between the Avaya and Asterisk. Home agent using SIP phone (a hard SIP phone is preferred for better voice quality and easy of control) to connect to the Asterisk over the Internet. When the home agent login to ACD using his/her CRM application, the AutoBridge knows which Asterisk extension to be bridged with the Avaya extension that the agent is engaging in a call. The AutoBridge protects your existing Avaya investment, no modification of your CTI or CRM is required to implement the Home Agent solution.

On the agent side, please enable Auto Answer on your Mobile phone or SIP phone in order to make the bridge connection much faster.

See Also: AutoBridge for 911 Emergency Call

See Also: AutoBridge Supports Database Logging

Benefits

  • Centralized management of agent side numbers
  • PSTN/Mobile number and Asterisk SIP phones are supported
  • License cost is much lower

About AutoBridge Softphone

The AutoBridge Softphone enables agents to login or logoff ACD using browser from their home/company provided computer. Also, it provides call control functions for agents to communicate with their customers and the support departments over the Avaya trunks and company numbers.

  • Login/Logoff 

After enter the valid agent id, password and press the Login button, the AutoBridge selects one available station from the pool and performs the ACD login for the agent. The default work mode of the login is AUX state. Agent can change his state to Auto, Manual, ACW or AUX mode. For the AUX mode, agent can also specify AUX reason by select the reason description from drop down Reason Code menu. If agent press the Logout button, the AutoBridge then logoff the agent from ACD and release the station to the pool.

  • Call Control 

Since the AutoBridge connects the agent station and agent’s mobile/SIP phone by conference call, it can only provide limited call control functions for the agent. If the agent is engaging in a call, he/she can blind transfer/conference by clicking the Transfer or Conference button after he/she enters the telephone number or selects the speed dial number from the drop down Speed Dial menu. If the agent is not engaging in a call, he/she can make call to a customer by entering the telephone number and click the Call button. He can drop the call by clicking the Hangup button after conversation is finished.

Testing using Docker Image

Please follow this guide to test AutoBridge using Docker Container.

Windows Preparation and Password Encryption

  • An access MDB file which stored the CT username and password of AE server. For security reason, a tool called encryptpasswd.exe is provided to generate encrypted password for the installation and configuration of the software
  • Execute the program, generate the encrypted passwords for the CT user of AE server, then paste the encrypted password to parameter ab_tlink. For example, the encrypted password for “p@ssword” is “R3NIw1yJMLlnPFzEQtuh2A==”

Windows 64 bit System 

  • For 64 bit Windows system, please follow the steps below
    • Configure ODBC System DSN using 32 bit version of ODBC Admin tool.
      C:WindowsSysWOW64odbcad32.exe

Windows Installation  

  • Download the TSAPI client for Windows 32-bit from Avaya web site, it contains the library files. You need to register DevConnect before you can access the download page.
  • Download the AutoBridge zip file here.
  • Follow the steps below to install the software.
    • Extract all the files into directory c:\program files\autobridge
    • Open Windows Command Prompt, enter the following commands to register the program as Windows Service
      • cd c:\program files\autobridge
      • AutoBridge -i
      • sc description AutoBridge “Provides simple WFH functionss for Avaya CM”
    • Open ODBC Setting, create System DSN called AUTOBRIDGECFG for Microsoft Access Driver and point to autobridge.mdb which is located in the directory c:\program files\autobridge
    • Open the Access file, edit the value of parameters ab_tlink_01 and ab_tlink_02 to the TLINK of your AES servers in the tParameter table
    • Start the Windows Service AutoBridge
    • Telnet to localhost and port number 14022, enter username tcpgate and password tcpgate01 to access the program console
    • Enter the following command in the program console to add extensions
      • add extension 61101
      • Hint: 61101 is agent extension
    • Enter the following command in the program console to add ACD monitoring
      • add acd 51101
      • Hint: 51101 is ACD
    • Enter the following command in the program console to add phantom devices
      • add phantom 41101
      • Hint: 41101 is phantom device
    • Enter the following command in the program console to add mapping between Avaya and Asterisk extension
      • add autobridge 10001 4511001
      • Hint: 10001 is Avaya extension, 4511001 is dialing string from Avaya to the Asterisk extension
    • Enter the following command in the program console, you will receive debug information
      • trace on asc
    • Enter the following command in the program console, you will get the help message
      • help

RedHat/CentOS 7.x Installation Guide

  • centosredhat
  • The following is for RedHat/CentOS 7 (64 bit only), other Linux distributions are not supported
  • Avaya provides only 32bit version of TSAPI SDK, the AutoBridge executable is also a 32bit application
  • Login as root and execute the following commands
  • yum update
  • reboot
  • Install the MySQL 8.x
  • sudo rpm -Uvh https://dev.mysql.com/get/mysql80-community-release-el7-1.noarch.rpm
    sudo yum --enablerepo=mysql80-community install mysql-community-server
    sudo service mysqld start
    grep "A temporary password" /var/log/mysqld.log
    mysql_secure_installation
  • Install the following packages
  • yum install glibc.i686 libstdc++.i686 expat.i686 unixODBC.i686 openssl-libs.i686 telnet wget telnet
  • wget https://dev.mysql.com/get/Downloads/Connector-ODBC/8.0/mysql-connector-odbc-setup-8.0.22-1.el7.i686.rpm
    wget https://dev.mysql.com/get/Downloads/Connector-ODBC/8.0/mysql-connector-odbc-8.0.22-1.el7.i686.rpm
    yum install mysql-connector-odbc*
    ln -s /usr/lib/libmyodbc8a.so /usr/lib/libmyodbc5.so
  • Download Avaya Aura AE Services 8.1.3 TSAPI Client for RHEL 7 from DevConnect
  • chmod +x tsapi-client-linux-8.1.3-25.i386.bin
  • Execute the installation file tsapi-client-linux-8.1.3-25.i386.bin
    • ./tsapi-client-linux-8.1.3-25.i386.bin
  • Edit /usr/lib/tslibrc, change 127.0.0.1 to the IP address of your Avaya AES
  • Config and start MySQL
  • chkconfig mysqld on
  • service mysqld start
  • Create database and user
  • mysql -u root -p
  • create database autobridge;
  • create user 'tcpgate'@'localhost' identified by 'P@ssw0rd';
  • grant all on autobridge.* to 'tcpgate'@'localhost';
  • flush privileges;
  • quit
  • mysql -h localhost -u tcpgate -p autobridge < autobridge.sql
  • Copy the following to /etc/odbc.ini file
    • [AUTOBRIDGECFG]
      Description = MySQL connection to AutoBridge
      Driver = MySQL
      Server = localhost
      Port = 3306
      Database = autobridge
  • Create user and copy files
  • useradd upinget
  • mkdir /usr/local/autobridge
  • cp AutoBridge /usr/local/autobridge
  • chmod +x /usr/local/autobridge/AutoBridge
  • chown -R upinget.upinget /usr/local/autobridge
  • mkdir -p /var/log/autobridge
  • chown -R upinget.upinget /var/log/autobridge
  • Auto start the daemon after server reboot
  • echo "rm /tmp/autobridge.log" >> /etc/rc.local
  • echo "su upinget -c '/usr/local/autobridge/AutoBridge -u tcpgate -p 40UIt9O3PqtwsSn+Wx6pig=='" >> /etc/rc.local
  • chmod +x /etc/rc.local

CallAnalytics 2.0.9 Released

Posted: August 30, 2019 in News, TSAPI

CallAnalytics 2.0.9 just released, this version has the following updates.

1. Update the “origucid” field of callinfo object using the CSTA transfer event.
2. Update the “vdn” field for VDN callinfo object.
3. Add setuserdata REST API, the userdata, ucid or callid or uui as parameter.
4. The callinfo REST API supports hexucid as parameter. The hexucid can be HEX UUI sent to Asterisk in the SIP header.

ctiSVR Click to Call for SuiteCRM

Posted: January 12, 2019 in News, TSAPI

Introduction

A SuiteCRM module is developed to support Click to Call in SuiteCRM, this module is open source and the source code can be found in github.

Install SuiteCRM Click to Call Module 

  1. Download the module package from here
  2. Upload and install the module in SuiteCRM

Configure SuiteCRM Click to Call CTI

  • Administrator -> Admin -> SuiteCRM Click To Call -> Click to Call Configuration
  • Enter CTI IP Address and Port number of ctiSVR

Configure SuiteCRM User Extension 

  • User Profile -> SuiteCRM Click To Call -> CTI Extension
  • Enter the extension of the user

Click To Call  

Once the module is installed, a small telephone icon appeared next to any telephone number. Click on the telephone icon will trigger Click to Call feature of the module.

ctiSVR 1.2.11 Released

Posted: December 3, 2018 in News, TSAPI

ctiSVR 1.2.11 just released, this version has the following updates:

1. Supports secure WebSocket and secure RESTful interfaces.
2. Two parameters to load the certificate and key files, they are “ivr_sslcertfilename” and “ivr_sslkeyfilename”.
3. To further improve IT security, a parameter called “ivr_enabletoken” is added to enable token in the REST and WebSocket interfaces.

CallAnalytics 2.0.7 Released

Posted: November 13, 2018 in News, TSAPI

CallAnalytics 2.0.7 just released, this version has the following update.

1. Supports sending data to Splunk using HTTP Event Collector protocol.
2. Add listacdsplit REST interface.
3. Add callinfo REST interface by hex UUI parameter.
4. Supports sending of qacdsplit data to Splunk and database.
5. Add qtrunkgroup REST interface.
6. Supports sending of qtrunkgroup data to Splunk and database.

Introduction

There are two methods which allow Asterisk to get call information from Avaya, CallAnalytics and RouteManager are using in the two methods respectively.

CallAnalytics Method

The first method can be found from this Avaya documentation, the UCID is passing from Avaya to Asterisk using the SIP UUI header. By sending the UUI field as parameter to CallAnalytics, we can get the information details related to the call which is dialed from Avaya to Asterisk. The REST API of the CallAnalytics is http://IP.PORT/callinfo?hexucid=SIPHEADER_UUI

The SIP header under different call scenario is extracted and the REST API to the call information is provided for your reference.

Manual dial without using CTI
INVITE sip:52001@asterisk SIP/2.0
From: “E.50001” <sip:50001@upinget.com>;tag=042529099c9e914aab5cea912500
To: <sip:52001@asterisk>
Call-ID: 042529099c9e914bab5cea912500
CSeq: 1 INVITE
Max-Forwards: 71
Via: SIP/2.0/TCP 10.10.1.100;branch=z9hG4bK042529099c9e914cab5cea912500
Supported: 100rel,histinfo,join,replaces,sdp-anat,timer
Allow: INVITE,ACK,OPTIONS,BYE,CANCEL,SUBSCRIBE,NOTIFY,REFER,INFO,PRACK,PUBLISH,UPDATE
User-Agent: Avaya/R016x.03.3.256.0
Contact: “E.50001” <sip:50001@10.10.1.100;transport=tcp>
Route: <sip:10.10.1.200;transport=tcp;lr;phase=terminating>
Accept-Language: en
Alert-Info: <cid:internal@asterisk>;avaya-cm-alert-type=internal
Min-SE: 1200
P-Asserted-Identity: “E.50001” <sip:50001@upinget.com>
Record-Route: <sip:10.10.1.100;transport=tcp;lr>
Session-Expires: 1200;refresher=uac
User-to-User: 00FA080002175F5D676591;encoding=hex
Diversion: <sip:40001@upinget.com>;reason=”unknown”
Content-Type: application/sdp
Content-Length: 208

To get the call information of Avaya, using the CallAnalytics REST API
http://IP.PORT/callinfo?hexucid=00FA080002175F5D676591
or
http://IP.PORT/callinfo?hexucid=0002175F5D676591

Dial using CTI with User Specific data
INVITE sip:52001@asterisk SIP/2.0
From: “E.50001” <sip:50001@upinget.com>;tag=8090c4e399c9e9120ac5cea912500
To: <sip:52001@asterisk>
Call-ID: 8090c4e399c9e9121ac5cea912500
CSeq: 1 INVITE
Max-Forwards: 71
Via: SIP/2.0/TCP 10.10.1.100;branch=z9hG4bK8090c4e399c9e9122ac5cea912500
Supported: 100rel,histinfo,join,replaces,sdp-anat,timer
Allow: INVITE,ACK,OPTIONS,BYE,CANCEL,SUBSCRIBE,NOTIFY,REFER,INFO,PRACK,PUBLISH,UPDATE
User-Agent: Avaya/R016x.03.3.256.0
Contact: “E.50001” <sip:50001@10.10.1.100;transport=tcp>
Route: <sip:10.10.1.200;transport=tcp;lr;phase=terminating>
Accept-Language: en
Alert-Info: <cid:internal@asterisk>;avaya-cm-alert-type=internal
Min-SE: 1200
P-Asserted-Identity: “E.50001” <sip:50001@upinget.com>
Record-Route: <sip:10.10.1.100;transport=tcp;lr>
Session-Expires: 1200;refresher=uac
User-to-User: 00C816FC7C2215000000005D6766210ABB71D013EC00000009FA08000218085D676621;encoding=hex
Diversion: <sip:40001@upinget.com>;reason=”unknown”
Content-Type: application/sdp
Content-Length: 208

To get the call information of Avaya, using the CallAnalytics REST API
http://IP.PORT/callinfo?hexucid=00C816FC7C2215000000005D6766210ABB71D013EC00000009FA08000218085D676621
or
http://IP.PORT/callinfo?hexucid=000218085D676621
To update the user data to CallAnalytics or CTI middleware such as CtiSVR, using the CallAnalytics REST API
http://IP.PORT/setuserdata?userdata=41101234567890&uui=FC7C2215000000005D6766210ABB71D013EC00000009

Dial using CTI with ASCII data
INVITE sip:52001@asterisk SIP/2.0
From: “E.50001” <sip:50001@upinget.com>;tag=8024fa5a9ac9e9110ad5cea912500
To: <sip:52001@asterisk>
Call-ID: 8024fa5a9ac9e9111ad5cea912500
CSeq: 1 INVITE
Max-Forwards: 71
Via: SIP/2.0/TCP 10.10.1.100;branch=z9hG4bK8024fa5a9ac9e9112ad5cea912500
Supported: 100rel,histinfo,join,replaces,sdp-anat,timer
Allow: INVITE,ACK,OPTIONS,BYE,CANCEL,SUBSCRIBE,NOTIFY,REFER,INFO,PRACK,PUBLISH,UPDATE
User-Agent: Avaya/R016x.03.3.256.0
Contact: “E.50001” <sip:50001@10.10.1.100;transport=tcp>
Route: <sip:10.10.1.200;transport=tcp;lr;phase=terminating>
Accept-Language: en
Alert-Info: <cid:internal@asterisk>;avaya-cm-alert-type=internal
Min-SE: 1200
P-Asserted-Identity: “E.50001” <sip:50001@upinget.com>
Record-Route: <sip:10.10.1.100;transport=tcp;lr>
Session-Expires: 1200;refresher=uac
User-to-User: 04C809313233343536373839FA08000218EF5D6766E9;encoding=hex
Diversion: <sip:40001@upinget.com>;reason=”unknown”
Content-Type: application/sdp
Content-Length: 208

The ASCII data is 313233343536373839
To get the call information of Avaya, using the CallAnalytics REST API
http://IP.PORT/callinfo?hexucid=04C809313233343536373839FA08000218EF5D6766E9
or
http://IP.PORT/callinfo?hexucid=000218EF5D6766E9

Route Manager Method

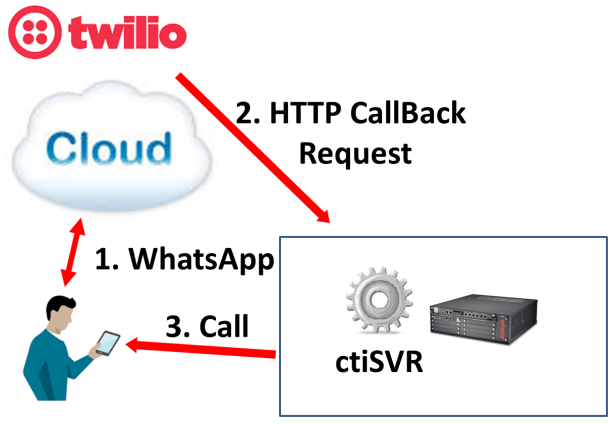
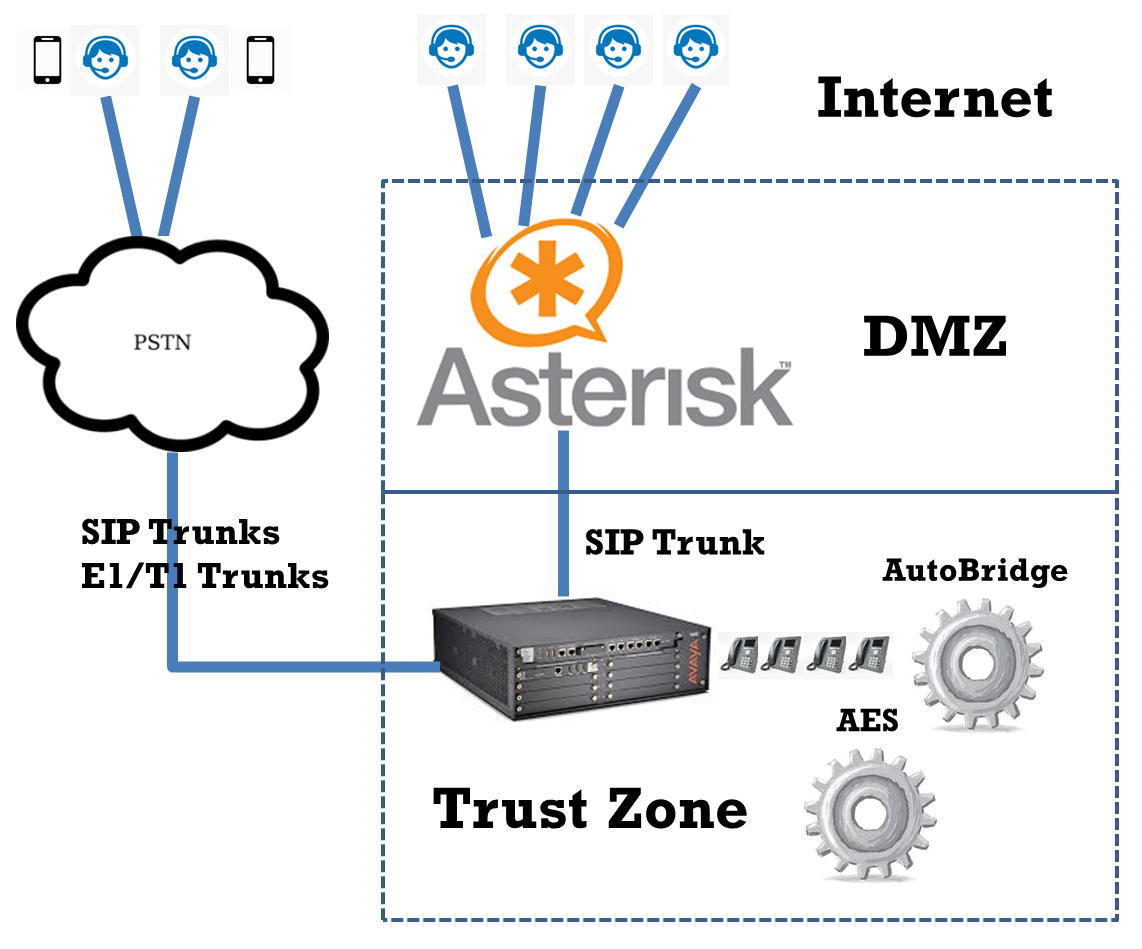
The second method is by Avaya Adjunct Routing. TSAPI UUI data can be passing to Asterisk by using of Avaya Adjunct Routing, this enables us to use Asterisk as IVR for call center environment. For example, many IVR applications such as Language Selection, Survey and PIN Verification can be implemented by the Asterisk. Our solution included using tools such is RouteMgr, callAnalytics, ctiSVR and uuiSVR, the architecture diagram is shown below.

The RouteMgr is for routing of incoming calls and creation of UUI data for Avaya and Asterisk integration. RouteMgr required advanced TSAPI license, it creates UUI data when the call has no attached UUI data and routes the call to destination based the routing configuration. Asterisk will see the UUI data in the SIP header, it can retrieve the call information which is in JSON format by sending REST command to callAnalytics. When Asterisk wants to transfer the call to Agent, it can update the user data with the same UUI by sending REST command to ctiSVR. Once call is transferred to Agent, the Agent softphone which has connection to AES will receive the call event with the UUI, the user data can be obtained by sending REST command to ctiSVR.

Avaya Monitoring Tool

Posted: June 10, 2018 in System Monitoring, TSAPI

Introduction

This tool uses Avaya TSAPI library and CM OSSI API, it monitors Avaya resources such as Trunk groups, Hunt groups and Test numbers. When default conditions such as Trunk group member, Hunt group member becomes ZERO or the Test number is unreachable, it sends notification emails to your administrators. Some triggers such as Skill Login or Logout can be executed right after such condition occurred. This tool also provides high level testers such as Line Tester and Recorder Tester for the contact center. The Line Tester is for testing of IVR circuits one by one. The Recorder Tester makes calls on behalf of agent extensions, voice recording will be triggered for these agent extensions so you can verify the healthiness of voice recording system before the operating hours of your call center. The tool can integrate with Nagios so you can monitor the Avaya resources in Nagios.

Testing using Docker Image

Please follow this guide test AvayaMonitor using Docker Container.

Preparation and Password Encryption

  • The access MDB file stored the the username and password of Avaya AE server for this tool. For security reason, a tool called encryptpasswd.exe is provided to generate an encrypted password for the installation and configuration of the software
  • Execute the program, generate the encrypted password for the user of Avaya AE server for this tool, then paste the encrypted password to a parameter called tm_tlink_01. For example, the encrypted password for “p@ssword” is “R3NIw1yJMLlnPFzEQtuh2A==”
  • encryptpasswd

64 bit Windows System 

  • For 64 bit Windows system, please follow the steps below
    • Configure ODBC System DSN using ODBC Data Sources (64-bit)
    • Configure the Windows firewall if you configure the tool to support Nagios monitoring

Windows Installation

  • Download the TSAPI client for Windows 64-bit from Avaya web site, it contains the library files.
  • Download the Avaya Monitoring Tool zip file here.
  • Follow the installation steps below to install the software.
    • Extract all the files into directory c:\program files\avayamonitor
    • Open Windows Command Prompt using Administrator right, enter the following commands to register the program as Windows Service
      • cd c:\program files\avayamonitor
      • AvayaMonitor64 -i
      • sc description AvayaMonitor64 “Provides monitoring function for Avaya CM using AES”
    • Execute the accessdatabaseengine_X64.exe if the system has no 64-bit Access Database Driver installed
    • Open 64-bit ODBC Setting, create System DSN called AVAYAMONITORCFG for Microsoft Access Driver and point the DB to avayamonitor.mdb which is located in the directory c:\program files\avayamonitor
    • Start the Windows Service AvayaMonitor64
    • Telnet to localhost and port number 14008, enter username tcpgate and password tcpgate01 to access the program console
    • Enter the following command to run configuration setup
      • setup
      • setup ossi
      • setup email
    • After setup, restart the AvayaMonitor64 Service again
    • Telnet to localhost and port number 14008, enter username tcpgate and password tcpgate01 to access the program console
    • Enter the following command to add trunk group monitoring
      • add trunk 412 24 name
      • Hint: 412 is trunk access code (TAC), provide a name so you can identify it easily
      • Hint: 24 is the number of member of the trunk
    • Enter the following command to add IVR split monitoring
      • add ivrsplit 12345 name
      • Hint: 12345 is split number for IVR, provide a name so you can identify it easily
      • Hint: when the number of login agent is ZERO, alert email will be sent
    • Enter the following command to add Agent split monitoring
      • add agentsplit 12346 name
      • Hint: 12346 is split number for Agent, provide a name so you can identify it easily
      • Hint: when the number of login agent is ZERO and there is call in QUEUE, alert email will be sent
    • Enter the following command to monitor queue size of split
      • add splitqueue 12345 10 name 
      • Hint: 12345 is split number for IVR or Agent
      • Hint: when the call queue size > threshold value (e.g. 10), an alert email will be sent
    • Enter the following command to add Emergency split (or called Control split) monitoring
      • add emergencysplit 12347 name
      • Hint: 12347 is Emergency split, provide a name so you can identify it easily
      • Hint: when the number of login agent is > ZERO, alert email will be sent
    • Enter the following commands for test number monitoring
      • add phantom 12345
      • Hint: 12345 is phantom device which is used for call dialing
      • add testnumber 912345678 description
      • Hint: phantom device 12345 will be used and the number 912345678 will be dialed at interval that specify by parameter tm_schedulerinterval
    • Enter the following command in the program console to add your email address
      • add email youremail@company.com
      • Hint: replace your email address please
    • Enter the following command in the program console, you will receive debug information.
      • trace on asc
    • Enter the following command in the program console, you will get the help message
      • help

Uninstallation

  • Stop the Window Service AvayaMonitor64
  • Open Windows Command Prompt, enter the following commands to uninstall the program from Windows Service
    • cd c:\program files\avayamonitor
    • AvayaMonitor64 -u

RedHat/CentOS 7.x Installation Guide

  • centos
  • The following is for RedHat/CentOS 7 (64 bit only), other Linux distributions are not supported
  • Avaya provides only 32bit version of TSAPI SDK, the AvayaMonitor executable is also a 32bit application
  • Login as root and execute the following commands
  • yum update
  • reboot
  • Install the MySQL 8.x
  • sudo rpm -Uvh https://dev.mysql.com/get/mysql80-community-release-el7-1.noarch.rpm
    sudo yum --enablerepo=mysql80-community install mysql-community-server
    sudo service mysqld start
    grep "A temporary password" /var/log/mysqld.log
    mysql_secure_installation
  • Install the following packages
  • yum install glibc.i686 libstdc++.i686 expat.i686 unixODBC.i686 openssl-libs.i686 telnet wget telnet
  • wget https://dev.mysql.com/get/Downloads/Connector-ODBC/8.0/mysql-connector-odbc-setup-8.0.22-1.el7.i686.rpm
    wget https://dev.mysql.com/get/Downloads/Connector-ODBC/8.0/mysql-connector-odbc-8.0.22-1.el7.i686.rpm
    yum install mysql-connector-odbc*
    ln -s /usr/lib/libmyodbc8a.so /usr/lib/libmyodbc5.so
  • Download Avaya Aura AE Services 8.1.3 TSAPI Client for RHEL 7 from DevConnect
  • chmod +x tsapi-client-linux-8.1.3-25.i386.bin
  • Execute the installation file tsapi-client-linux-8.1.3-25.i386.bin
    • ./tsapi-client-linux-8.1.3-25.i386.bin
  • Edit /usr/lib/tslibrc, change 127.0.0.1 to the IP address of your Avaya AES
  • Config and start MySQL
  • chkconfig mysqld on
  • service mysqld start
  • Create database and user
  • mysql -u root -p
  • create database avayamonitor;
  • create user 'tcpgate'@'localhost' identified by 'P@ssw0rd';
  • grant all on avayamonitor.* to 'tcpgate'@'localhost';
  • flush privileges;
  • quit
  • mysql -h localhost -u tcpgate -p avayamonitor <avayamonitor.sql
  • Copy the following to /etc/odbc.ini file
    • [AVAYAMONITORCFG]
      Description = MySQL connection to AvayaMonitor
      Driver = MySQL
      Server = localhost
      Port = 3306
      Database = avayamonitor
  • Create user and copy files
  • useradd upinget
  • mkdir /usr/local/avayamonitor
  • cp AvayaMonitor /usr/local/avayamonitor
  • chmod +x /usr/local/avayamonitor/AvayaMonitor
  • chown -R upinget.upinget /usr/local/avayamonitor
  • mkdir -p /var/log/avayamonitor
  • chown -R upinget.upinget /var/log/avayamonitor
  • Auto Start the daemon after server reboot
  • echo "rm /tmp/avayamonitor.log" >> /etc/rc.local
  • echo "su ctisvr -c '/usr/local/avayamonitor/AvayaMonitor -u tcpgate -p 40UIt9O3PqtwsSn+Wx6pig=='" >> /etc/rc.local
  • chmod +x /etc/rc.local

Triggers ACD Login/Logout When Check Error

  • Enter the following command to implement skill trigger for a monitored number
    • genpass
      • Hint: use the genpass command to generate an encrypted password for acd login
    • add skilltrigger 912345678 66001 55001 oKd75RltJLcf+uXkp2CYHA== login
      • Hint: 912345678 is the monitoring number resource, it can be trunk group, ivr split, agent split or test number
      • Hint: 66001 is an extension number for ACD login or logout
      • Hint: 55001 is an agnt ID for ACD login or logout
      • Hint: oKd75RltJLcf+uXkp2CYHA== is encrypted password, use that one generated by genpass command
      • Hint: login means ACD login when error occurred, logout means ACD logout when error occurred

Triggers Call Transfer to Announcement Message When Check Error

  • Enter the following command to implement transfer trigger for a monitored number
    • add transfertrigger 912345678 987654321 10001 10002 Comment
      • Hint: 912345678 is the monitoring number resources, it can be hunt group, ivr split, agent split or testing number
      • Hint: 987654321 is the dialed number when error or resume happened
      • Hint: 10001 is an announcement number for error condition
      • Hint: 10002 is an announcement number for resume condition

Triggers Make Call and Sends DTMF Pattern 

  • Enter the following command to implement dtmf trigger for a monitored number
    • add dtmf 0 1 5 123
    • add dtmf 0 2 6 999
      • Hint: dtmf parttern 0 has two steps, step 1 wait 5 seconds and sends DTMF 123, step 2 waits 6 seconds and sends DTMF 999
    • add dtmftrigger 912345678 987654321 0 1 Comment 
      • Hint: 912345678 is the monitoring number resources, it can be hunt group, ivr split, agent split or testing number
      • Hint: 987654321 is the dialed number when error or resume happened
      • Hint: 0 is the dtmf pattern for error condition
      • Hint: 1 is the dtmf pattern for resume condition

Triggers RESTful API 

Line Tester Feature 

  • Enter the following command to add a line tester job
    • add ltjob 1 apple 7 8 
      • add a line tester job called apple, start dialing from 7:00am and end at 8:00am
  • Enter the following command to add internal stations for testing
    • add ltstation 1 12345 
      • add one station to the job
    • bulkadd ltstation 1 12345 12350
      • add the range of stations to the job

Recorder Tester Feature 

  • Enter the following command to add a recorder tester job
    • add rtjob 1 orange 12345 5 6 
      • add a recorder test job called orange, start dialing announcement 12345 from 5:00am and end at 6:00am
  • Enter the following command to add agent stations for testing
    • add rtstation 1 40001
      • add one station to the job
    • bulkadd rtstation 1 40001 40005 
      • add the range of stations to the job

Answer Call Tester Feature 

  • Enter the following command to add a answer call tester job
    • add answerjob 1 orange 5 6  12345 54321
      • add a answer call test job called orange, start the job from 5:00am to 6:00am, call number 12345 and expected answered by 54321

Nagios XI Integration

AvayaMonitor can integrate with Nagios by REST interface. Nagios XI is free when the number of monitoring host less than 7 and it is a good tool when using it to monitor Avaya objects such as Trunk, IVR splits, Agent splits and Hotline numbers. The following is the procedure to install and configure Nagios XI on the AvayaMonitor CentOS solution.

  • Follow this guide to install Nagiox XI
  • Install the following package on AvayaMonitor CentOS server
    • yum install perl-JSON
    • yum install perl-Nagios-Plugin
      • For latest version of Nagios XI OVA image, to fix the missing of perl-Nagios-Plugin by the following command
        • yum install nagios-plugins-perl
      • For latest version of Nagios XI OVA  image, to fix the missing of Monitoring::Plugin perl module by the following command
        • cpan install Monitoring::Plugin
  • Follow this guide to install check_json.pl plugin
  • Once the plugin is added, add the following commands in Nagios
    • check_trunk
      • Command Name
        • check_trunk
      • Command Line
        • $USER1$/check_json.pl --url 'http://$HOSTADDRESS$:5200/trunk?tac=$ARG1$' --attributes '{utilization}' --warning @$ARG2$ --critical @$ARG3$ --perfvars 'utilization' --outputvars 'message'
      • Command Type
        • check command
      • Active
        • checked
    • check_ivrsplit
      • Command Name
        • check_ivrsplit
      • Command Line
        • $USER1$/check_json.pl --url 'http://$HOSTADDRESS$:5200/ivrsplit?split=$ARG1$' --attributes '{utilization}' --warning @$ARG2$ --critical @$ARG3$ --perfvars 'utilization' --outputvars 'message'
      • Command Type
        • check command
      • Active
        • checked
    • check_agentsplit
      • Command Name
        • check_agentsplit
      • Command Line
        • $USER1$/check_json.pl --url 'http://$HOSTADDRESS$:5200/agentsplit?split=$ARG1$' --attributes '{utilization}' --warning @$ARG2$ --critical @$ARG3$ --perfvars 'utilization' --outputvars 'message'
      • Command Type
        • check command
      • Active
        • checked
    • check_number
      • Command Name
        • check_number
      • Command Line
        • $USER1$/check_json.pl --url 'http://$HOSTADDRESS$:5200/testnumber?number=$ARG1$' --attributes '{failure}' --warning @$ARG2$ --critical @$ARG3$ --perfvars 'failure' --outputvars 'message'
      • Command Type
        • check command
      • Active
        • checked
    • check_cmaesvcsctilink
      • Command Name
        • check_cmaesvcsctilink
      • Command Line
        • $USER1$/check_json.pl --url 'http://$HOSTADDRESS$:5200/cmaesvcsctilink?ctilink=$ARG1$' --attributes '{alarmvalue}' --warning @$ARG2$ --critical @$ARG3$ --perfvars 'alarmvalue' --outputvars 'message'
      • Command Type
        • check command
      • Active
        • checked
    • check_cmprocessorchannels
      • Command Name
        • check_cmprocessorchannels
      • Command Line
        • $USER1$/check_json.pl --url 'http://$HOSTADDRESS$:5200/cmprocessorchannels?channelnumber=$ARG1$' --attributes '{alarmvalue}' --warning @$ARG2$ --critical @$ARG3$ --perfvars 'alarmvalue' --outputvars 'message'
      • Command Type
        • check command
      • Active
        • checked
    • check_endpointregister
      • Command Name
        • check_endpointregister
      • Command Line
        • $USER1$/check_json.pl --url 'http://$HOSTADDRESS$:5200/endpointregister?groupname=$ARG1$' --attributes '{percentoutofservice}' --warning @$ARG2$ --critical @$ARG3$ --perfvars 'percentoutofservice' --outputvars 'message'
      • Command Type
        • check command
      • Active
        • checked
  • Then add your services one by one, for example
  • After the services were added, you can see the status of the services in the Nagios view

License 

btn_buynowCC_LG_wCUP

ctiSVR 1.2.10 Released

Posted: April 26, 2018 in News, TSAPI

ctiSVR 1.2.10 just released, this version has the following updates:

1. Change TSAPI event notification method from acsSetESR to acsEventNotify.
2. calltoui.exe supports Microsoft Dynamic CRM generic listener adapter.
3. calltoui.exe supports parameterized URL for inbound call solution.
4. Recompile Linux distribution to fix potential segmentation fault caused by strtok function.

CallAnalytics 2.0.6 Released

Posted: February 12, 2018 in News, TSAPI

CallAnalytics 2.0.6 just released. This release has the following updates

1. Fixed a minor bug without releasing device in the Splunk and databaes logging.
2. Added a REST interface to query call answer extensions.
3. Fixed a bug to prevent multi-threading dead locking.