4 Oct 2014, clintSVR 1.2.1 just released. The release supports logging of all real time reports to database, you can get the real time data easily by querying the database directly. This release also fixed some minor bugs, please refer to the readme.txt file for detail information.
Introduction

The bcmsSVR is similar to clintSVR, it is a gateway program for the access of real-time BCMS, historical BCMS and other reports from Avaya CM. It also provides API interfaces for the development of call centre reports and wallboard applications. The bcmsSVR retrieves BCMS and other reports at an interval that is specified by you, it stores the real-time and historical data in the database, Splunk, Kafka and memory which enables multiple programs to access the data via REST query API, OCX and C/C++ DLL interfaces. The data is presented in XML or JSON format, and the following reports and interfaces are supported:
- REST query API to get real-time and historical reports
- Integrated with ctiSVR for real-time reports with AUX reason codes
- C++ interface header, library and DLL files are provided
- OCX interface for VB or ASP.net programming
- Supports XMPP connection so bcmsSVR can connect to XMPP servers such as Openfire
- Supports logging of report data to Splunk
- Supports logging of report data to Kafka
- Supports logging of report data to MSSQL, MySQL and Oracle database
- Supports the following real-time and historical BCMS reports
- monitor bcms split
- monitor bcms split SLA
- monitor bcms split status (REST and database logging only, required CtiSVR license to support Reason Code)
- monitor bcms split agent stats (REST and database logging only, required CtiSVR license to support Reason Code)
- monitor bcms system
- monitor bcms vdn
- list bcms split
- list bcms split day
- list bcms vdn
- list bcms vdn day
- list bcms agent
- list bcms agent day
- list bcms trunk
- list bcms trunk day
- list bcms summary split
- list bcms summary spliti day
- list bcms summary vdn
- list bcms summary vdn day
- list bcms summary agent
- list bcms summary agent day
- list bcms summary trunk
- list bcms summary trunk day
- Provides API for the following commands
- status trunk
- display variables
- change variables
- display alarms
- change agent password
- display agent
- list measurements hunt-group last-hour
- list measurements hunt-group yesterday-peak
- list measurements hunt-group today-peak
- list measurements trunk-group hourly
- list measurements trunk-group summary last-hour
- list measurements trunk-group summary yesterday-peak
- list measurements trunk-group summary today-peak
- change agent basic information
- add agent
- change agent
- change agent basic
- change agent password
- remove agent
- add agent skills
- delete agent skills
- update agent skills
- add hunt-group member
- delete hunt-group member
- list station
- list agent
- list hunt
- list vdn
- list trunk
- list history
- list multimedia ip-stations
- list media-gateway
- status media-gateways
- display capacity
- status hunt-group
- add hunt-group member
- delete hunt-group member
- monitor traffic trunk-groups
- Supported OS
- Windows
- CentOS / RedHat
- Ubuntu
- Debian
- Free Tool using bcmsSVR
See Also: clintSVR / CMS Real Time Data
See Also: Call Analytics
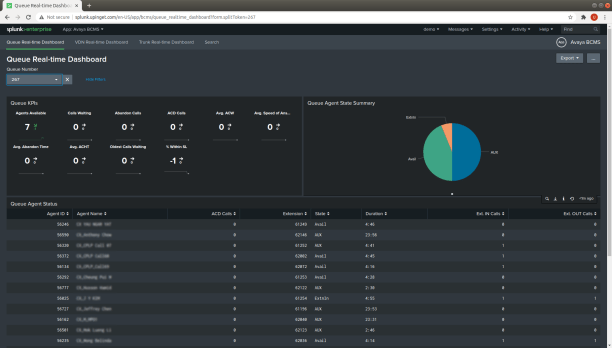
See Also: Splunk App Avaya BCMS
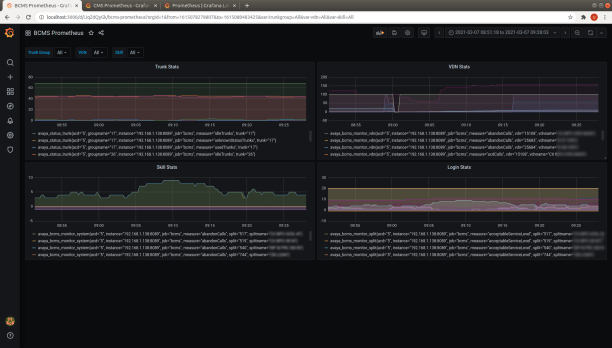
See Also: Using Grafana to Monitor Avaya Call Center

See Also: Integration with Grafana and Prometheus using Metrics API
Preparation and Password Encryption
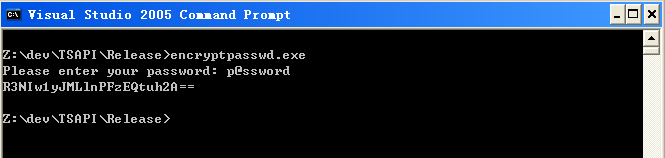
- The access MDB file stored username and password used by the bcmsSVR program. For security reason, a tool called encryptpasswd.exe is provided to generate encrypted password for the installation and configuration of the software.
- Execute the program, generate the encrypted password for the user of Avaya CM server, then use the encrypted password when you add ACD object in the program console. For example, the encrypted password for “p@ssword” is “R3NIw1yJMLlnPFzEQtuh2A==”

64 bit Windows System
- For 64 bit Windows system, please follow the steps below
- Configure ODBC System DSN using C:\Windows\SysWOW64\odbcad32.exe
- Stop the Windows firewall because it enables by default and we don’t have time to figure out what ports are required to be opened, you need to find it out yourself. BcmsSVR uses TCP port 14017 for telnet console, enable it in firewall so you can configure the program remotely.
Testing using Docker Image
Please follow this guide to BcmsSVR using Docker Container.
Testing using OVA File

We have created a OVA file which you can deploy it to VirtualBox or VMware Workstation or Player for testing. After deploying the OVA file, please modify the following for your own environment
- Reference this guide to delete the file /etc/udev/rules.d/70-persistent-net.rules
- Change the MAC address and IP address of the VM in the file /etc/sysconfig/network-scripts/ifcfg-eth0
- Telnet to bcmsSVR console port 14017, update parameters for your environment
- Once the changes are completed, reboot the VM
The username and password of the OVA VM is
- OS : root/P@ssw0rd
- MySQL: root/P@ssw0rd
- bcmsSVR console: tcpgate/tcpgate01
- Splunk URL: http://newIP:8000/
Installation
- We have recorded a video for Windows 2012 64bit, please watch the video before the installation
- Download the bcmsSVR zip file here or backup site.
- Follow the steps below to install the software.
- Extract all the files into directory c:\program files\bcmsSVR
- Open Windows Command Prompt, enter the following commands to register the program as Windows Service, you need to run command prompt as Administrator when you run Windows 7 or above
- cd c:\program files\bcmsSVR
- bcmsSVR -i
- sc description bcmsSVR “Provides BCMS real-time and historical functions for Avaya CM”
- Open ODBC Setting, create a System DSN called BCMSSVRCFG for Microsoft Access Driver and select bcmsSVR.mdb which is located in the directory c:\program files\bcmsSVR
- Start the Windows Service bcmsSVR
- Telnet to localhost and port number 14017, enter username tcpgate and password tcpgate01 to access the program console
- Enter the following command to add an acd object
- add acd 1 10.2.10.100 5023 username encrypted_password pin|NULL name false
- Hint: Add an ACD object which the IP address is 10.2.10.100, port 5023 and not using SSH connection
- Hint: bcmsSVR can manage multiple ACD objects
- Hint: For security reason, some user configuration come with pin. If your user account has no pin, type NULL there
- Hint: For SSH connection, set the last parameter to true
- To turn on trace, enter the following command
- trace on asc
- To get help message, enter the following command
- help
Add Reports
- Start from version 2.0.0, the command to add bcms report is prefix with “bcms” which is used to distinguish with other reports
- You can get real time and historical report data by Report Agents or get the data via the supported API interfaces. When you add a Report Agent, the data will be pulled from Avaya CM, then pushed to Splunk and database at an interval that specified by you. When the data has imported to Splunk, you can use Splunk to make customized reports and dashboards. You can also access the stored real time and historical data from the database directly.
- Telnet to the IP and port number 14017 where bcmsSVR is installed, enter username tcpgate and password tcpgate01 to access the program console
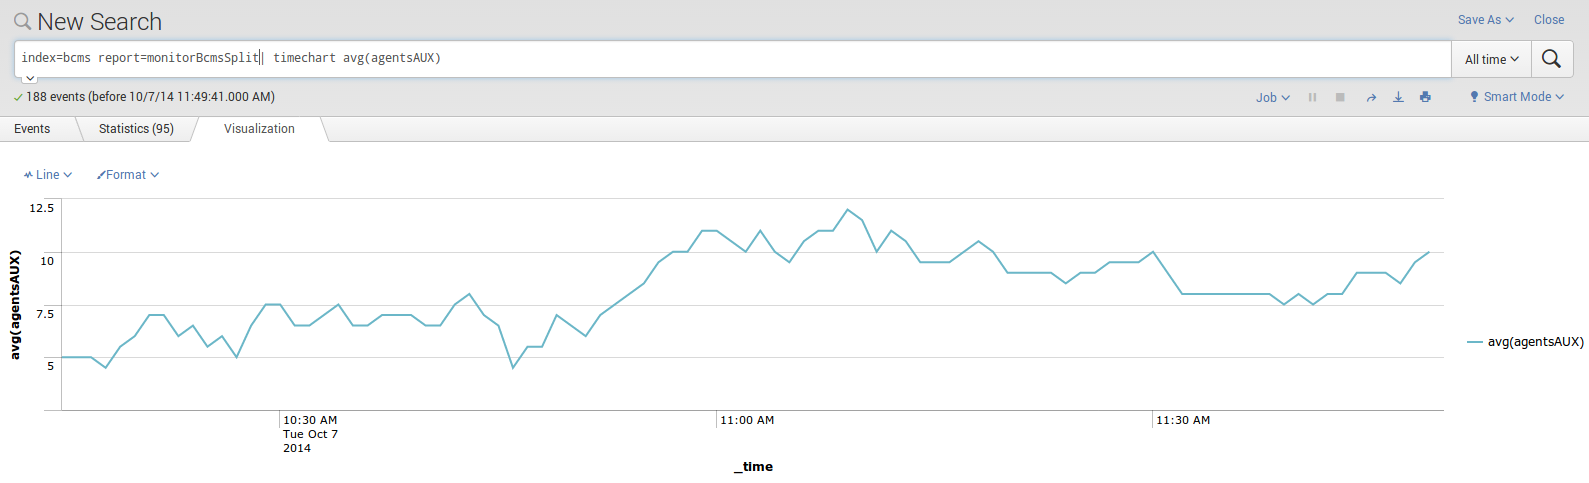
- To add “monitor bcms split” report, enter the following command
- add bcmsmonitorsplit 1 640 10 split_640
- add bcmsmonitorsplit 1 129;640 10 twosplits
- Hint: 1 is ACD number
- Hint: 640 is split/skill number
- Hint: 10 is refresh rate in seconds, the minimum refresh rate is 3 seconds
- Hint: split_640 is a description
- Hint: bcmsSVR will push the “monitor bcms split” report data to Splunk and database every 10 seconds
- Hint: bcmsSVR will keep a copy of the report data in memory as cache, if access the data within bcms_cache_timeout period, the cache data will be provided, this design reduce the loading to Avaya CM
- Hint: each object is separated by “;” for multiple objects monitoring
- To add “monitor bcms system” report, enter the following command
- add bcmsmonitorsystem 2 all 10 allsplits
- Hint: real time data of all splits in ACD 2 will be pushed to Splunk and database every 10 seconds. Since no split number is provided, split name will be pushed into Splunk and database
- add bcmsmonitorsystem 2 129;640 10 twosplits
- Hint: real time data of two splits 129 and 640 will be pushed to Splunk and database every 10 seconds
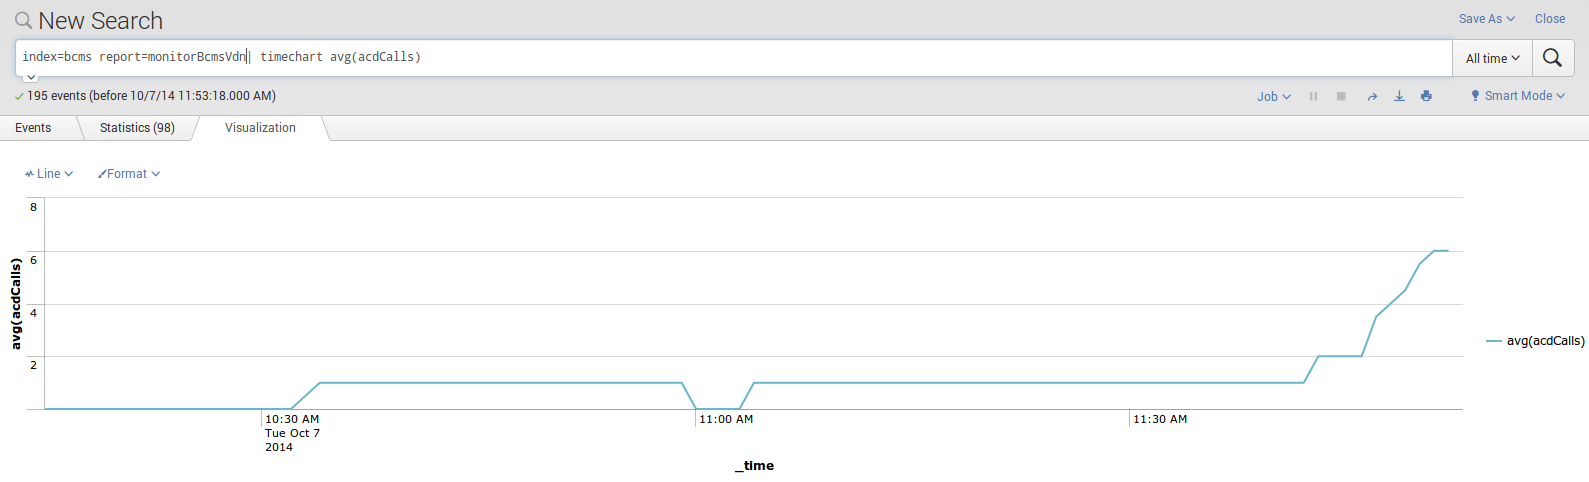
- To add “monitor bcms vdn” report, enter the following command
- add bcmsmonitorvdn 3 10800;10801 10 twovdns
- Hint: real time data of vdns 10800 and 10801 in ACD 3 will be pushed to Splunk and database every 10 seconds
- To ad “status trunk” report, enter the following command
- add statustrunk 3 26 10 trunk_26
- add statustrunks 3 26;27 10 twotrunks
- Hint: real time data of trunk 26 in ACD 3 will be pushed to Splunk and database every 10 seconds
- Hint: each object is separated by “;” for multiple objects monitoring
- To add “list bcms split” report, enter the following command
- add bcmslistsplit 4 640 300 listsplit_640
- Hint: historical report about split 640 in ACD 4 will be pushed to Splunk and database every 5 minutes
- To add “list bcms split day” report, enter the following command
- add bcmslistsplitday 4 640 300 listsplit_640_day
- Hint: historical report about split 640 daily in ACD 4 will be pushed to Splunk and database every 5 minutes
- To add “list bcms vdn” report, enter the following command
- add bcmslistvdn 5 10800 300 listvdn_10800
- Hint: historical report about vdn 10800 in ACD 5 will be pushed to Splunk and database every 5 minutes
- To add “list bcms vdn day” report, enter the following command
- add bcmslistvdnday 5 10800 300 listvdn_10800_day
- Hint: historical report about vdn 10800 daily in ACD 5 will be pushed to Splunk and database every 5 minutes
- To add “list bcms agent” report, enter the following command
- add bcmslistagent 6 40004 300 listagent_40004
- Hint: historical report about agent 40004 in ACD 6 will be pushed to Splunk and database every 5 minutes
- To add “list bcms trunk” report, enter the following command
- add bcmslisttrunk 6 26 300 listtrunk_26
- Hint: historical report about trunk 26 in ACD 6 will be pushed to Splunk and database every 5 minutes
- To add “display variables” report, enter the following command
- add displayvariables 7 all 10 allvariables
- Hint: all variables in ACD 7 will be pushed to Splunk and database every 10 seconds
- To add “list bcms summary split” report, enter the following command
- add bcmslistsummarysplit 4 640 300 listsummarysplit_640
- Hint: historical report about split 640 in ACD 4 will be pushed to Splunk and database every 5 minutes
- To add “list bcms summary vdn” report, enter the following command
- add bcmslistsummaryvdn 5 10800 300 listsummaryvdn_10800
- Hint: historical report about vdn 10800 in ACD 5 will be pushed to Splunk and database every 5 minutes
- To add “list bcms summary agent” report, enter the following command
- add bcmslistsummaryagent 6 40004 300 listsummaryagent_40004
- Hint: historical report about agent 40004 in ACD 6 will be pushed to Splunk and database every 5 minutes
- To add “list bcms summary trunk” report, enter the following command
- add bcmslistsummarytrunk 6 26 300 listsummarytrunk_26
- Hint: historical report about trunk 26 in ACD 6 will be pushed to Splunk and database every 5 minutes
- To add “list measurements hunt-group last-hour” report, enter the following command
- add listmeashuntgroup 1 lasthour 300 last-hour
- Hint: Last hour hunt group measurements in ACD 1 will be pushed to Splunk and database every 5 minutes
- To add “list measurements hunt-group yesterdaypeak” report, enter the following command
- add listmeashuntgroup 1 yesterdaypeak 300 yesterday-peak
- Hint: Yesterday peak hunt group measurements in ACD 1 will be pushed to Splunk and database every 5 minutes
- To add “list measurements hunt-group todaypeak” report, enter the following command
- add listmeashuntgroup 1 todaypeak 300 today-pea
- Hint: Today peak hunt group measurements in ACD 1 will be pushed to Splunk and database every 5 minutes
- To add “list agent” report, enter the following command
- add listagent 1 3600 list_agent_every_hour
- Hint: dump the data from command “list agent” for ACD 1 to database every hour
- To add “list station” report, enter the following command
- add liststation 1 3600 list_station_every_hour
- Hint: dump the data from the command “list station” for ACD 1 to database every hour
- To add “list vdn” report, enter the following command
- add listvdn 1 3600 list_vdn_every_hour
- Hint: dump the data from the command “list vdn” for ACD 1 to database every hour
- To add “list trunk” report, enter the following command
- add trunk 1 3600 list_trunk_every_hour
- Hint: dump the data from the command “list trunk” for ACD 1 to database every hour
- To add “list history” report, enter the following command
- add listhistory 1 3600 list_history_every_hour
- Hint: dump the data from command “list history” for ACD 1 to database every hour
- To add “list multimedia ip-stations” report, enter the following command
- add multimediaipstations 1 3600 list_multimedia_ip_stations_every_hour
- HInt: dump the data from the command “list multimedia ip-stations” for ACD 1 to database every hour
- To add “list media-gateway” report, enter the following command
- add listmediagateway 1 3600 list_mediagateway_every_hour
- HInt: dump the data from the command “list media-gateway” for ACD 1 to database every hour
Logging Report Data to Database
- Start from version 2.0.0, the tables for bcms report is prefix with “bcms” which is used to distinguish with other reports
- The following SQL commands and screen dump are example for MySQL
- Create database and user
-
mysql -u root -p
-
create database bcms; -
create user 'tcpgate'@'localhost' identified by 'tcpgate'; -
grant all on bcms.* to 'tcpgate'@'localhost'; -
flush privileges; -
quit; -
mysql -h localhost -u tcpgate -p bcms < bcms.sql - Open ODBC Setting, create a System DSN called BCMSSVRDBCFG for MySQL database. The following screen dump is for Windows installation

- Copy the following to /etc/odbc.ini for CentOS installation
- [BCMSSVRDBCFG]
Description = MySQL connection to bcmsSVR DB
Driver = MySQL
Server = localhost
Port = 3306
Database = bcms
- [BCMSSVRDBCFG]
- Edit the following parameters for report data database logging
- bcms_db_dsn
- Hint: The ODBC System DSN, enter the value is BCMSSVRDBCFG
- bcms_db_username
- Hint: The username used to connect the database
- bcms_db_passwd
- Hint: The encrypted password of the database user
- bcms_db_table
- Hint: One of the table that holds the bcms data, enter the default value tBcmsMonitorSplit
- bcms_db_errfile
- Hint: The error file for SQL statements when db error occurred. The default value is bcms_err.txt
- bcms_errorreportinterval
- Hint: The error report interval, the default value is 900 seconds (15 minutes)
- bcms_db_sqltype
- Hint: Currently mysql, mssql and oracle are supported
- bcms_db_allreport
- Hint: Set it to true if you want all report data are sent to database. Set it to false if you want to control it by “add dbreport” command
- bcms_db_dsn
- You can find the real time and historical data in database directly

Uninstallation
- Stop the Window Service bcmsSVR
- Open Windows Command Prompt, enter the following commands to uninstall the program from Windows Service
- cd c:\program files\bcmsSVR
- bcmsSVR -u
Kafka Integration
- Change the following parameters in order to have integration with Kafka
- update parameter bcms_kafkabroker 192.168.1.101:32770,192.168.1.102:32770
- Hint: Multiple brokers are separated by comma
- update parameter bcms_kafkatopic bcms
- Hint: Set the default topic for payload data sent to Kafka
- update parameter bcms_kafkabroker 192.168.1.101:32770,192.168.1.102:32770
- You can add more Kafka broker by the following command
- add kafkabroker 192.168.1.103:32770
- You can map each report type to different Kafka topic
- add kafkatopic bcmsmonitorsystem bcms.monitor
- Hint: For bcmsmonitorsystem reports, the topic bcms.monitor will be used
- add kafkatopic bcmsmonitorsystem bcms.monitor
- If you want to set Kafka configuration properties, you can use the following command
- add kafkaconfig security.protocol sasl_plaintext
- add kafkaconfig sasl.password 40UIt9O3PqtwsSn+Wx6pig== true
- Hint: Your data is stored in the bcmsSVR configuration database, therefore encryption is required for sensitive information
CentOS 6.x Installation Guide
- The following is for CentOS 6 only
- The executable file for 32bit version is “bcmsSVR” and the 64bit version is “bcmsSVR64”, copy and use the correct file please
- Install the following packages
- Follow this guide to install Kafka library for bcmsSVR version >= 2.1.0
-
yum install mysql-server mysql -
yum install mysql-connector-odbc unixODBC -
wget http://download.fedoraproject.org/pub/epel/6/x86_64/epel-release-6-8.noarch.rpm
-
rpm -ivh epel-release-6-8.noarch.rpm
-
yum install libssh
- Config and start MySQL
-
chkconfig mysqld on -
service mysqld start - Create database and user
-
mysql -u root -p
-
create database bcmssvr; -
create user 'tcpgate'@'localhost' identified by 'tcpgate'; -
grant all on bcmssvr.* to 'tcpgate'@'localhost'; -
flush privileges; -
quit -
mysql -h localhost -u tcpgate -p bcmssvr < bcmssvr.sql - Copy the following to /etc/odbc.ini file
- [BCMSSVRCFG]
Description = MySQL connection to bcmsSVR configuration
Driver = MySQL
Server = localhost
Port = 3306
Database = bcmssvr - [BCMSSVRDBCFG]
Description = MySQL connection to bcmsSVR DB
Driver = MySQL
Server = localhost
Port = 3306
Database = bcms
- [BCMSSVRCFG]
- Create user and copy files
-
useradd bcmssvr -
mkdir /usr/local/bcmssvr -
cp bcmsSVR /usr/local/bcmssvr -
chmod +x /usr/local/bcmssvr/bcmsSVR -
chown -R bcmssvr.bcmssvr /usr/local/bcmssvr -
mkdir -p /var/log/bcmssvr -
chown -R bcmssvr.bcmssvr /var/log/bcmssvr - Auto start the daemon after server reboot
-
echo "rm /tmp/bcmssvr.log" >> /etc/rc.local -
echo "su bcmssvr -c '/usr/local/bcmssvr/bcmsSVR'" >> /etc/rc.local
CentOS 7.x Installation Guide
- The following is for RedHat/CentOS 7 64 bit OS only, other Linux distribution is similar
- Login as root and execute the following commands
- Disable SELINUX and stop firewall
-
sed -i 's/\(^SELINUX=\).*/\SELINUX=disabled/' /etc/selinux/config
-
systemctl disable firewalld
-
systemctl stop firewalld
-
reboot
- Install the MySQL 8.x
-
sudo rpm -Uvh https://dev.mysql.com/get/mysql80-community-release-el7-1.noarch.rpm sudo yum --enablerepo=mysql80-community install mysql-community-server sudo service mysqld start grep "A temporary password" /var/log/mysqld.log mysql_secure_installation - Install the following packages
-
yum install telnet libssh librdkafka
-
yum install mysql-connector-odbc unixODBC
- Config and start MySQL
-
systemctl enable mysqld
-
systemctl start mysqld
- Create database and user
-
mysql -u root -p
-
create database bcmssvr;
-
create user 'tcpgate'@'localhost' identified by 'P@ssw0rd';
-
grant all on bcmssvr.* to 'tcpgate'@'localhost';
-
flush privileges;
-
quit
-
mysql -h localhost -u tcpgate -p bcmssvr < bcmssvr.sql
- Copy the following to /etc/odbc.ini file
- [BCMSSVRCFG]
Description = MySQL connection to bcmsSVR Configuration
Driver =MySQL ODBC 8.0 ANSI Driver
Server = localhost
Port = 3306
Database = bcmssvr - [BCMSSVRDBCFG]
Description = MySQL connection to bcmsSVR DB
Driver =MySQL ODBC 8.0 ANSI Driver
Server = localhost
Port = 3306
Database = bcms
- [BCMSSVRCFG]
- Create user and copy files
-
useradd bcmssvr
-
mkdir /usr/local/bcmssvr
-
cp bcmsSVR64 /usr/local/bcmssvr
-
chmod +x /usr/local/bcmssvr/bcmsSVR64
-
chown -R bcmssvr.bcmssvr /usr/local/bcmssvr
-
mkdir -p /var/log/bcmssvr
-
chown -R bcmssvr.bcmssvr /var/log/bcmssvr
- Auto start the daemon after server reboot
-
echo "rm -f /tmp/bcmssvr.log" >> /etc/rc.local
-
echo "su bcmssvr -c '/usr/local/bcmssvr/bcmsSVR64 -u tcpgate -p 40UIt9O3PqtwsSn+Wx6pig=='" >> /etc/rc.local
-
chmod +x /etc/rc.local
Ubuntu 14.04 Installation Guide

- The following is for Ubuntu 14.04 only
- The executable file of 32 bit version is “bcmsSVR”, the 64 bit version is “bcmsSVR64”
- Install the following packages
-
sudo apt-get install mysql-server mysql-client
-
sudo apt-get install libmyodbc unixodbc unixodbc-bin
-
sudo apt-get install libssh-4 libssh2-1 openssl unrar
- Create database and user
-
mysql -u root -p
-
create database bcmssvr;
-
create user 'tcpgate'@'localhost' identified by 'tcpgate';
-
grant all on bcmssvr.* to 'tcpgate'@'localhost';
-
flush privileges;
-
quit
-
mysql -h localhost -u tcpgate -p bcmssvr < bcmssvr.sql
- Copy the following to /etc/odbcinst.ini file for Ubunt 64bit
- [MySQL]
Description = ODBC for MySQL
Driver = /usr/lib/x86_64-linux-gnu/odbc/libmyodbc.so
Setup = /usr/lib/x86_64-linux-gnu/odbc/libodbcmyS.so
UsageCount = 1
- [MySQL]
- Copy the following to /etc/odbcinst.ini file for Ubunt 32bit
- [MySQL]
Description = ODBC for MySQL
Driver = /usr/lib/i386-linux-gnu/odbc/libmyodbc.so
Setup = /usr/lib/i386-linux-gnu/odbc/libodbcmyS.so
UsageCount = 1
- [MySQL]
- Install the ODBC driver
-
sudo odbcinst -i -d -f /etc/odbcinst.ini
- Copy the following to /etc/odbc.ini file
- [BCMSSVRCFG]
Description = MySQL connection to bcmsSVR configuration
Driver = MySQL
Server = localhost
Port = 3306
Socket = /var/run/mysqld/mysqld.sock
Database = bcmssvr - [BCMSSVRDBCFG]
Description = MySQL connection to bcmsSVR DB
Driver = MySQL
Server = localhost
Port = 3306
Socket = /var/run/mysqld/mysqld.sock
Database = bcms
- [BCMSSVRCFG]
- Install your system DSN
-
sudo odbcinst -i -s -l -f /etc/odbc.ini
- Create user and copy files
-
sudo useradd bcmssvr
-
sudo mkdir /usr/local/bcmssvr
-
sudo cp bcmsSVR /usr/local/bcmssvr
-
sudo chmod +x /usr/local/bcmssvr/bcmsSVR
-
sudo chown -R bcmssvr.bcmssvr /usr/local/bcmssvr
-
sudo mkdir -p /var/log/bcmssvr
-
sudo chown -R bcmssvr.bcmssvr /var/log/bcmssvr
- Auto start the daemon after server reboot, add the following before ‘exit 0’ to /etc/rc.local file
-
rm -f /tmp/bcmssvr.log
-
su bcmssvr -c '/usr/local/bcmssvr/bcmsSVR'
Ubuntu 16.04 Installation Notes
- Follow this guide to install MySQL ODBC driver “libmyodbc” on Ubuntu 16.04
Ubuntu 18.04 Installation Notes
- Install librdkafka-dev package
- sudo apt-get install librdkafka-dev
- Follow this guide to install MySQL ODBC driver “libmyodbc” on Ubuntu 18.04
- Follow this guide to create the /etc/rc.local file
Debian 10.x Installation Guide

- The following is for Debian 10.x only
- Install the following packages
-
sudo apt-get install mariadb-server mariadb-client
-
sudo apt-get install unixodbc unixodbc-bin
-
sudo apt-get install libssh-4 libssh2-1 openssl librdkafka-dev
-
mkdir odbc_package
-
cd odbc_package
-
wget https://downloads.mariadb.com/Connectors/odbc/latest/mariadb-connector-odbc-3.1.9-debian-buster-amd64.tar.gz
-
tar xzvf mariadb-connector-odbc-3.1.9-debian-buster-amd64.tar.gz
-
cd mariadb-connector-odbc-3.1.9-debian-buster-amd64
-
sudo install lib/mariadb/libmaodbc.so /usr/lib64/
-
sudo install -d /usr/lib64/mariadb/
-
sudo install -d /usr/lib64/mariadb/plugin/
-
sudo install lib/mariadb/plugin/auth_gssapi_client.so /usr/lib64/mariadb/plugin/
-
sudo install lib/mariadb/plugin/caching_sha2_password.so /usr/lib64/mariadb/plugin/
-
sudo install lib/mariadb/plugin/client_ed25519.so /usr/lib64/mariadb/plugin/
-
sudo install lib/mariadb/plugin/dialog.so /usr/lib64/mariadb/plugin/
-
sudo install lib/mariadb/plugin/mysql_clear_password.so /usr/lib64/mariadb/plugin/
-
sudo install lib/mariadb/plugin/sha256_password.so /usr/lib64/mariadb/plugin/
- Create database and user
-
sudo mysql -u root -p
-
create database bcmssvr;
-
create user 'tcpgate'@'localhost' identified by 'tcpgate';
-
grant all on bcmssvr.* to 'tcpgate'@'localhost';
-
create database bcms;
-
grant all on bcms.* to 'tcpgate'@'localhost';
-
flush privileges;
-
quit
-
mysql -h localhost -u tcpgate -p bcmssvr < bcmssvr.sql
-
mysql -h localhost -u tcpgate -p bcms < bcms_MYSQL.sql
- Create a template file MariaDB_odbc_driver_template.ini
- [MariaDB ODBC 3.0 Driver]
Description = MariaDB Connector/ODBC v.3.0
Driver = /usr/lib64/libmaodbc.so
- [MariaDB ODBC 3.0 Driver]
- Install the ODBC driver
-
sudo odbcinst -i -d -f MariaDB_odbc_driver_template.ini
- Create a template file bcmssvr_template.ini
- [BCMSSVRCFG]
Description = MariaDB connection to bcmsSVR configuration
Driver = MariaDB ODBC 3.0 Driver
Server = localhost
Port = 3306
Socket = /var/run/mysqld/mysqld.sock
Database = bcmssvr - [BCMSSVRDBCFG]
Description = MariaDB connection to bcmsSVR DB
Driver = MariaDB ODBC 3.0 Driver
Server = localhost
Port = 3306
Socket = /var/run/mysqld/mysqld.sock
Database = bcms
- [BCMSSVRCFG]
- Install your system DSN
-
sudo odbcinst -i -s -l -f bcmssvr_template.ini
- Create user and copy files
-
sudo useradd bcmssvr
-
sudo mkdir /usr/local/bcmssvr
-
sudo cp bcmsSVR64 /usr/local/bcmssvr
-
sudo chmod +x /usr/local/bcmssvr/bcmsSVR64
-
sudo chown -R bcmssvr.bcmssvr /usr/local/bcmssvr
-
sudo mkdir -p /var/log/bcmssvr
-
sudo chown -R bcmssvr.bcmssvr /var/log/bcmssvr
- Follow this guide to create /etc/rc.local file
- Auto start the daemon after server reboot, add the following before ‘exit 0’ to /etc/rc.local file
-
rm -f /tmp/bcmssvr.log
-
su bcmssvr -c '/usr/local/bcmssvr/bcmsSVR64'
Dictionary
- The program supports dictionary for objects such as agentid, split/skill and vdn so your mapped name are presented in the resulting XML string.
- To add new dictionary, enter the following command
- add dict
- Hint: Enter the acd, id and mappedName when they are prompted
REST Query API
- Start from version 2.0.0, the command for bcms report is prefix with “bcms” which is used to distinguish with other reports
- To enable REST query API, enter the following command in the program console
- add tcp 8088 * * custom bcmsrest
- Hint: 8088 is the port number for the REST query API, choose one that fits your environment
- add tcp 8088 * * custom bcmsrest
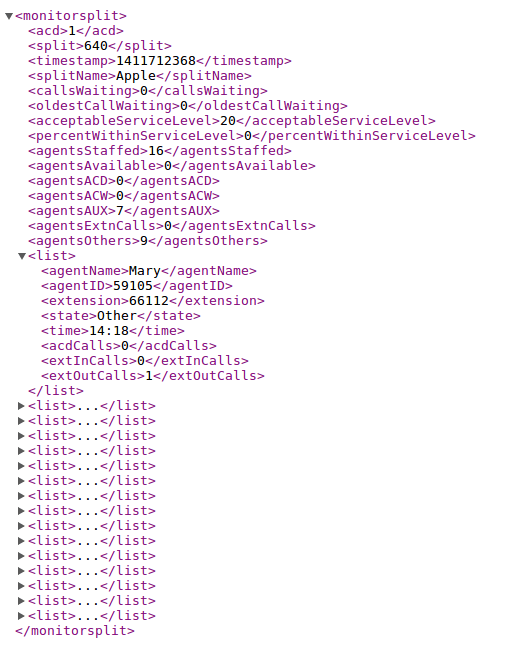
- The URL syntax for Monitor Split is
- http://bcmsSVRIP:8088/bcmsmonitorsplit?acd=1&split=640
- http://bcmsSVRIP:8088/bcmsmonitorsplit?acd=1&description=split_640
- Hint: The Monitor Split report is retrieved from cache or directly from CM
- Hint: The report is searchable by split and description parameters, make sure the description value is uniquely identified
- The browser will display the following XML result
- The URL syntax for Monitor System Report is
- http://bcmsSVRIP:8088/bcmsmonitorsystem?acd=1&split=129;640
- http://bcmsSVRIP:8088/bcmsmonitorsystem?acd=1&description=projectA
- Hint: 1 is the ACD number
- Hint: The report is also searchable by description parameter, make sure the description value is uniquely identified
- Hint: The browser will display the following XML result

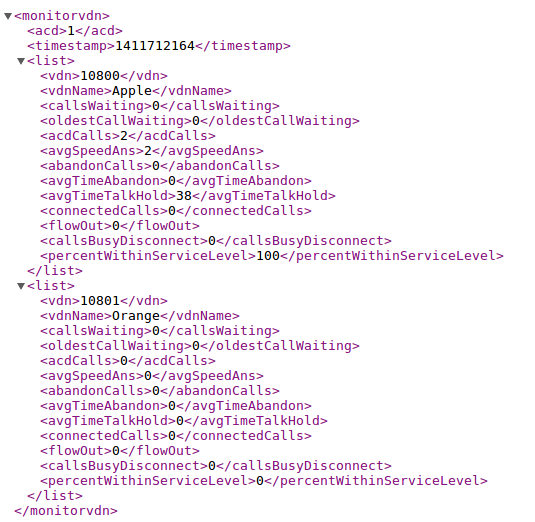
- The URL syntax for Monitor VDN is
- http://bcmsSVRIP:8088/bcmsmonitorvdn?acd=1&vdn=10080;10801
- Hint: The report is also searchable by description parameter, make sure the description value is uniquely identified
- Hint: The browser will display the following XML result
- The URL syntax for Status Trunk Report is
- http://bcmsSVRIP:8088/statustrunk?acd=1&trunk=26
- http://bcmsSVRIP:8088/statustrunk?acd=1&description=statustrunk_26
- The browser will display the following XML result

- The URL syntax for List Split Report is
- http://bcmsSVRIP:8088/bcmslistsplit?acd=1&split=640
- http://bcmsSVRIP:8088/bcmslistsplit?acd=1&description=listsplit_640
- The browser will display the following XML result
- The URL syntax for List Split Daily Report is
- http://bcmsSVRIP:8088/bcmslistsplitday?acd=1&split=640
- http://bcmsSVRIP:8088/bcmslistsplitday?acd=1&description=listsplit_640_day
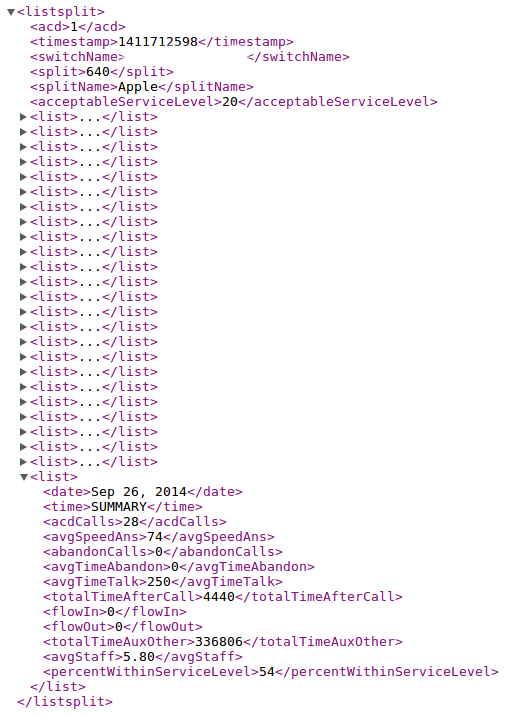
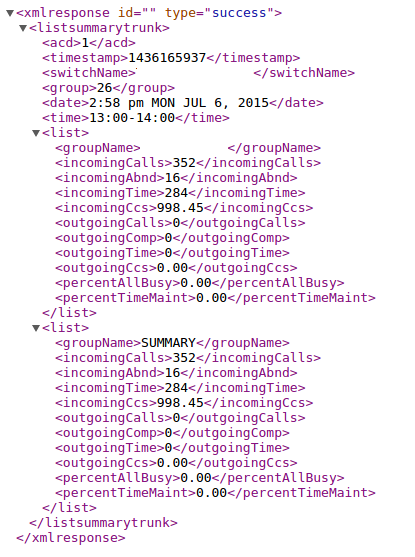
- The URL syntax for List Summary Split Report is
- http://bcmsSVRIP:8088/bcmslistsummarysplit?acd=1&split=640
- http://bcmsSVRIP:8088/bcmslistsummarysplit?acd=1&description=listsummarysplit_640
- The browser will display the following XML result

- The URL syntax for List VDN Report is
- http://bcmsSVRIP:8088/bcmslistvdn?acd=1&vdn=10800
- http://bcmsSVRIP:8088/bcmslistvdn?acd=1&description=listvdn_10800
- The browser will display the following XML result
- The URL syntax for List VDN Daily Report is
- http://bcmsSVRIP:8088/bcmslistvdnday?acd=1&vdn=10800
- http://bcmsSVRIP:8088/bcmslistvdn?acd=1&description=listvdn_10800_day
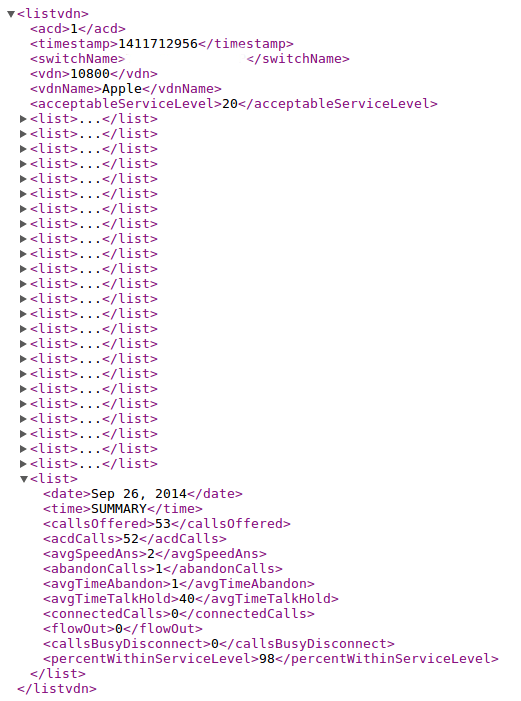
- The URL syntax for List Summary VDN Report is
- http://bcmsSVRIP:8088/bcmslistsummaryvdn?acd=1&vdn=10800
- http://bcmsSVRIP:8088/bcmslistsummaryvdn?acd=1&description=listsummaryvdn_10800
- The browser will display the following XML result

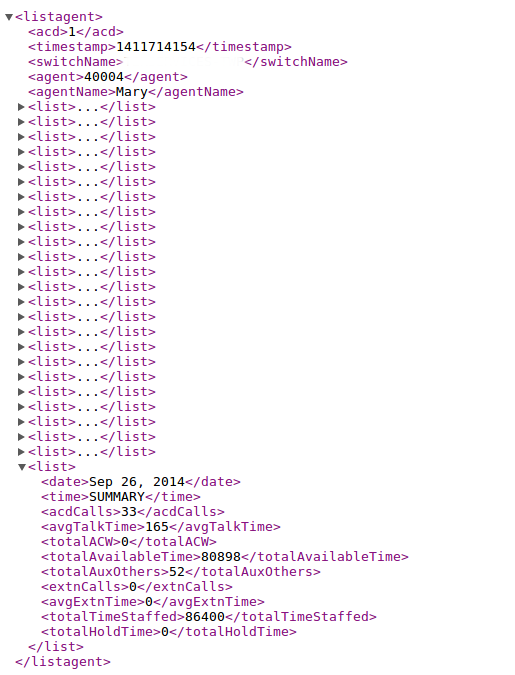
- The URL syntax for List Agent Report is
- http://bcmsSVRIP:8088/bcmslistagent?acd=1&agent=40004
- http://bcmsSVRIP:8088/bcmslistagent?acd=1&description=listagent_40004
- The browser will display the following XML result

- The URL syntax for List Summary Agent Report is
- http://bcmsSVRIP:8088/bcmslistsummaryagent?acd=1&agent=40004
- http://bcmsSVRIP:8088/bcmslistsummaryagent?acd=1&description=listsummaryagent_40004
- The browser will display the following XML result

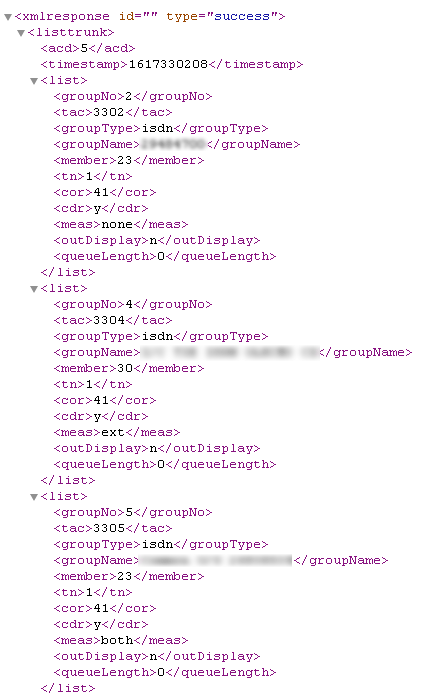
- The URL syntax for List Trunk Report is
- http://bcmsSVRIP:8088/bcmslisttrunk?acd=1&trunk=26
- http://bcmsSVRIP:8088/bcmslisttrunk?acd=1&description=listtrunk_26
- The browser will display the following XML result

- The URL syntax for List Summary Trunk Report is
- http://bcmsSVRIP:8088/bcmslistsummarytrunk?acd=1&trunk=26
- http://bcmsSVRIP:8088/bcmslistsummarytrunk?acd=1&description=listsummarytrunk_26
- The browser will display the following XML result

- The URL syntax for Display Variables
- http://bcmsSVRIP:8088/displayvariables?acd=4&variables=A;B
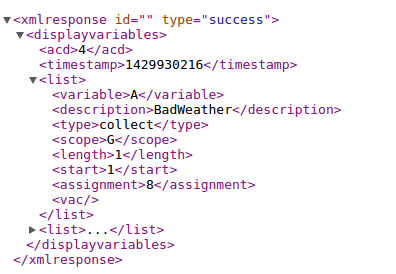
- The URL for Change Variables
- http://bcmsSVRIP:8088/changevariables?acd=4&variable=A&description=BadWeather&type=collect&scope=G&length=1&start=1&assignment=8

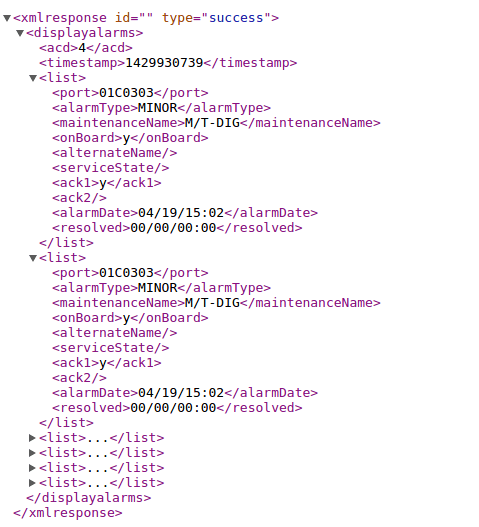
- The URL for Display Alarms
- http://bcmsSVRIP:8088/displayalarms?acd=4&active=y&resolved=n&major=y&minor=y&warning=n
- The URL for Display Agent
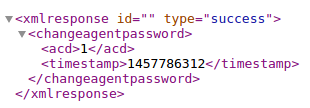
- The URL for Change Agent Password
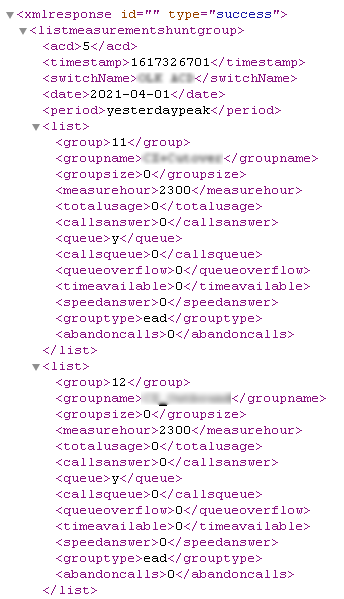
- The URL for List Measurements Hunt Group
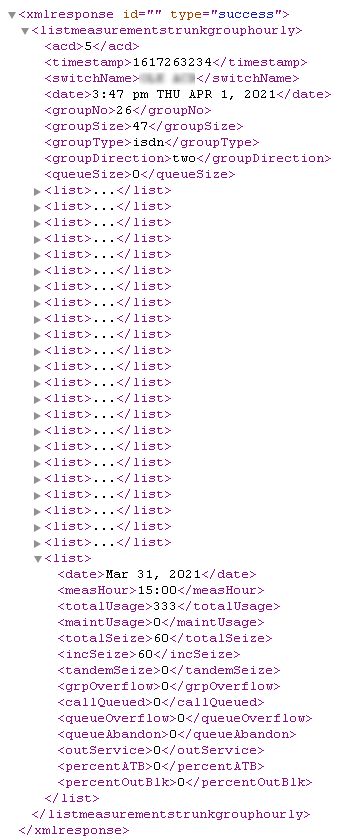
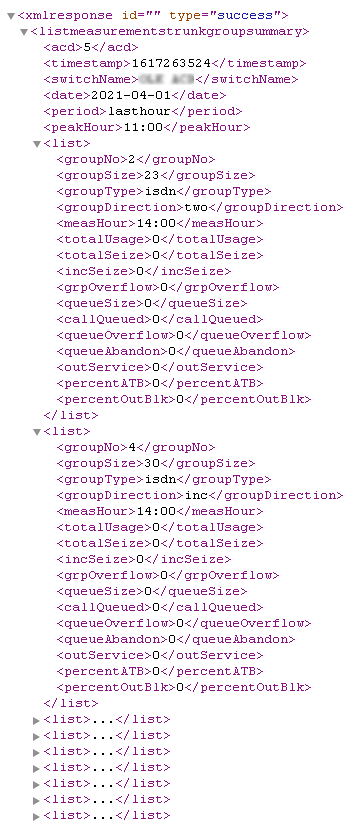
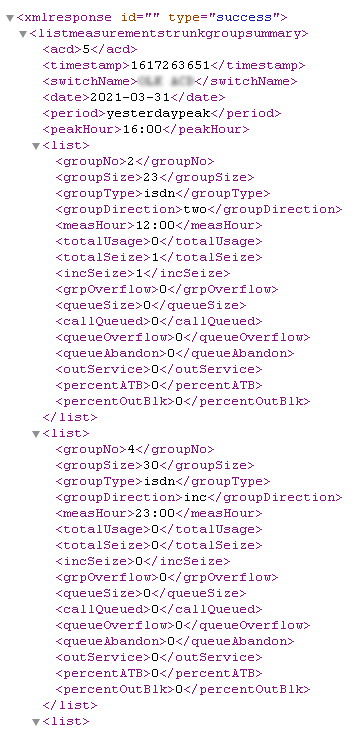
- The URL for List Measurements Trunk Group Hourly
- The URL for List Measurements Trunk Group Summary
- The URL for Change Agent Basic
- The URL for Add Agent Skills
- The URL for Delete Agent Skills
- The URL for Update Agent Skills
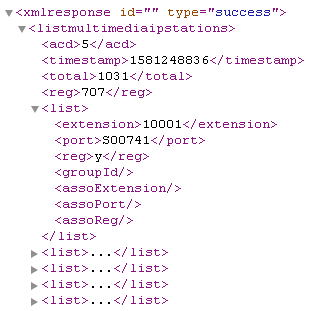
- The URL for List MultiMedia IP-Stations
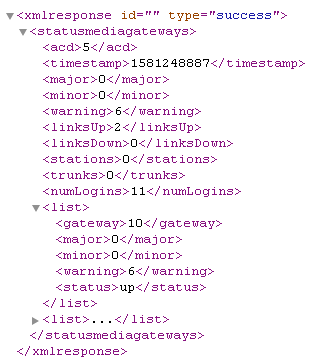
- The URL for Status MediaGateways
- The URL for Display Capacity
- The URL for List Hunt Group
- The URL for List Trunk
- The URL for List VDN
- The URL for List Media-Gateway
- The URL for Status Hunt Group
- The URL for Add Hunt Group Member
- The URL for Delete Hunt Group Member


C++ API Interface
- Start from version 2.0.0, the api for bcms report is prefix with “bcmsapi_” which is used to distinguish with other reports
- To enable C++ API interface, enter the following command in the program console
- add tcp 5050 * * custom bcmsapi
- Hint: 5050 is the port number for the C++ API interface, choose one that fits your environment
- add tcp 5050 * * custom bcmsapi
- Sample code is provided
//
// bcmsApp.cpp
//

#include "bcms.h"
#include
#include
#include
using namespace std;

int main(int argc, char** argv)
{
    BCMS_HANDLE handle;
    BCMSLogin_t login;
    BCMSMonitorSplit_t monitorSplit;
    BCMSMonitorSystem_t monitorSystem;
    BCMSMonitorVdn_t monitorVdn;
    BCMSStatusTrunk_t statusTrunk;
    BCMSListSplit_t listSplit;
    BCMSListVdn_t listVdn;
    BCMSListAgent_t listAgent;
    BCMSListTrunk_t listTrunk;
    BCMSListSummarySplit_t listSummarySplit;
    BCMSListSummaryVdn_t listSummaryVdn;
    BCMSListSummaryAgent_t listSummaryAgent;
    BCMSListSummaryTrunk_t listSummaryTrunk;
    BCMSDisplayVariables_t displayVariables;
    BCMSChangeVariables_t changeVariables;
    BCMSDisplayAlarms_t displayAlarms;
    BCMSListMeasurementsHuntGroup_t measHuntGroup;
    BCMSDisplayAgent_t displayAgent;
    BCMSChangeAgentBasic_t changeAgentBasic;
    BCMSAddAgentSkill_t addAgentSkill;
    BCMSDeleteAgentSkill_t deleteAgentSkill;
    BCMSUpdateAgentSkill_t updateAgentSkill;
    unsigned int bufferSize;

    memset(&login, 0x00, sizeof(BCMSLogin_t));
    strcpy(login.username, "app");
    strcpy(login.passwd, "app");
    if (bcmsapi_Login(&handle, "127.0.0.1", 5050, &login)==BCMSRC_SUCC) {
    // update agent skill
    memset(&updateAgentSkill, 0x00, sizeof(BCMSUpdateAgentSkill_t));
    updateAgentSkill.acd = 6;
    strcpy(updateAgentSkill.agent, "50101");
    strcpy(updateAgentSkill.skill[0].sn, "910");
    strcpy(updateAgentSkill.skill[0].sl, "1");
    strcpy(updateAgentSkill.skill[1].sn, "911");
    strcpy(updateAgentSkill.skill[1].sl, "1");
    if (bcmsapi_UpdateAgentSkill(handle, &updateAgentSkill, &bufferSize)==BCMSRC_SUCC) {
        vector<unsigned char> buffer(bufferSize);
        if (bcmsapi_GetResultXML(handle, &buffer[0], bufferSize)==BCMSRC_SUCC) {
            string xml = string((char*)&buffer[0], buffer.size());
            cout << &buffer[0] << endl;
        }
    }
    // delete agent skill
    memset(&deleteAgentSkill, 0x00, sizeof(BCMSDeleteAgentSkill_t));
    deleteAgentSkill.acd = 6;
    strcpy(deleteAgentSkill.agent, "50101");
    strcpy(deleteAgentSkill.skill[0].sn, "910");
    strcpy(deleteAgentSkill.skill[1].sn, "911");
    if (bcmsapi_DeleteAgentSkill(handle, &deleteAgentSkill, &bufferSize)==BCMSRC_SUCC) {
        vector<unsigned char> buffer(bufferSize);
        if (bcmsapi_GetResultXML(handle, &buffer[0], bufferSize)==BCMSRC_SUCC) {
            string xml = string((char*)&buffer[0], buffer.size());
            cout << &buffer[0] << endl;
        }
    }
    // add agent skill
    memset(&addAgentSkill, 0x00, sizeof(BCMSAddAgentSkill_t));
    addAgentSkill.acd = 6;
    strcpy(addAgentSkill.agent, "50101");
    strcpy(addAgentSkill.skill[0].sn, "910");
    strcpy(addAgentSkill.skill[0].sl, "1");
    strcpy(addAgentSkill.skill[1].sn, "911");
    strcpy(addAgentSkill.skill[1].sl, "1");
    if (bcmsapi_AddAgentSkill(handle, &addAgentSkill, &bufferSize)==BCMSRC_SUCC) {
        vector<unsigned char> buffer(bufferSize);
        if (bcmsapi_GetResultXML(handle, &buffer[0], bufferSize)==BCMSRC_SUCC) {
            string xml = string((char*)&buffer[0], buffer.size());
            cout << &buffer[0] << endl;
        }
    }
    // display agent
    memset(&displayAgent, 0x00, sizeof(BCMSDisplayAgent_t));
    displayAgent.acd = 6;
    strcpy(displayAgent.agent, "50101");
    if (bcmsapi_DisplayAgent(handle, &displayAgent, &bufferSize)==BCMSRC_SUCC) {
        vector<unsigned char> buffer(bufferSize);
        if (bcmsapi_GetResultXML(handle, &buffer[0], bufferSize)==BCMSRC_SUCC) {
            cout << &buffer[0] << endl;
        }
    }
    // change agent basic
    memset(&changeAgentBasic, 0x00, sizeof(BCMSChangeAgentBasic_t));
    changeAgentBasic.acd = 6;
    strcpy(changeAgentBasic.agent, "50101");
    strcpy(changeAgentBasic.name, "Hello World");
    strcpy(changeAgentBasic.tn, "3");
    strcpy(changeAgentBasic.cor, "5");
    if (bcmsapi_ChangeAgentBasic(handle, &changeAgentBasic, &bufferSize)==BCMSRC_SUCC) {
        vector<unsigned char> buffer(bufferSize);
        if (bcmsapi_GetResultXML(handle, &buffer[0], bufferSize)==BCMSRC_SUCC) {
            string xml = string((char*)&buffer[0], buffer.size());
            cout << &buffer[0] << endl;
        }
    }

    // list measurement hunt group
    memset(&measHuntGroup, 0x00, sizeof(BCMSListMeasurementsHuntGroup_t));
    measHuntGroup.acd = 1;
    if (bcmsapi_ListMeasurementsHuntGroupLastHour(handle, &measHuntGroup, &bufferSize)==BCMSRC_SUCC) {
        vector<unsigned char> buffer(bufferSize);
        if (bcmsapi_GetResultXML(handle, &buffer[0], bufferSize)==BCMSRC_SUCC) {
            cout << &buffer[0] << endl;
        }
    }
    memset(&measHuntGroup, 0x00, sizeof(BCMSListMeasurementsHuntGroup_t));
    measHuntGroup.acd = 1;
    if (bcmsapi_ListMeasurementsHuntGroupYesterdayPeak(handle, &measHuntGroup, &bufferSize)==BCMSRC_SUCC) {
        vector<unsigned char> buffer(bufferSize);
        if (bcmsapi_GetResultXML(handle, &buffer[0], bufferSize)==BCMSRC_SUCC) {
            cout << &buffer[0] << endl;
        }
    }
    memset(&measHuntGroup, 0x00, sizeof(BCMSListMeasurementsHuntGroup_t));
    measHuntGroup.acd = 1;
    if (bcmsapi_ListMeasurementsHuntGroupTodayPeak(handle, &measHuntGroup, &bufferSize)==BCMSRC_SUCC) {
        vector<unsigned char> buffer(bufferSize);
        if (bcmsapi_GetResultXML(handle, &buffer[0], bufferSize)==BCMSRC_SUCC) {
            cout << &buffer[0] << endl;
        }
    }
    // monitor split
    memset(&monitorSplit, 0x00, sizeof(BCMSMonitorSplit_t));
    monitorSplit.acd = 1;
    strcpy(monitorSplit.split, "640");
    if (bcmsapi_BcmsMonitorSplit(handle, &monitorSplit, &bufferSize)==BCMSRC_SUCC) {
        vector<unsigned char> buffer(bufferSize);
        if (bcmsapi_GetResultXML(handle, &buffer[0], bufferSize)==BCMSRC_SUCC) {
            cout << &buffer[0] << endl;
        }
    }
    // monitor system
    memset(&monitorSystem, 0x00, sizeof(BCMSMonitorSystem_t));
    monitorSystem.acd = 1;
    strcpy(monitorSystem.split, "640");
    if (bcmsapi_BcmsMonitorSystem(handle, &monitorSystem, &bufferSize)==BCMSRC_SUCC) {
        vector<unsigned char> buffer(bufferSize);
        if (bcmsapi_GetResultXML(handle, &buffer[0], bufferSize)==BCMSRC_SUCC) {
            cout << &buffer[0] << endl;
        }
    }
    // monitor vdn
    memset(&monitorVdn, 0x00, sizeof(BCMSMonitorVdn_t));
    monitorVdn.acd = 1;
    strcpy(monitorVdn.vdn, "10800");
    if (bcmsapi_BcmsMonitorVdn(handle, &monitorVdn, &bufferSize)==BCMSRC_SUCC) {
        vector<unsigned char> buffer(bufferSize);
        if (bcmsapi_GetResultXML(handle, &buffer[0], bufferSize)==BCMSRC_SUCC) {
            cout << &buffer[0] << endl;
        }
    }
    // status trunk
    memset(&statusTrunk, 0x00, sizeof(BCMSStatusTrunk_t));
    statusTrunk.acd = 1;
    strcpy(statusTrunk.trunk, "26");
    if (bcmsapi_StatusTrunk(handle, &statusTrunk, &bufferSize)==BCMSRC_SUCC) {
        vector<unsigned char> buffer(bufferSize);
        if (bcmsapi_GetResultXML(handle, &buffer[0], bufferSize)==BCMSRC_SUCC) {
            cout << &buffer[0] << endl;
        }
    }
    // list split
    memset(&listSplit, 0x00, sizeof(BCMSListSplit_t));
    listSplit.acd = 1;
    strcpy(listSplit.split, "640");
    if (bcmsapi_BcmsListSplit(handle, &listSplit, &bufferSize)==BCMSRC_SUCC) {
        vector<unsigned char> buffer(bufferSize);
        if (bcmsapi_GetResultXML(handle, &buffer[0], bufferSize)==BCMSRC_SUCC) {
            cout << &buffer[0] << endl;
        }
    }
    // list summary split
    memset(&listSummarySplit, 0x00, sizeof(BCMSListSummarySplit_t));
    listSummarySplit.acd = 1;
    strcpy(listSummarySplit.split, "640");
    if (bcmsapi_BcmsListSummarySplit(handle, &listSummarySplit, &bufferSize)==BCMSRC_SUCC) {
        vector<unsigned char> buffer(bufferSize);
        if (bcmsapi_GetResultXML(handle, &buffer[0], bufferSize)==BCMSRC_SUCC) {
            cout << &buffer[0] << endl;
        }
    }
    // list vdn
    memset(&listVdn, 0x00, sizeof(BCMSListVdn_t));
    listVdn.acd = 1;
    strcpy(listVdn.vdn, "10800");
    if (bcmsapi_BcmsListVdn(handle, &listVdn, &bufferSize)==BCMSRC_SUCC) {
       vector<unsigned char> buffer(bufferSize);
       if (bcmsapi_GetResultXML(handle, &buffer[0], bufferSize)==BCMSRC_SUCC) {
           cout << &buffer[0] << endl;
       }
    }
    // list summary vdn
    memset(&listSummaryVdn, 0x00, sizeof(BCMSListSummaryVdn_t));
    listSummaryVdn.acd = 1;
    strcpy(listSummaryVdn.vdn, "10800");
    if (bcmsapi_BcmsListSummaryVdn(handle, &listSummaryVdn, &bufferSize)==BCMSRC_SUCC) {
        vector<unsigned char> buffer(bufferSize);
        if (bcmsapi_GetResultXML(handle, &buffer[0], bufferSize)==BCMSRC_SUCC) {
            cout << &buffer[0] << endl;
        }
    }
    // list agent
    memset(&listAgent, 0x00, sizeof(BCMSListAgent_t));
    listAgent.acd = 1;
    strcpy(listAgent.agent, "40004");
    if (bcmsapi_BcmsListAgent(handle, &listAgent, &bufferSize)==BCMSRC_SUCC) {
        vector<unsigned char> buffer(bufferSize);
        if (bcmsapi_GetResultXML(handle, &buffer[0], bufferSize)==BCMSRC_SUCC) {
            cout << &buffer[0] << endl;
        }
    }
    // list summary agent
    memset(&listSummaryAgent, 0x00, sizeof(BCMSListSummaryAgent_t));
    listSummaryAgent.acd = 1;
    strcpy(listSummaryAgent.agent, "40004");
    if (bcmsapi_BcmsListSummaryAgent(handle, &listSummaryAgent, &bufferSize)==BCMSRC_SUCC) {
        vector<unsigned char> buffer(bufferSize);
        if (bcmsapi_GetResultXML(handle, &buffer[0], bufferSize)==BCMSRC_SUCC) {
            cout << &buffer[0] << endl;
        }
    }
    // list trunk
    memset(&listTrunk, 0x00, sizeof(BCMSListTrunk_t));
    listTrunk.acd = 1;
    strcpy(listTrunk.trunk, "26");
    if (bcmsapi_BcmsListTrunk(handle, &listTrunk, &bufferSize)==BCMSRC_SUCC) {
        vector<unsigned char> buffer(bufferSize);
        if (bcmsapi_GetResultXML(handle, &buffer[0], bufferSize)==BCMSRC_SUCC) {
            cout << &buffer[0] << endl;
        }
    }
    // list summary trunk
    memset(&listSummaryTrunk, 0x00, sizeof(BCMSListSummaryTrunk_t));
    listSummaryTrunk.acd = 1;
    strcpy(listSummaryTrunk.trunk, "26");
    if (bcmsapi_BcmsListSummaryTrunk(handle, &listSummaryTrunk, &bufferSize)==BCMSRC_SUCC) {
        vector<unsigned char> buffer(bufferSize);
        if (bcmsapi_GetResultXML(handle, &buffer[0], bufferSize)==BCMSRC_SUCC) {
            cout << &buffer[0] << endl;
        }
    }
    // display variables
    memset(&displayVariables, 0x00, sizeof(BCMSDisplayVariables_t));
    displayVariables.acd = 4;
    strcpy(displayVariables.variables, "all");
    if (bcmsapi_DisplayVariables(handle, &displayVariables, &bufferSize)==BCMSRC_SUCC) {
        vector<unsigned char> buffer(bufferSize);
        if (bcmsapi_GetResultXML(handle, &buffer[0], bufferSize)==BCMSRC_SUCC) {
            cout << &buffer[0] << endl;
        }
    }
    // change variables
    memset(&changeVariables, 0x00, sizeof(BCMSChangeVariables_t));
    changeVariables.acd = 4;
    strcpy(changeVariables.variable, "A");
    strcpy(changeVariables.description, "BadWeather");
    strcpy(changeVariables.type, "collect");
    strcpy(changeVariables.scope, "G");
    strcpy(changeVariables.length, "5");
    strcpy(changeVariables.start, "1");
    strcpy(changeVariables.assignment, "12345");
    if (bcmsapi_ChangeVariables(handle, &changeVariables, &bufferSize)==BCMSRC_SUCC) {
        vector<unsigned char> buffer(bufferSize);
        if (bcmsapi_GetResultXML(handle, &buffer[0], bufferSize)==BCMSRC_SUCC) {
            cout << &buffer[0] << endl;
        }
    }
    // display alarms
    memset(&displayAlarms, 0x00, sizeof(BCMSDisplayAlarms_t));
    displayAlarms.acd = 4;
    displayAlarms.active = true;
    displayAlarms.resolved = false;
    displayAlarms.major = true;
    displayAlarms.minor = true;
    displayAlarms.warning = false;
    if (bcmsapi_DisplayAlarms(handle, &displayAlarms, &bufferSize)==BCMSRC_SUCC) {
        vector<unsigned char> buffer(bufferSize);
        if (bcmsapi_GetResultXML(handle, &buffer[0], bufferSize)==BCMSRC_SUCC) {
            cout << &buffer[0] << endl;
        }
    }
    bcmsapi_Logout(handle);
 }
 return 0;
}
XMPP Connection

- Modify the following parameters in bcmsSVR.mdb for the XMPP feature
- bcms_xmpp_jid
- jid such as “yourname@company.com”
- bcms_xmpp_username
- username is used if bcms_xmpp_jid is not used for authentication
- bcms_xmpp_passwd
- use the utility encryptpasswd.exe to generate an encrypted password
- bcms_xmpp_server
- xmpp server IP or hostname
- bcms_xmpp_port
- xmpp server port
- bcms_xmpp_saslmethod
- authentication methods such as plain, digestmd5 and crammd5
- bcms_xmpp_jid
- Supported XMPP servers
- Openfire 3.91.
Splunk Connection
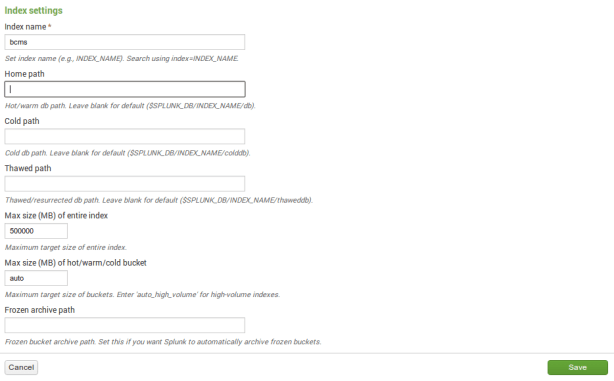
- Create index for bcmsSVR
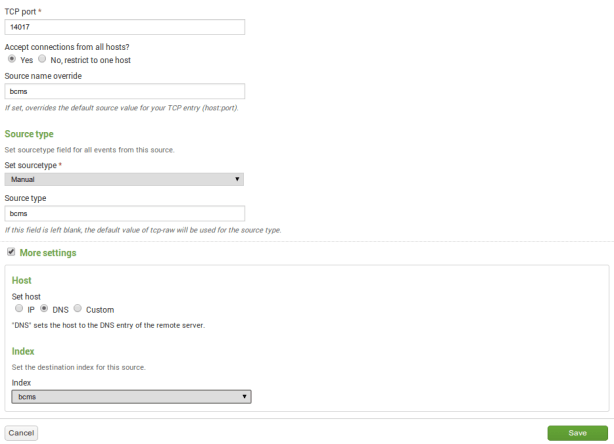
- Create TCP input for bcmsSVR
- Login bcmsSVR program console and update two parameters
- update parameter bcms_splunk_host 10.10.10.123
- Hint: 10.10.10.123 is the IP address of Splunk
- update parameter bcms_splunk_port 14017
- Hint: 14017 is the port number that defined in Spunk for bcmsSVR data
- update parameter bcms_splunk_allreport true
- Hint: Set it to true if you want all report data are sent to Splunk. Set it to false if you to control it by “add splunkreport” command
- reload
- update parameter bcms_splunk_host 10.10.10.123
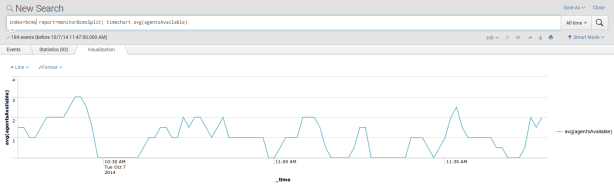
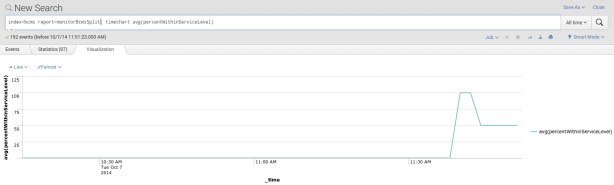
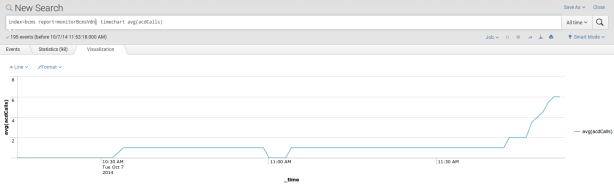
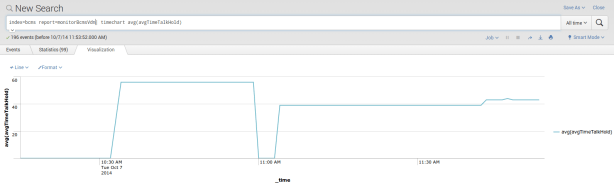
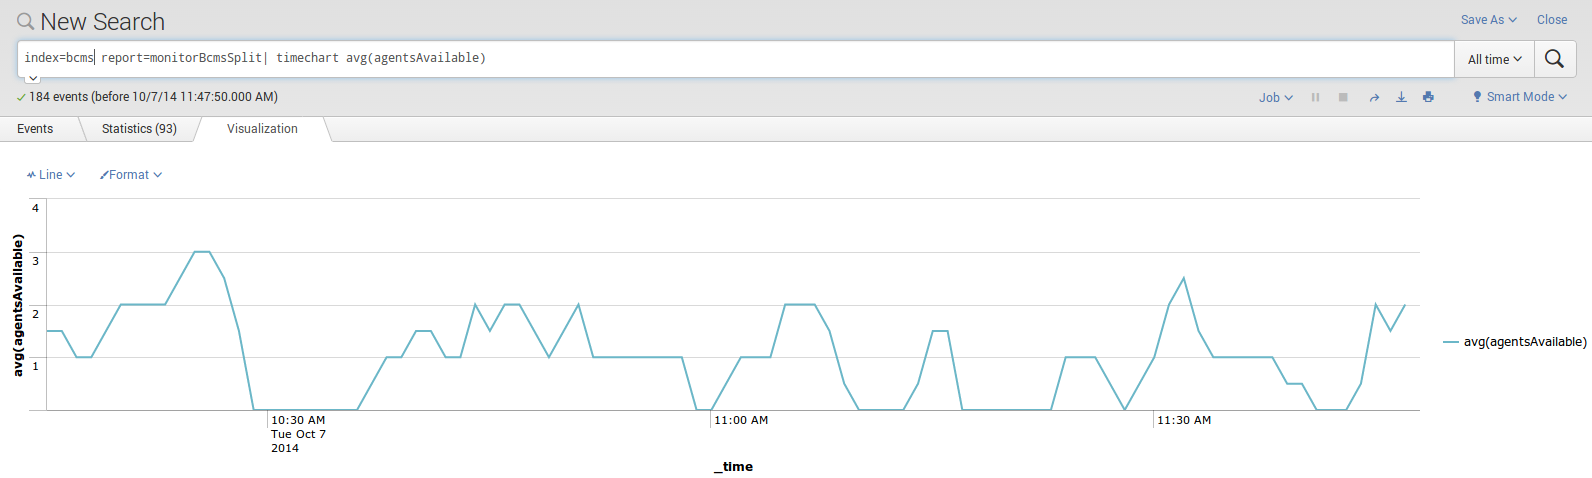
- Search the report in Splunk

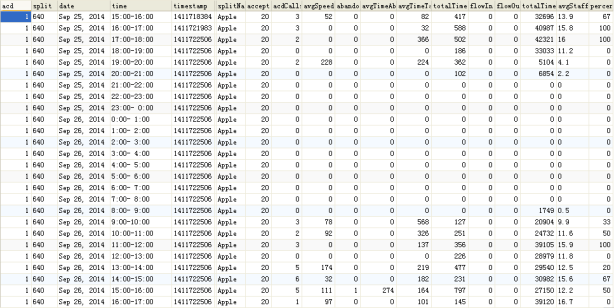
- Graphs can be plotted easily using the report data, for example


Know Problem
- During the restart process of Splunk, bcmsSVR is unable to send raw data to Splunk and missing data will be anticipated
Support and License
- Please contact upinget.com for support and license
We created several tools to implement CTI functions on agent desktop and IVR server. When the tools are grouped together, they become our CTI architecture.
The ScreenPop is installed on agent desktop, it is responsible for application screen pop. The calltoui.exe is our soft phone implementation. Application can integrate with ScreenPop by the screenPop.ocx or restful interface. The uuiSVR is our data server implementation which breaks the data size limitation of TSAPI uui. The ivrSVR is a CTI server for agent and IVR applications, the applications invoke call control functions via a restful interface. User data passing between IVR application and agent desktop application is achievable via the uuiSVR.

18 Aug 2014, clintSVR just released. This version of clintSVR supports
- Logging of RTA_IEX data to database
- Report CustomRTA is supported if your CMS installed the rta_iex customized report
- New API DeviceRTA and AgentRTA are supported when the rta_iex report is installed and the two APIs enables you to implement call center agent map application
The CMS custom rta_iex report contains a lot of useful information about the state and duration of call center agents. I am modifying the clintSVR to feed the RTA raw data to Splunk so we have a total view of our agents. By using the Splunk search interface, you can find out how long your agent to take a break (AUX) or to do after call work (ACW). Most important, you can find the result within seconds.
The new version of clintSVR 1.1.9 just released and it supports the logging of custom RTA raw data to Splunk. You can use Splunk to create summary and agent reports such as AUX reason code and duration summary report, ACW summary and duration report, etc. Please contact me for a trial license key.
Introduction
The ivrSVR is a CTI server for IVR systems and agent front end applications. The ivrSVR is part of my CTI Architecture, it uses TSAPI library to monitor IVR and agent extensions, it hides the technical details of TSAPI and provide simple ActiveX, REST and WebSocket interfaces for the development of IVR systems and front end applications. The ivrSVR program supports passing of customized user data between different kind of CTI software when a customized DLL is developed. Currently, the ivrSVR program supports the following call control functions:
- ACD Login – Login ACD
- ACD Logout – Logut ACD
- ACD SetState – Set AUX, ACW, MANUAL or AUTO mode
- MakeCall – Make a call
- Answer – Answer a call
- Hangup – Hangup a call
- DropParty – drop specific party from a call
- Hold – Hold a call
- Retrieve – Retrieve a call
- Transfer – Single step or two steps transfer which depends on extension state
- Conference – Single step or two steps conference which depends on extension state
- Consultation – Make a consultation call
- Reconnect – Reconnect from a consultation call
- Alternate – Alternate a hold and a connected call
- SingleStepConference – Join a new device into an existing call
- SelectiveListeningHold – prevent a specific party on a call from hearing anything said by another specific party or all other parties on the call
- SelectiveListeningRetrieve – retrieve a party from listen-hold to another party or all parties that were previously being listen-held
- DTMF – Send a DTMF tone or a string of DTMF tones
- UserData – Get user data when for call alert or hangup
- ClearCall – Clear a call or all calls of an extension
- DeflectCall – Redirects an alerting call at a device with the connection to a new destination, either on-PBX or off-PBX
- PickupCall – Redirects an alerting call at a device to another on-PBX device
- Snapshot – Snapshot a device
- QueryACDSplit – Query ACD split and provides number of available agents, number of calls in queue and number of logon agents
- QueryAgentLogin – Query the extension of each ACD agent logged into the specified ACD split
- QueryAgentState – Query the agent state of an ACD agent
- QueryCallClassifier – Query the number of “idle” and “in-use” ports of call classifier cards
- QueryTimeOfDay – Query the switch information for the year, month, day, hour, minute, and second
- QueryDeviceName -Query the associated name of the device
- QueryDoNotDisturb – Query the status of the send all calls feature expressed as on or off at a device
- QueryDeviceInfo – Query the class and type of a device
- QueryForwarding – Query the associated name of the device
- QueryMsgWaitingInd – Query status of the message waiting indicator expressed as on or off for a device
- QueryStationStatus – Query the idle and/or busy state of a station
- QueryTrunkGroup – Query the number of idle trunks and the number of in-use trunks
- QueryUCID – Query the Universal Call ID (UCID) for a normal callID
- SetDoNotDisturb – Turns on or off the G3 Send All Calls (SAC) feature for a user station
- SetForwarding – Sets the G3 Call Forwarding feature on or off for a user station
- SetMsgWaitingInd – Sets the G3 Message Waiting Indicator (MWI) on or off for a user station
Release
1 May 2016, ivrSVR 1.1.9 just released. This version included the following updates:
1. The Answer() API supports answer call by callid.
2. The Retrieve() API supports retrieve call by callid.
3. The ClearCall() API supports clear call by callid.
4. New API SingleStepConference() is supported.
5. New admin command “bulkadd extension” and “bulkdelete extension” are supported via tcpgate console.
6. The MakeCall() API returns additonal UCID field to application.
7. The Consultation() API returns additional UCID field to application.
25 Mar 2016, ivrSVR 1.1.8 just released. This version supports additional CTI functions
- QueryDeviceInfo
- DeflectCall
- PickupCall
- QueryAgentLogin
- QueryAgentState
- QueryCallClassifier
- QueryDeviceName
- QueryDoNotDisturb
- QueryForwarding
- QueryMsgWaitingInd
- QueryStationStatus
- QueryTimeOfDay
- QueryTrunkGroup
- QueryUCID
- SetDoNotDisturb
- SetForwarding
- SetMsgWaitingInd
Preparation and Password Encryption
- The access MDB file stored the the username and password of AE server. For security reason, a tool called encryptpasswd.exe is provided to generate an encrypted password for the installation and configuration of the software
- Execute the program, generate an encrypted passwords for the user of AE server, then paste the encrypted password to parameter ivr_tlink. For example, the encrypted password for “p@ssword” is “R3NIw1yJMLlnPFzEQtuh2A==”
64 bit Windows System
- For 64 bit Windows system, please follow the steps below
- Download and install the Microsoft Visual C++ 2008 Service Pack 1 Redistributable Package MFC Security Update http://www.microsoft.com/en-hk/download/details.aspx?id=26368, select the x86 version
- Configure ODBC System DSN using
- C:\Windows\SysWOW64\odbcad32.exe
- Stop the Windows firewall because it enables by default and I don’t have time to figure out what ports are required to open, you need to find them out by yourself.
Installation
- Download the TSAPI client for Windows 32-bit from Avaya web site, it contains the library files. DevConnect registration is required before you can access the download page.
- Download the ivrSVR zip file here or backup site.
- Follow the installation steps below to install the software.
- Extract all the files into directory c:\program files\ivrSVR
- Open Windows Command Prompt, enter the following commands to register the program as Windows Service
- cd c:\program files\ivrSVR
- ivrSVR -i
- Open ODBC Setting, create a System DSN called IVRSVRCFG for Microsoft Access Driver and point to ivrsvr.mdb which is located in the directory c:\program files\ivrSVR
- Open the Access file, edit the value of parameters ivr_tlink_01 and ivr_tlink_02 to the TLINK of your AES servers in the tParameter table
- Start the Windows Service ivrSVR
- Telnet to localhost and port number 14012, enter username tcpgate and password tcpgate01 to access the program console
- Enter the following command in the program console, you will receive debug information
- trace on asc
- Enter the following command in the program console, you will get the help message
- help
- To support passing of user data between applications, please install uuiSVR which is described in ScreenPop page. Then modify the ivr_uuisvr parameter to have the IP address and port number of the uuiSVR.
Load Balance and Redundant Configuration

- The ivrSVR is designed as a stateless CTI server especially the REST interface which has no fixed connection between the clients and servers.
- You can use Linux Virtual Servers to form a Virtual IP (VIP) for ivrSVR instances. If you configure the LVS as round robin, then load balance of ivrSVR can be implemented very easily.
- If one of the ivrSVR server instance is failure, LVS can detect it and route the subsequent traffic to other healthy ivrSVR instances.
- If you want to remove a particular ivrSVR instance from the LVS, you can do it very easily by the following tcpgate console command
- add blacklist 10.10.1.231 activeLVS
- Hint: this adds the active LVS as blacklist IP address to ivrSVR, the polling messages from the LVS will not be entertained and LVS will remove the ivrSVR from the connection pool.
- delete blacklist 10.10.1.231
- Hint: After maintenance, please remove the blacklist so LVS polling messages will be entertained and LVS will add the ivrSVR to the connection pool.
- add blacklist 10.10.1.231 activeLVS
Customized DLL for Passing of User Data
- Edit the parameters to enable passing of user data. A customized DLL is used to set or get of user data from UUI key
- ivr_custdataconfigstring, the configuration string of your customized DLL
- ivr_custdatadll, the path and name of the DLL
- ivr_custdatamaxsize, the maximum size of user data
ActiveX
- Register the ActiveX control ctiClient.ocx by the following Windows command
- regsvr32 ctiClient.ocx
REST interface
- ACD Login
- ACD Logout
- ACD SetState
- MakeCall
- Answer
- Hangup
- DropParty
- Hold
- Retrieve
- http://IP:PORT/retrieve?extension=61111
- http://IP:PORT/retrieve?extension=61111&destination=T1234%232
- We must encode # character as %23 in the REST interface
- http://IP:PORT/retrieve?extension=61111&callid=1234
- Transfer
- http://IP:PORT/transfer?extension=61111
- Two steps transfer after consultation call
- http://IP:PORT/transfer?extension=61111&destination=912345678&data=hello
- One step transfer
- http://IP:PORT/transfer?extension=61111
- Conference
- http://IP:PORT/conference?extension=61111
- Two steps conference after consultation call
- http://IP:PORT/conference?extension=61111&destination=912345678&data=hello
- One step conference
- http://IP:PORT/conference?extension=61111
- Consultation
- Reconnect
- Alternate
- DTMF
- http://IP:PORT/dtmf?extension=61111&dtmf=0
- http://IP:PORT/dtmf?extension=61111&dtmf=1
- http://IP:PORT/dtmf?extension=61111&dtmf=2
- http://IP:PORT/dtmf?extension=61111&dtmf=3
- http://IP:PORT/dtmf?extension=61111&dtmf=4
- http://IP:PORT/dtmf?extension=61111&dtmf=5
- http://IP:PORT/dtmf?extension=61111&dtmf=6
- http://IP:PORT/dtmf?extension=61111&dtmf=7
- http://IP:PORT/dtmf?extension=61111&dtmf=8
- http://IP:PORT/dtmf?extension=61111&dtmf=9
- http://IP:PORT/dtmf?extension=61111&dtmf=*
- http://IP:PORT/dtmf?extension=61111&dtmf=%23
- We must encode # character as %23 in the REST interface
- UserData
- http://IP:PORT/userdata?extension=61111&type=alert
- http://IP:PORT/userdata?extension=61111&type=hangup
- http://IP:PORT/userdata?type=get&uui=FCCCCCCC0000000156A853617F00000113EC00000005
- http://IP:PORT/userdata?type=set&&data=hello
- http://IP:PORT/userdata?type=update&uui=FCCCCCCC0000000156A853617F00000113EC00000005&data=hello
- ClearCall
- http://IP:PORT/clearcall?extension=61111&destination=62222
- http://IP:PORT/clearcall?extension=61111&destination=61111
- Hint: clear all calls for extension 61111
- http://IP:PORT/clearcall?extension=61111&callid=12345
- DeflectCall
- PickupCall
- SingleStepConference
- SelectiveListeningHold
- SelectiveListeningRetrieve
- Snapshot
- QueryACDSplit
- QueryAgentLogin
- QueryAgentState
- QueryCallClassifier
- QueryTimeOfDay
- QueryDeviceName
- QueryDoNotDisturb
- QueryDeviceInfo
- QueryForwarding
- QueryMsgWaitingInd
- QueryStationStatus
- QueryTrunkGroup
- QueryUCID
- SetDoNotDisturb
- SetForwarding
- SetMsgWaitingInd
Installation for WebSocket interface Call Control
- Enter the following command in the program console to add a WebSocket interface port
- add tcp 9001 * * custom ivrsvrws
- WebSocket interface accepts JSON request, returns JSON response and delivers unsolicited JSON events
- The JSON strings for MakeCall request and response are
- {id: “1”, request: “makecall”, extension: “101”, destination: “67896789”, data: “hello world”}
- {msgtype: “response”, id: “1”, result: “success”, callid: “12345”, ucid: “00001148011456795778”}
- The JSON strings for Hold call request and response are
- {id: “2”, request: “hold”, extension: “101”}
- {msgtype: “response”, id: “2”, result: “success”, error: “”}
- The JSON strings for Retrieve call request and response are
- {id: “3”, request: “retrieve”, extension: “101”}
- {id: “3”, request: “retrieve”,, extension: “101”, destination: “T1234#1”}
- {msgtype: “response”, id: “3”, result: “success”, error: “”}
- The JSON strings for Hangup call request and response are
- {id: “4”, request: “hangup”, extension: “101”, data: “hello world”}
- {msgtype: “response”, id: “4”, result: “success”, error: “”}
- The JSON strings for DropParty call request and response are
- {id: “4”, request: “dropparty”, extension: “101”, party: “60123”, data: “hello world”}
- {msgtype: “response”, id: “4”, result: “success”, error: “”}
- The JSON strings for Answer call request and response are
- {id: “5”, request: “answer”,extension: “101”, destination: “67896789”}
- {msgtype: “response”, id: “5”, result: “success”, callid: “12345”}
- The JSON strings for Consultation call request and response are
- {id: “6”, request: “consultation”,extension: “101”, destination: “67896789”, data: “hello world”}
- {msgtype: “response”, id: “6”, result: “success”, primarycallid: “123”, secondarycallid: “456”, ucid: “00001148011456795778”}
- The JSON strings for Reconnect call request and response are
- {id: “7”, request: “reconnect”, extension: “101” }
- {msgtype: “response”, id: “7”, result: “success”, error: “”}
- The JSON strings for Alternate call request and response are
- {id: “8”, request: “alternate”, extension: “101”}
- {msgtype: “response”, id: “8”, result: “success”, error: “”}
- The JSON strings for Transfer call request and response are
- {id: “9”, request: “transfer”, extension: “101”, destination: “67896789”}
- {msgtype: “response”, id: “9”, result: “success”, error: “”}
- The JSON strings for Conference call request and response are
- {id: “10”, request: “conference”, extension: “101”, destination: “67896789”}
- {msgtype: “response”, id: “10”, result: “success”, error: “”}
- The JSON strings to send DTMF request and response are
- {id: “11”, request: “dtmf”, extension: “101”, dtmf: “1”}
- {msgtype: “response”, id: “11”, result: “success”, error: “”}
- The JSON strings for ACD Login request and response are
- {id: “12”, request: “login”, extension: “101”, agentid: “12345”, passwd:”67890″}
- {msgtype: “response”, id: “12”, result: “success”, error: “”}
- The JSON strings for ACD Logout request and response are
- {id: “13”, request: “logout”, extension: “101”, agentid: “12345”, passwd:”67890″}
- {msgtype: “response”, id: “13”, result: “success”, error: “”}
- The JSON strings for ACD SetState request and response are
- {id: “14”, request: “setstate”, extension: “101”, state: “aux”, reasoncode:”1″}
- {id: “14”, request: “setstate”, extension: “101”, state: “acw”}
- {id: “14”, request: “setstate”, extension: “101”, state: “manual”}
- {id: “14”, request: “setstate”, extension: “101”, state: “auto”}
- {msgtype: “response”, id: “14”, result: “success”, error: “”}
- The JSON strings for StartMonitor extension
- {id: “15”, request: “startmonitor”, extension: “101”}
- {msgtype: “response”, id: “15”, result: “success”, error: “”}
- The JSON strings for StopMonitor extension
- {id: “16”, request: “stopmonitor”, extension: “101”}
- {msgtype: “response”, id: “16”, result: “success”, error: “”}
- The JSON strings for Alert UserData request and response are
- {id: “17”, request: “userdata”, extension: “101”, type: “alert”}
- {“msgtype”: “response”, “id”: “17”, “result”: “success”, “callid”: 1361, “calling”: “101”, “called”: “102”, “alerting”: “102”, “cli”: “101”, “dnis”: “102”, “uec”: “”, “ucid”: “00001013551428290972”, “split”: “”, “trunkgroup”: “5”, “trunkmember”: “20”, “userdata”: “”}
- The JSON strings for Hangup UserData request and response are
- {id: “18”, request: “userdata”, extension: “101”, type: “hangup”}
- {“msgtype”: “response”, “id”: “18”, “result”: “success”, “callid”: 1361, “releasing”: “101”, “ucid”: “00001013551428290972”, “userdata”: “”}
- The JSON strings for Get, Set and Update UserData requests are
- {id: “18”, request: “userdata”, extension: “101”, type: “get”, uui: “FCCCCCCC0000000156A853617F00000113EC00000005”}
- {“msgtype”: “response”, “id”: “18”, “result”: “success”, “data”: “get data”}
- {id: “18”, request: “userdata”, extension: “101”, type: “set”, data: “set data”}
- {“msgtype”: “response”, “id”: “18”, “result”: “success”, “uui”: “FCCCCCCC0000000156A853617F00000113EC00000005”}
- {id: “18”, request: “userdata”, extension: “101”, type: “update”, uui: “FCCCCCCC0000000156A853617F00000113EC00000005”, data: “upate data”}
- {“msgtype”: “response”, “id”: “18”, “result”: “success”, “error”: “”}
- The JSON strings for ClearCall request and response are
- {id: “19”, request: “clearcall”, extension: “101”, destination: “102”}
- {msgtype: “response”, id: “19”, result: “success”, error: “”}
- The JSON strings for DeflectCall request and response are
- {id: “20”, request: “deflectcall”, extension: “101”, destination: “102”}
- {msgtype: “response”, id: “20”, result: “success”, error: “”}
- The JSON strings for PickupCall request and response are
- {id: “21”, request: “pickupcall”, extension: “101”, destination: “102”}
- {msgtype: “response”, id: “21”, result: “success”, error: “”}
- The JSON strings for Snapshot request and response are
- {id: “22”, request: “snapshot”, extension: “101”}
- {“msgtype”: “response”, “id”: “22”, “result”: “success”, “error”: “”, “extension”: “101”, “numcall”: 1, “list”: [{“callid”: 13815, “state”: “connect”, “numparty”: 2, “party”: [{“extension”: “101”}, {“extension”: “T13815#2”}]}]}
- The JSON strings for SingleStepConference request and response are
- {id: “22”, request: “singlestepconference”, extension: “101”, devicetojoin: “102”, type: “passive”}
- {msgtype: “response”, id: “22”, result: “success”, callid: “12345”, ucid: “00001000481428289124”}
- The JSON strings for SelectiveListeningHold request and response are
- {id: “22”, request: “selectivelisteninghold”, extension: “101”, party: “102”}
- {id: “22”, request: “selectivelisteninghold”, extension: “101”, party: “all”}
- {msgtype: “response”, id: “22”, result: “success”}
- The JSON strings for SelectiveListeningRetrieve request and response are
- {id: “22”, request: “selectivelisteningretrieve”, extension: “101”, party: “102”}
- {id: “22”, request: “selectivelisteningretrieve”, extension: “101”, party: “all”}
- {msgtype: “response”, id: “22”, result: “success”}
- The JSON strings for QueryACDSplit request and response are
- {id: “23”, request: “queryacdsplit”, split: “201”}
- {“msgtype”: “response”, “id”: “23”, “result”: “success”, “agentsavailable”: 5, “callsqueue”: 0, “agentslogon”: 26}
- The JSON strings for QueryAgentLogin request and response are
- {id: “24”, request: “queryagentlogin”, split: “201”}
- {“msgtype”: “response”, “id”: “24”, “result”: “success”, “split”: “201”, “numextension”: 5, “list”: [{“extension”: “101”}, {“extension”: “102”}, {“extension”: “103”}, {“extension”: “104”}, {“extension”: “105”}]}
- The JSON strings for QueryAgentState request and response are
- {id: “25”, request: “queryagentstate”, extension: “101”}
- {“msgtype”: “response”, “id”: “25”, “result”: “success”, “skillmode”: “null”, “talkstate”: “idle”, “reasoncode”: 0}
- The JSON string for QueryCallClassifier request and response are
- {id: “26”, request: “querycallclassifier”}
- {“msgtype”: “response”, “id”: “26”, “result”: “success”, “availport”: 439, “usedport”: 5}
- The JSON string for QueryTimeOfDay request and response are
- {id: “27”, request: “querytimeofday”}
- {“msgtype”: “response”, “id”: “27”, “result”: “success”, “year”: 16, “month”: 3, “day”: 23, “hour”: 22, “minute”: 24, “second”: 16}
- The JSON string for QueryDeviceName request and response are
- {id: “28”, request: “querydevicename”, extension: “101”}
- {“msgtype”: “response”, “id”: “28”, “result”: “success”, “name”: “Peter”}
- The JSON string for QueryDoNotDisturb request and response are
- {id: “29”, request: “querydonotdisturb”, extension: “101”}
- {“msgtype”: “response”, “id”: “29”, “result”: “success”, “dnd”: “false”}
- The JSON string for QueryDeviceInfo request and response are
- {id: “30”, request: “querydeviceinfo”, extension: “101”}
- {“msgtype”: “response”, “id”: “30”, “result”: “success”, “associatedclass”: “other”, “associateddevice”: “”}
- The JSON string for QueryForwarding request and response are
- {id: “31”, request: “queryforwarding”, extension: “101”}
- {“msgtype”: “response”, “id”: “31”, “result”: “success”, “destination”: “102”}
- The JSON string for QueryMsgWaitingInd request and response are
- {id: “32”, request: “querymsgwaitingind”, extension: “101”}
- {“msgtype”: “response”, “id”: “32”, “result”: “success”, “indicator”: “false”}
- The JSON string for QueryStationStatus request and response are
- {id: “33”, request: “querystationstatus”, extension: “101”}
- {“msgtype”: “response”, “id”: “33”, “result”: “success”, “busy”: “false”}
- The JSON string for QueryTrunkGroup request and response are
- {id: “34”, request: “querytrunkgroup”, tag: “410”}
- {“msgtype”: “response”, “id”: “34”, “result”: “success”, “idletrunks”: 91, “usedtrunks”: 1}
- The JSON string for QueryUCID request and response are
- {id: “35”, request: “queryucid”, callid: “123”}
- {“msgtype”: “response”, “id”: “35”, “result”: “success”, “ucid”: “00001148011456795778”}
- The JSON string for SetDoNotDisturb request and response are
- {id: “36”, request: “setdonotdisturb”, extension: “101”, dnd: “true”}
- {“msgtype”: “response”, “id”: “36”, “result”: “success”, “error”: “”}
- The JSON string for SetForwarding request and response are
- {id: “37”, request: “setforwarding”, extension: “101”, destination: “102”, fwd: “true”}
- {“msgtype”: “response”, “id”: “37”, “result”: “success”, “error”: “”}
- The JSON string for SetMsgWaitingInd request and response are
- {id: “38”, request: “setmsgwaitingind”, extension: “101”, ind: “true”}
- {“msgtype”: “response”, “id”: “38”, “result”: “success”, “error”: “”}
- The JSON strings for incoming Call Offer event is
- {msgtype: “event”, eventtype: “offer”, “referenceid”: 1, origcalling: “101”, origcalled: “102”, calling: “101”, called: “102”, alerting: “102”, ucid: “00001094861421138402”, uui: “”, uec: “”, split: “”, custdata: “”, time:1424044800, trunkgroup: “10”, trunkmember: “12”, lastredirection: “”, callid: 48}
- The JSON string for outgoing Call Alert event is
- {“msgtype”: “event”, “eventtype”: “alert”, “referenceid”: 1, “origcalling”: “101”, “origcalled”: “102”, “calling”: “101”, “called”: “102”, “alerting”: “102”, “ucid”: “00001000481428289124”, “uui”: “”, “custdata”: “”, “time”: 1428289128, “trunkgroup”: “5”, “trunkmember”: “118”, “callid”: 48}
- The JSON string for Call Connect event is
- {“msgtype”: “event”, “eventtype”: “connect”, “referenceid”: 1, “origcalling”: “101”, “origcalled”: “102”, “calling”: “101”, “called”: “102”, “answering”: “102#2”, “ucid”: “00001000481428289124”, “uui”: “”, “uec”: “”, “split”: “”, “custdata”: “”, “time”: 1428289134, “trunkgroup”: “5”, “trunkmember”: “118”, “lastredirection”: “”, “callid”: 48}
- The JSON string for Call Fail event is
- {msgtype: “event”, eventtype: “fail”, “referenceid”: 1, failing: “101”, called: “102”, cause: 23, time:1424044800, callid: 48}
- The JSON string for Call Hold event is
- {“msgtype”: “event”, “eventtype”: “hold”, “referenceid”: 1, “holding”: “101”, “time”: 1428289135, “callid”: 48}
- The JSON string for Call Retrieve event is
- {msgtype: “event”, eventtype: “retrieve”, “referenceid”: 1, retrieving: “101”, time:1428289135, callid: 48}
- The JSON string for Call Disconnect event is
- {“msgtype”: “event”, “eventtype”: “disconnect”, “referenceid”: 1, “releasing”: “101”, “uui”: “”, “custdata”: “”, “time”: 1428289136, “callid”: 48}
- The JSON string for Call Transfer event is
- {msgtype: “event”, eventtype: “transfer”, “referenceid”: 1, transferring: “101”, transferred: “102”, ucid: “00001094861421138402”, uui: “”, cusdata: “”, time:1424044800, trunkgroup: “10”, trunkmember: “12”, primarycallid: 123, secondarycallid: 124, party1: “101”, party2: “102”, party3: “”, party4: “”, party5: “”, party6: “”}
- The JSON string for Call Conference event is
- {msgtype: “event”, eventtype: “conference”, “referenceid”: 1, controller: “101”, addedparty: “102”, ucid: “00001094861421138402”, uui: “”, cusdata: “”, time:1424044800, trunkgroup: “10”, trunkmember: “12”, primarycallid: 123, secondarycallid: 124, party1: “101”, party2: “102”, party3: “”, party4: “”, party5: “”, party6: “”}
- The JSON string for Call Idle event is
- {msgtype: “event”, eventtype: “idle”, “referenceid”: 1, time: 1424044800, “extension”: “101”}
Uninstallation
- Stop the Window Service ivrSVR
- Open Windows Command Prompt, enter the following commands to uninstall the program from Windows Service
- cd c:\program files\ivrsvr
- ivrSVR -u
Support and License
- Please contact upinget.com for support and license
6 Jun 2014, clintSVR 1.1.8 just released. This release supports some new features and fixed a numbers of bugs. For details, please refer to the support page.
- Supports input object with space by encoding space as %20.
- Add <split></split>, <agent></agent> and <vdn></vdn> section for result XML.
- The REST interface supports report searching by description.
- The clintSVR checks split and vdn objects are input in ascending order.
- Returns error when number of reports (split,vdn) not equal to input objects (split,vdn).
- Mapping of agent state to different name. For example map ACD IN to ONCALL.
- The Dictionary supports global scope mapping and individual ACD mapping.
- The XMPP interface supports report searching by description.
- Fixed zero or inaccurate value of “Average” figures bug in split skill report and top agent split skill report.
24 May 2014, AvayaCDR 1.5.4 just released. This version supports CentOS 6.x 64bit, Ubuntu 14.04 32bit and 64bit OS. Also this version has some minor bug fixing. For details, please refer the support page. I repackaged the software to include the files for Ubuntu 14.04 32bit and 64bit OS on 5 Jun.
13 May 2014, clintSVR 1.1.7 just released. This release supports feeding CMS real time data to Splunk so we can generate dashboard reports easily. For details, please refer to the support page.
I am writing a connector for clintSVR and Splunk. Splunk is a software for machine data and it is very easy to generate dashboard reports using its google like search function. I can create the following dashboard reports by using the SplitSkillReport and SplitSkillStatus data. If you already have Splunk installed, you can create your own dashboard reports whatever you want. I will release the next version of clintSVR and write more posts on this feature.

