I use Microsoft Access MDB file to store program configurations for my tools. Recently some users told me some of my tools start up abnormal because configuration data could not read from the MDB file. I installed a testing Windows 2003 R2 server and applied the latest patches, found that the problem can be easily simulated. I recreated such MDB file from a workable one and the problem was gone immediately, it seemed something wrong that I could not explain. I recreated the relevant MDB file for my tools and updated the file in SourceForge, please download the file if you also encountered this problem.
Introduction

The clintSVR is a gateway program for the access of Avaya CMS real time and historical reports. It uses a tool called CLINT to retrieve the real time and historical data from Avaya CMS and provides API(s) for you to do application development. Applications such as wallboard and agent map software can be implemented on top of clintSVR. The clintSVR retrieves CMS real time and historical reports at an interval that specified by you, it stores the data in memory and allows multiple access by different programs via REST query API, WebSocket, OCX and C/C++ interfaces. The data is presented in XML / JSON format and the following interfaces and reports are supported:
- REST API to get real time and historical data
- WebSocket API to get real time and historical data
- C++ interface which header, library and DLL files are provided
- OCX interface for VB or ASP.net programming, some users use the OCX directly in Excel and manipulate the real time data using Excel formula
- Supports logging of data to database such as MSSQL, MySQL and Oracle
- Supports logging of data to Kafka
- Supports logging of data to Splunk
- Supports XMPP connection so clintSVR can connect to XMPP server such as Openfire
- Supports the following real time reports
- Agent Report
- Agent Group
- Event Count Summary
- Queue Agent Status
- Queue Top Agent Status
- Queue Agent Summary
- Split Skill Status
- Split Skill Report
- Split Skill Call Profile
- Split Skill Aux Report
- Split Skill Top Agent
- Split Skill Top Agent Status
- Trunk Group Report
- VDN Report
- VDN Call Profile
- VDN Skill Preference
- CustomRTA
- DeviceRTA
- AgentRTA
- Custom Report
- Supports the following historical reports via DLL, OCX and REST interfaces
- Historical Trunk Group Busy Hour
- Historical Trunk Group Summary Interval
- Historical Split Skill Summary Interval
- Historical Agent Summary Interval
- Historical Split Skill Service Level Interval (required additional charging)
- Historical VDN Interval
- Supports the following administration reports via DLL, OCX and REST interfaces
- Multi Agent Add Skill
- Multi Agent Delete Skill
- Multi Agent Modify Skill
- AUX Agent Report
- UPINGET Customized Reports (required additional charging)
- UPINGET Agent Group
- UPINGET Queue Agent Status
- UPINGET Real Time Split Skill Report
- UPINGET Historical All Split Skill Agent Summary
- UPINGET Historical All VDN Report
- UPINGET Real Time Queue Agent Status
- UPINGET Real Time All Split Skill Report
- UPINGET Real Time All Agent Status
- UPINGET Real Time All VDN Report
- UPINGET Split Skill SLA
- UPINGET VDN SLA
- Supports RT-Socket integration
- RT-Socket Split Skill Report
- Free Tool using clintSVR
See Also: bcmsSVR/BCMS Real Time and Historical Report Data
See Also: Call Analytics
Avaya CMS License Requirement
- For CMS 16 – 18, only CLINT license activation is required
- For CMS 19+, CLINT external session license is required. For details, please reference this document.
Prerequisite
- The CMS tool CLINT is activated
- A login ID with login shell such as /bin/ksh is created
- To verify your environment ready for the tool, please follow the steps below
- Download a tool called plink from web site which is the official site of putty
- Execute the following command to test if you can run clint from your machine
- plink -pw yourCmsPassword -ssh YourCmsUsername@YourCmsIP /cms/toolsbin/clint -u cmssvc
- You are ready to install the tool if you see the following output screen

Preparation and Password Encryption
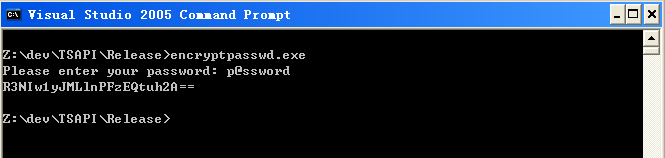
- The access MDB file stored username and password used by the clintSVR program. For security reason, a tool called encryptpasswd.exe is provided to generate encrypted password for the installation and configuration of the software.
- Execute the program, generate an encrypted password for the CMS user which is specific for the tool, then paste the encrypted password to parameter cs_cmspasswd. For example, the encrypted password for “p@ssword” is “R3NIw1yJMLlnPFzEQtuh2A==”

Testing using Docker Image
Please follow this guide to test ClintSVR using Docker Container.
Testing using OVA File

We have created a OVA file which you can deploy it to VirtualBox or VMware Workstation or Player for testing. After deploying the OVA file, please modify the following for your own environment.
- Reference this guide to delete the file /etc/udev/rules.d/70-persistent-net.rules
- Change the MAC address and IP address of the VM in the file /etc/sysconfig/network-scripts/ifcfg-eth0
- Telnet to clintSVR console port 14011, update parameters such as cs_cmsip, cs_cmsusername and cs_cmspasswd
- Once the changes are completed, reboot the VM
The username and password of the OVA VM is
- OS : root/P@ssw0rd
- MySQL: root/P@ssw0rd
- clintSVR console: tcpgate/tcpgate01
- Splunk URL: http://newIP:8000/
64 bit Windows System
- For 64 bit Windows system, please follow the steps below
- Configure ODBC System DSN using C:\Windows\SysWOW64\odbcad32.exe
- Stop the Windows firewall because it enables by default. ClintSVR use TCP port 14011 for telnet console, open it in firewall so you can configure the program remotely.
- If your system does not have the 64bit version of Access driver, please download and install Microsoft Access Database Engine 2016 Redistributable.
Installation
- We have recorded a video for Windows 2012 installation, please watch the video before the installation.
- Download the clintSVR zip file here or backup site.
- Follow the steps below to install the software.
- Extract all the files into directory c:\program files\clintSVR
- Open Windows Command Prompt, and enter the following commands to register the program as Windows Service, you need to run command prompt as Administrator when you run Windows 7 or above
- cd c:\program files\clintSVR
- clintSVR -i
- sc description clintSVR “Provides real-time report functions for Avaya CMS”
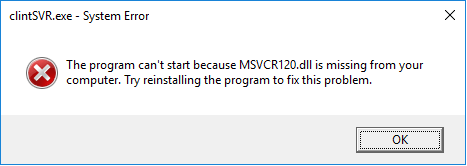
- If you found the following screen, please install Visual C++ Redistributable Packages for Visual Studio 2013, select the vcredist_x86.exe file, please
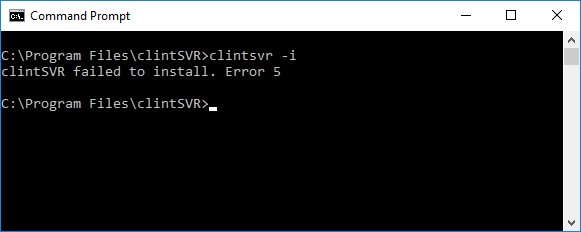
- If you found the following screen, please make sure you run the command prompt as Administrator
- Open ODBC Setting, create System DSN called CLINTSVRCFG for Microsoft Access Driver and select clintSVR.mdb which is located in the directory c:\program files\clintSVR
- Version 2.2.1 or above
- Start the Windows Service clintSVR
- Telnet to the tcpgate console and enter the following commands for program configuration
- setup
- setup database
- setup api
- setup splunk
- Version 2.2.0 or below
- Open the Access file, and edit the value of parameters cs_cmsip which is the IP address of the CMS server
- Edit the value of parameter cs_cmsport which is the SSH port number, default value is 22
- Edit the value of parameter cs_cmsusername which is the username in the CMS server for the clintSVR program, create one when necessary, don’t use CMS application user because CMS application user by default has no shell and SSH connection is disabled
- Edit the value of parameter cs_cmspasswd, and use the encrypted password generated by the encryptpasswd.exe program
- Start the Windows Service clintSVR
Add Reports
- To get real time report data, you need to add your report to clintSVR. The clintSVR will build a connection with CMS after you have added the report. CMS will push the real time report to clintSVR at an interval that specified by you
- Telnet to the IP and port number 14011 where clintSVR is installed, enter username tcpgate and password tcpgate01 to access the program console
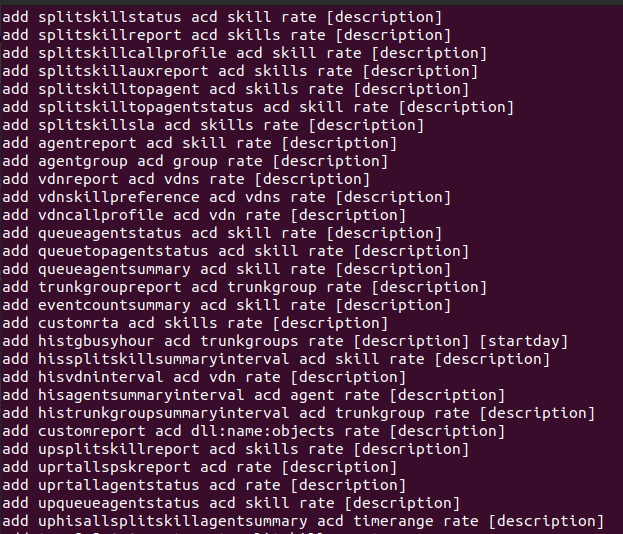
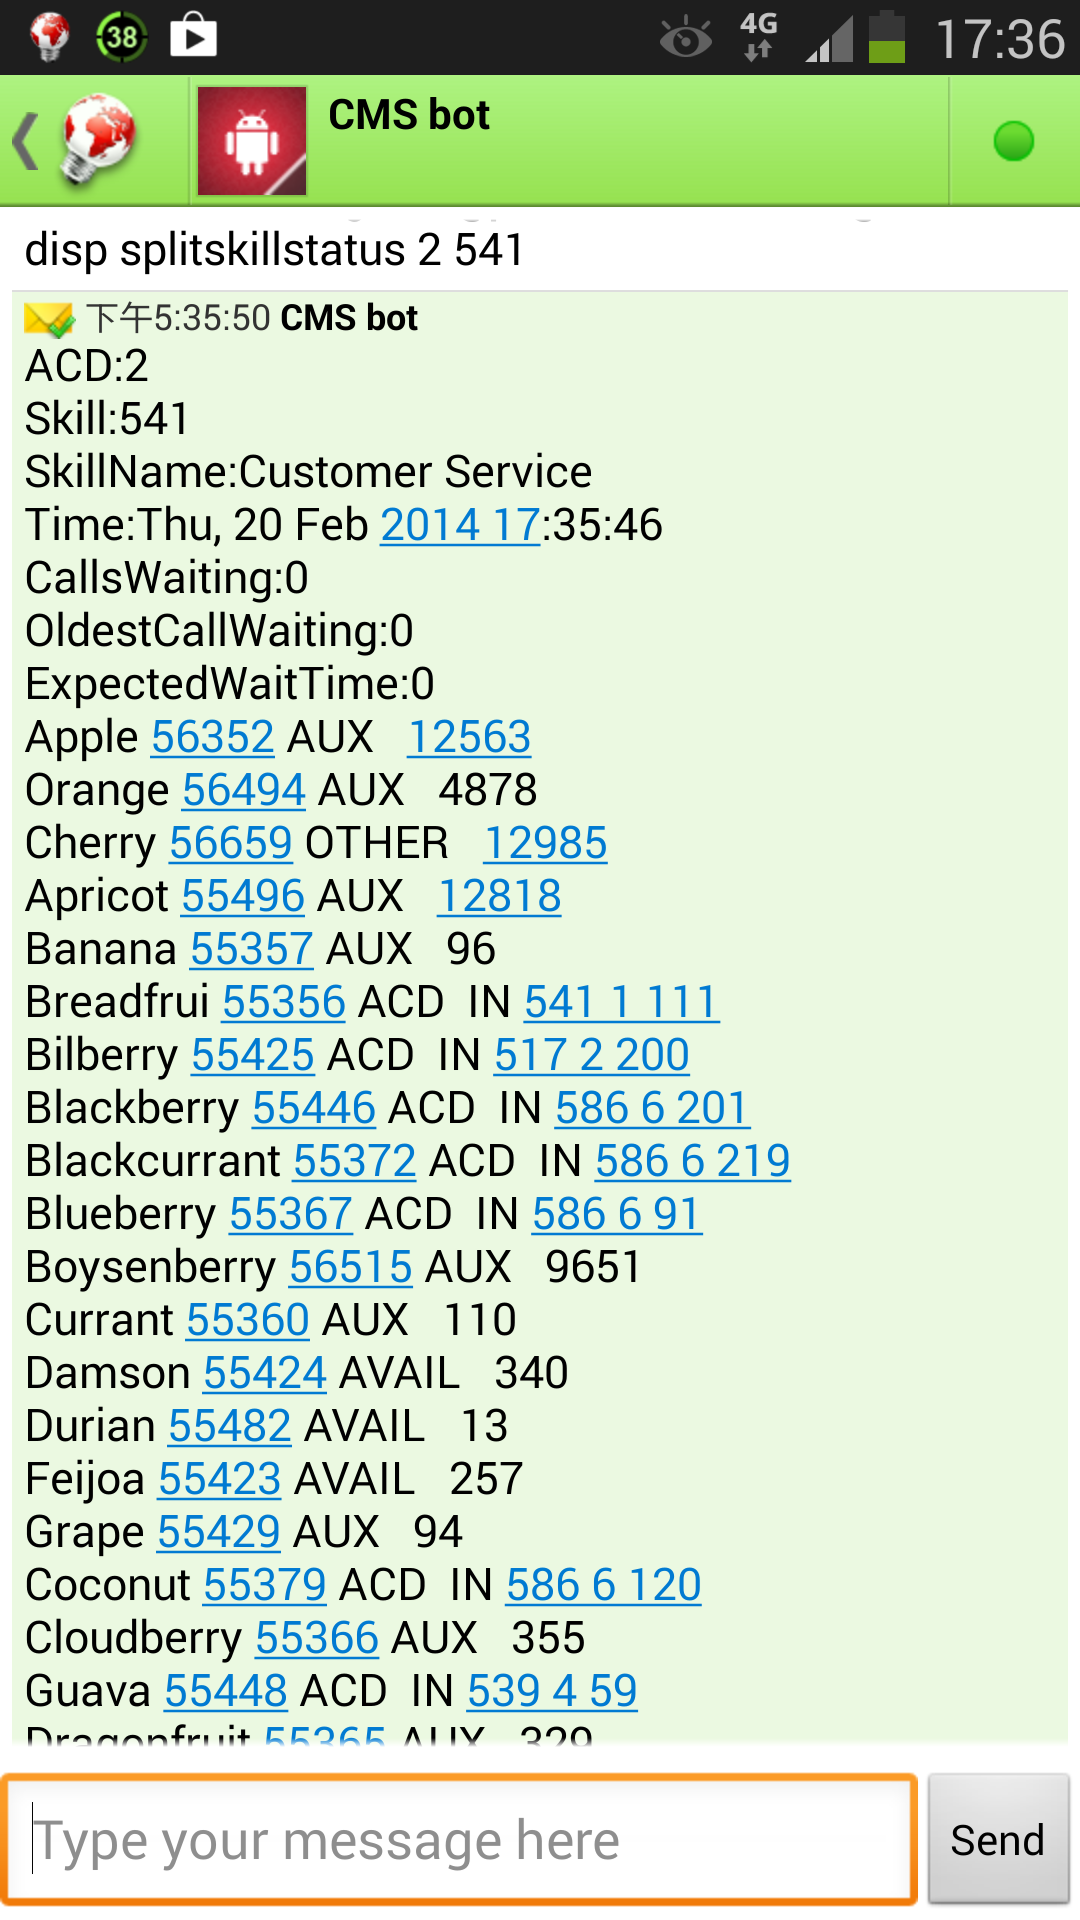
- To add Split Skill Status Report, enter the following command
- add splitskillstatus 2 45 10 programA
- Hint: 2 is ACD number
- Hint: 45 is skill number
- Hint: 10 is refresh rate in seconds
- Hint: programA is a description
- Hint: CMS will push the Split Skill Status report to clintSVR every 10 seconds
- To add Spit Skill AUX Report, enter the following command
- add splitskillauxreport 2 45 10 programA
- Hint: multiple skills parameter is supported, the skills are inputted in ascending order and separated by “;”. For example, 1;2;3;4;5;6;7;8;9;10 are splits in ascending order
- To add Split Skill Top Agent report, enter the following command
- add splitskilltopagent 2 45 10 programA
- Hint: multiple skills parameter is supported, the skills are inputted in ascending order and separated by “;”. For example, 1;2;3;4;5;6;7;8;9;10 are splits in ascending order
- To add Split Skill Top Agent Status report, enter the following command
- add splitskilltopagentstatus 2 45 10 programA
- To add Split Skill Report, enter the following command
- add splitskillreport 2 45 10 programA
- Hint: multiple skills parameter is supported, the skills are inputted in ascending order and separated by “;”. For example, 1;2;3;4;5;6;7;8;9;10 are splits in ascending order.
- To add Split Skill Call Profile Report, enter the following command
- add splitskillcallprofile 2 45 10 programA
- To add VDN Report, enter the following command
- add vdnreport 3 21101 10 programA
- Hint: multiple vdns parameter is supported, the vdns are input in ascending order and separated by “;”. For example, 1001;1002;1003 are vdns in ascending order
- To add VDN Skill Preference report, enter the following command
- add vdnskillpreference 2 21101 10 programA
- Hint: multiple vdns parameter is supported, the vdns are input in ascending order and separated by “;”. For example, 1001;1002;1003 are vdns in ascending order
- To add VDN Call Profile report, enter the following command
- add vdncallprofile 2 21101 10 programA
- To add Agent Report, enter the following command
- add agentreport 2 45 10 programA
- To add Agent Group report, enter the following command
- add agentgroup 2 Apple 10 programA
- Hint: Apple is agent group name. Name with space is supported and the space is encoded as %20. E.g. If you agent group is called “Apple team”, the encoded name is “Apple%20team”. To get the report via REST, provide the name in encoded format. But it is not required when using the C++ or OCX interface.
- To add Event Count Summary report, enter the following command
- add eventcountsummary 2 45 10 programA
- To add Queue Agent Status report, enter the following command
- add queueagentstatus 2 45 10 programA
- To add Queue Top Agent Status report, enter the following command
- add queuetopagentstatus 2 45 10 programA
- To add Queue Agent Summary report, enter the following command
- add queueagentsummary 2 45 10 programA
- To add Trunk Group Report, enter the following command
- add trunkgroupreport 2 41 10 programA
- To add Custom RTA report, enter the following command
- add customrta 2 1-999;1000-2000 10 rta
- To turn on trace, enter the following command
- trace on asc
- To get help message, enter the following command
- help
Uninstallation
- Stop the Window Service clintSVR
- Open Windows Command Prompt, enter the following commands to uninstall the program from Windows Service
- cd c:\program files\clintSVR
- clintSVR -u
RedHat/CentOS 7.x Installation Procedure

- The following is for RedHat/CentOS 7 64 bit OS only, other Linux distribution is similar
- Login as root and execute the following commands
- Disable SELINUX and stop firewall
-
sed -i 's/\(^SELINUX=\).*/\SELINUX=disabled/' /etc/selinux/config
-
systemctl disable firewalld
-
systemctl stop firewalld
-
reboot
- Install the MySQL 8.x
-
sudo rpm -Uvh https://dev.mysql.com/get/mysql80-community-release-el7-1.noarch.rpm sudo yum --enablerepo=mysql80-community install mysql-community-server sudo service mysqld start grep "A temporary password" /var/log/mysqld.log mysql_secure_installation - Install the following packages
-
yum install telnet ntp
-
yum install libssh2 mysql-connector-odbc unixODBC
- Config and start MySQL
-
systemctl enable mysqld
-
systemctl start mysqld
- Config and start ntpd
-
systemctl enable ntpd
-
systemctl start ntpd
- Create database and user
-
mysql -u root -p
-
> create database clintsvr;
-
> create database clintrtdb;
-
> create user 'tcpgate'@'localhost' identified by 'P@ssw0rd';
-
> grant all on clintsvr.* to 'tcpgate'@'localhost';
-
> grant all on clintrtdb.* to 'tcpgate'@'localhost';
-
> flush privileges;
-
> quit
-
mysql -h localhost -u tcpgate -p clintsvr < clintsvr.sql
-
mysql -h localhost -u tcpgate -p clintrtdb < clintrtdb.sql
- Copy the following to /etc/odbc.ini file
- [CLINTSVRCFG]
Description = MySQL connection to clintSVR
Driver =MySQL ODBC 8.0 ANSI Driver
Server = localhost
Port = 3306
Database = clintsvr - [CLINTRTDBCFG]
Description = MySQL connection to clintSVR RTDB
Driver =MySQL ODBC 8.0 ANSI Driver
Server = localhost
Port = 3306
Database = clintrtdb
- [CLINTSVRCFG]
- Create user and copy files
-
useradd clintsvr
-
mkdir /usr/local/clintsvr
-
cp clintSVR64 /usr/local/clintsvr
-
chmod +x /usr/local/clintsvr/clintSVR64
-
chown -R clintsvr.clintsvr /usr/local/clintsvr
-
mkdir -p /var/log/clintsvr
-
chown -R clintsvr.clintsvr /var/log/clintsvr
- Auto start the daemon after server reboot
-
echo "rm /tmp/clintsvr.log" >> /etc/rc.local
-
echo "su clintsvr -c '/usr/local/clintsvr/clintSVR64 -u tcpgate -p 40UIt9O3PqtwsSn+Wx6pig=='" >> /etc/rc.local
-
chmod +x /etc/rc.local
Ubuntu 14.04 Installation Guide

- The following is for Ubuntu 14.04 only, the commands can be found in the ubuntu/installation.txt file
- The executable file of 32 bit version is “clintSVR”, the 64 bit version is “clintSVR64”
- Install the following packages
-
sudo apt-get install mysql-server mysql-client
-
sudo apt-get install libmyodbc unixodbc unixodbc-bin
-
sudo apt-get install libssh2-1 libssh-4 openssl unrar
- Create database and user
-
mysql -u root -p
-
create database clintsvr;
-
create user 'tcpgate'@'localhost' identified by 'tcpgate';
-
grant all on clintsvr.* to 'tcpgate'@'localhost';
-
flush privileges;
-
quit
-
mysql -h localhost -u tcpgate -p clintsvr < clintsvr.sql
- Copy the following to /etc/odbcinst.ini file for Ubunt 64bit
- [MySQL]
Description = ODBC for MySQL
Driver = /usr/lib/x86_64-linux-gnu/odbc/libmyodbc.so
Setup = /usr/lib/x86_64-linux-gnu/odbc/libodbcmyS.so
UsageCount = 1
- [MySQL]
- Copy the following to /etc/odbcinst.ini file for Ubunt 32bit
- [MySQL]
Description = ODBC for MySQL
Driver = /usr/lib/i386-linux-gnu/odbc/libmyodbc.so
Setup = /usr/lib/i386-linux-gnu/odbc/libodbcmyS.so
UsageCount = 1
- [MySQL]
- Install the ODBC driver
-
sudo odbcinst -i -d -f /etc/odbcinst.ini
- Copy the following to /etc/odbc.ini file
- [CLINTSVRCFG]
Description = MySQL connection to clintSVR
Driver = MySQL
Server = localhost
Port = 3306
Socket = /var/run/mysqld/mysqld.sock
Database = clintsvr - [CLINTRTDBCFG]
Description = MySQL connection to clintSVR RTDB
Driver = MySQL
Server = localhost
Port = 3306
Socket = /var/run/mysqld/mysqld.sock
Database = clintrtdb
- [CLINTSVRCFG]
- Install your system DSN
-
sudo odbcinst -i -s -l -f /etc/odbc.ini
- Create user and copy files
-
sudo useradd clintsvr
-
sudo mkdir /usr/local/clintsvr
-
sudo cp clintSVR /usr/local/clintsvr
-
sudo chmod +x /usr/local/clintsvr/clintSVR
-
sudo chown -R clintsvr.clintsvr /usr/local/clintsvr
-
sudo mkdir -p /var/log/clintsvr
-
sudo chown -R clintsvr.clintsvr /var/log/clintsvr
- Auto start the daemon after server reboot, add the following before ‘exit 0’ to /etc/rc.local file
-
rm -f /tmp/clintsvr.log
-
su clintsvr -c '/usr/local/clintsvr/clintSVR'
Ubuntu 16.04 Installation Notes
- Follow this guide to install MySQL ODBC driver “libmyodbc” on Ubuntu 16.04
Ubuntu 18.04 Installation Notes
- Follow this guide to install MySQL ODBC driver “libmyodbc” on Ubuntu 18.04
- Follow this guide to create the /etc/rc.local file
Dictionary
- The program supports dictionary mapping for objects such as agentID, split/skill, vdn so your mapped name are presented in the resulting XML string.
- To add new dictionary, enter the following command
- add dict
- Hint: Enter the acd, id and mappedName when they are prompted
REST Query API
- To enable REST query API, enter the following command in the program console
- add tcp 8088 * * custom clintcgi
- Hint: 8088 is the port number for the REST query API, choose one that fits your environment
- add tcp 8088 * * custom clintcgi
- The URL syntax for VDN Report is
- http://clintSVRIP:8088/vdnreport?acd=3&vdns=21101
- http://clintSVRIP:8088/vdnreport?acd=3&description=programA
- Hint: The VDN report is added before
- Hint: The report is searchable by vdns and description parameters, make sure the description value is unique identified
- Hint: The following XML is for example of VDN Report for vdns 45790 and 45791

- The URL syntax for Split Skill Status Report is
- http://clintSVRIP:8088/splitskillstatus?acd=2&skill=45
- http://clintSVRIP:8088/splitskillstatus?acd=2&description=programA
- Hint: 2 is ACD number
- HInt: 45 is the skill number
- Hint: The report is searchable by skill and description parameters, make sure the description value is unique identified
- Hint: The following XML is for example of Split Skill Report for skill 532

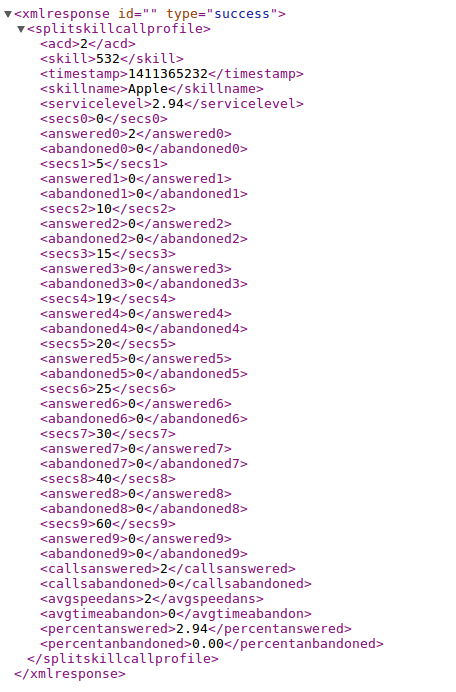
- The URL syntax for Split Skill Call Profile report is
- http://clintSVRIP:8088/splitskillcallprofile?acd=2&skill=45
- http://clintSVRIP:8088/splitskillcallprofile?acd=2&description=programA
- Hint: The following XML is for example of Split Skill Call Profile reports for skill 532
- The URL syntax for Split Skill AUX report is
- http://clintSVRIP:8088/splitskillauxreport?acd=2&skills=45
- http://clintSVRIP:8088/splitskillauxreport?acd=2&description=programA
- Hint: The following XML is for example of Split Skill AUX Reports for skills 532 and 533

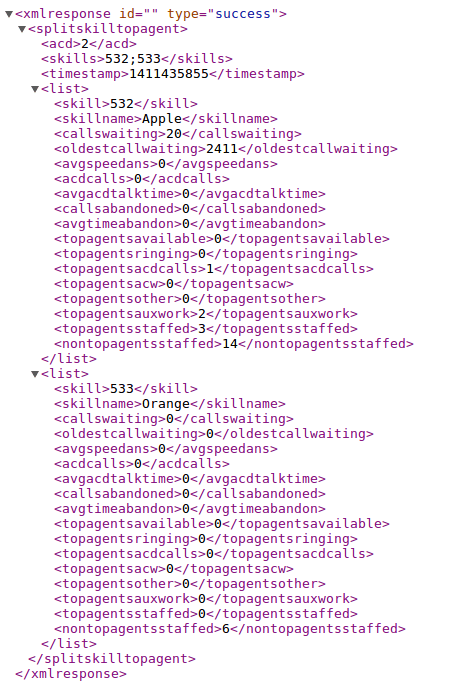
- The syntax for Split Skill Top Agent report is
- http://clintSVRIP:8088/splitskilltopagent?acd=2&skills=45
- http://clintSVRIP:8088/splitskilltopagent?acd=2&description=programA
- Hint: The following XML is for example of Split Skill Top Agent report for skills 532 and 533
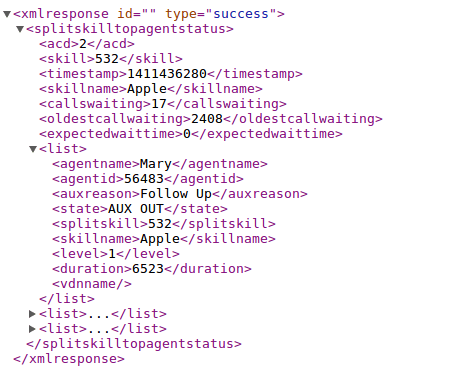
- The URL syntax for Split Skill Top Agent Status report is
- http://clintSVRIP:8088/splitskilltopagentstatus?acd=2&skill=45
- http://clintSVRIP:8088/splitskilltopagentstatus?acd=2&description=programA
- Hint: The following XML is for example of Split Skill Top Agent Status report for skills 532
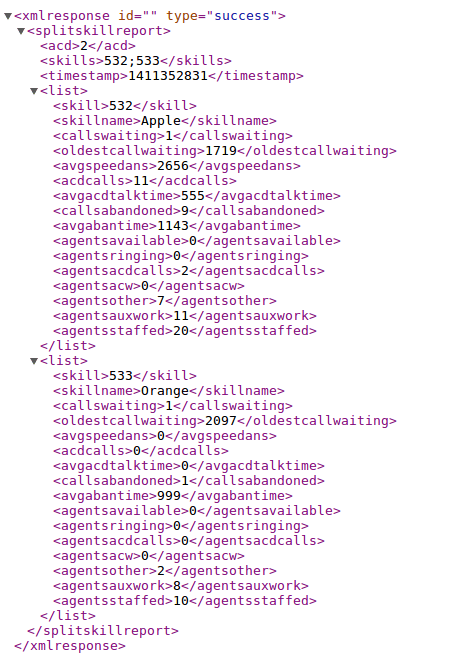
- The URL syntax for Split Skill Report is
- http://clintSVRIP:8088/splitskillreport?acd=2&skills=45
- http://clintSVRIP:8088/splitskillreport?acd=2&description=programA
- Hint: The following XML is for example of Split Skill Reports for skills 532 and 533
- The URL syntax for Split Skill SLA is
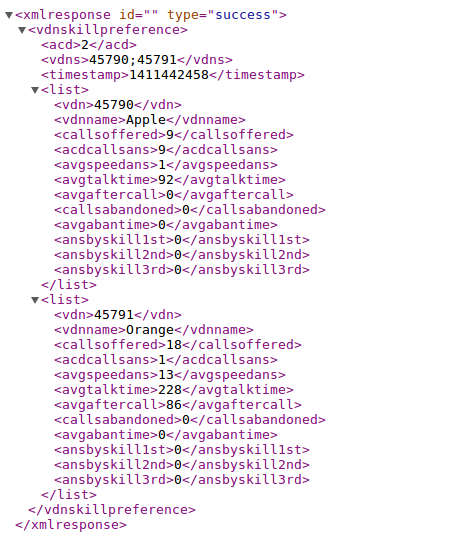
- The URL syntax for VDN Skill Preference is
- http://clintSVRIP:8088/vdnskillpreference?acd=2&vdns=21101
- http://clintSVRIP:8088/vdnskillpreference?acd=2&description=programA
- Hint: The following XML is for example of VDN Skill Preference report for vdns 45790 and 45791

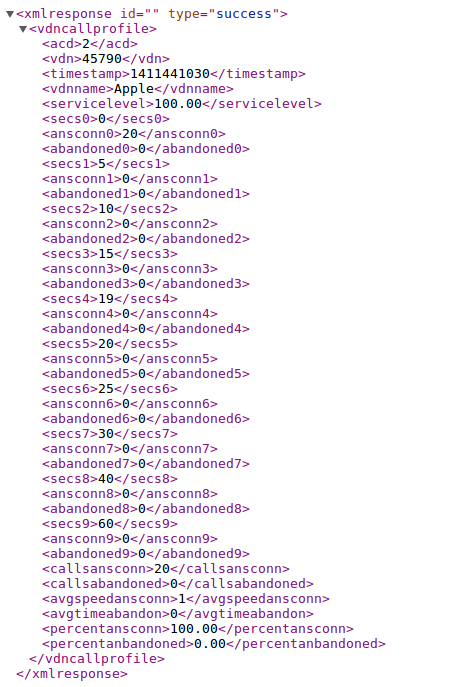
- The URL syntax for VDN Call Profile report is
- http://clintSVRIP:8088/vdncallprofile?acd=2&vdn=21101
- http://clintSVRIP:8088/vdncallprofile?acd=2&description=programA
- Hint: The following XML is for example of VDN Call Profile report for vdn 45790
- The URL syntax for Agent Report is
- http://clintSVRIP:8088/agentreport?acd=2&skill=45
- http://clintSVRIP:8088/agentreport?acd=2&description=programA
- Hint: The following XML is for example of Agent Reports for skill 532

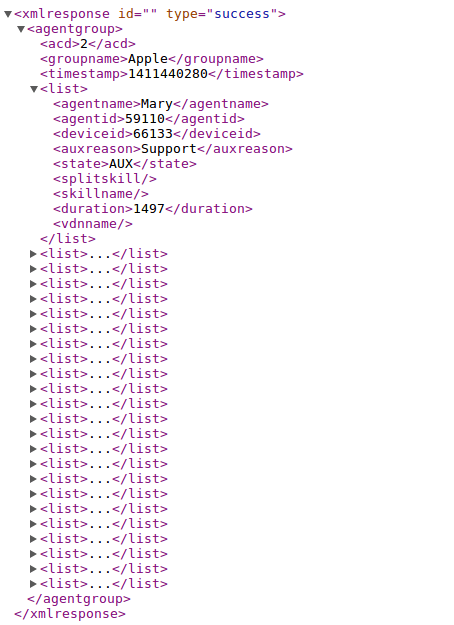
- The URL syntax for Agent Group is
- http://clintSVRIP:8088/agentgroup?acd=2&groupname=Apple
- http://clintSVRIP:8088/agentgroup?acd=2&description=programA
- Hint: The following XML is for example of Agent Group report for groupname Apple
- The URL syntax for Aux Agent Report is
- http://clintSVRIP:8088/auxagentreport?acd=2&skill=45
- Hint: No need to add the report into clintSVR, you can get the output directly via the REST interface.

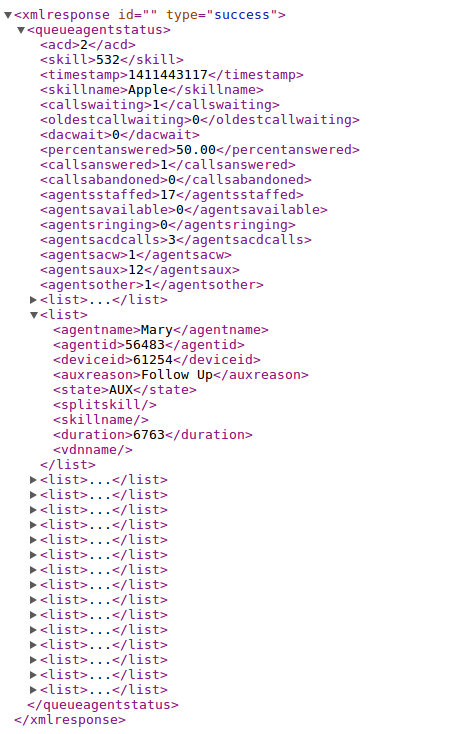
- The URL syntax for Queue Agent Status is
- http://clintSVRIP:8088/queueagentstatus?acd=2&skill=45
- http://clintSVRIP:8088/queueagentstatus?acd=2&description=programA
- Hint: The following XML is for example of Queue Agent Status report for skill 532

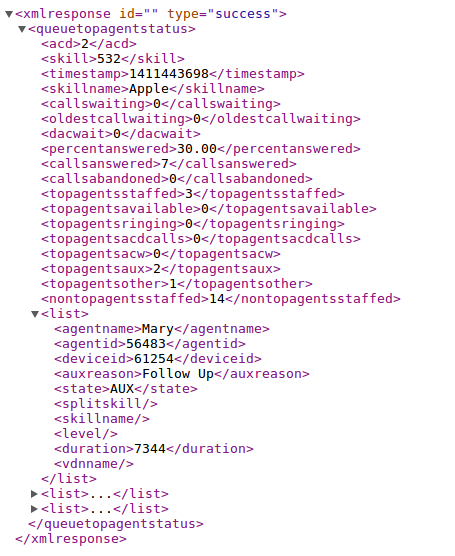
- The URL syntax for Queue Top Agent Status is
- http://clintSVRIP:8088/queuetopagentstatus?acd=2&skill=45
- http://clintSVRIP:8088/queuetopagentstatus?acd=2&description=programA
- Hint: The following XML is for example of Queue Top Agent Status report for skill 532

- The URL syntax for Queue Agent Summary is
- http://clintSVRIP:8088/queueagentsummary?acd=2&skill=45
- http://clintSVRIP:8088/queueagentsummary?acd=2&description=programA
- Hint: The following XML is for example of Queue Agent Summary report for skill 532

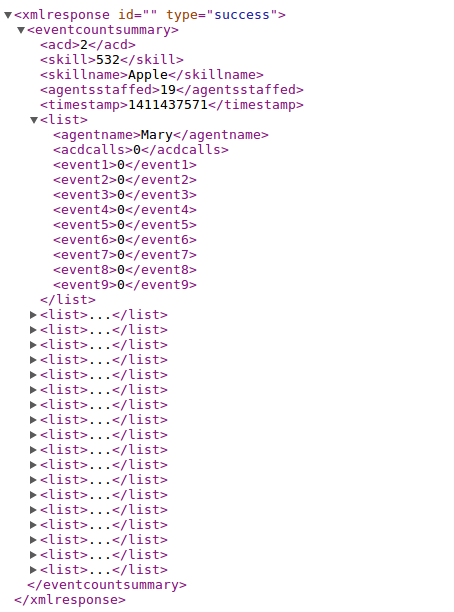
- The URL syntax for Event Count Summary is
- http://clintSVRIP:8088/eventcountsummary?acd=2&skill=45
- http://clintSVRIP:8088/eventcountsummary?acd=2&description=programA
- Hint: The following XML is for example of Event Count Summary report for skill 532
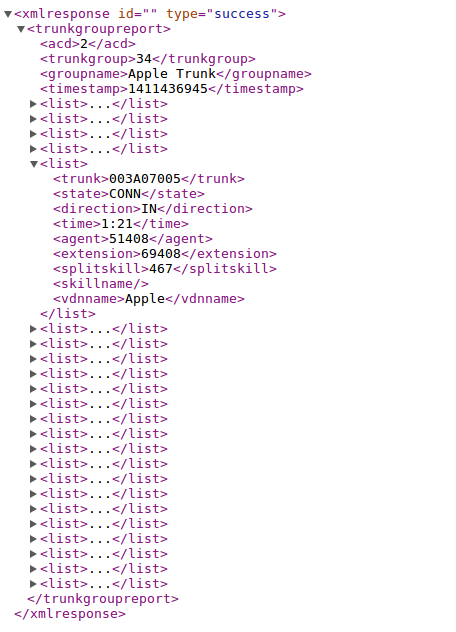
- The URL syntax for Trunk Group Report is
- http://clintSVRIP:8088/trunkgroupreport?acd=2&trunkgroup=45
- http://clintSVRIP:8088/trunkgroupreport?acd=2&description=programA
- Hint: The following XML is for example of Trunk Group Reports for trunk group 34
- The URL syntax for RTA report
- http://clintSVRIP:8088/customrta?acd=2&skills=1-999;1000-2000
- http://clintSVRIP:8088/customrta?acd=2&description=rta
- Hint: The following XML is for example of Custom RTA report for skills 532 and 533
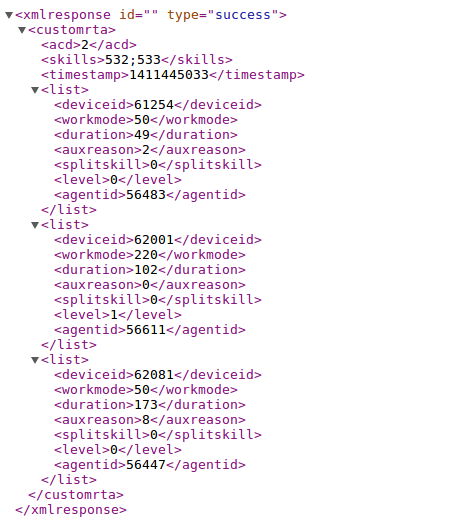
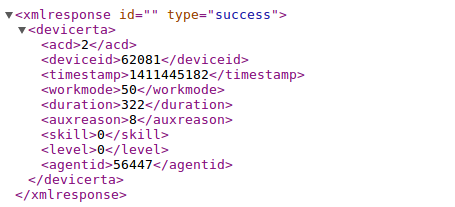
- The URL syntax for RTA data on one specific device
- http://clintSVRIP:8088/devicerta?acd=2&deviceid=62081

- The URL syntax for RTA data on one specific agent
- http://clintSVRIP:8088/agentrta?acd=2&agentid=56447

- The URL syntax for Historical Agent Summary Interval
- The URL syntax for Historical Trunk Group Busy Hour
- http://clintSVRIP:8088/histgbusyhour?acd=2&trunkgroups=26;27&date=yesterday
- http://clintSVRIP:8088/histgbusyhour?acd=2&trunkgroups=26;27&date=20160322

- The URL syntax for Historical Trunk Summary Interval
- The URL syntax for Historical Split Skill Summary Interval
- The URL syntax for Historical Split Skill Service Level Interval
- The URL syntax for Historical VDN Interval
- The URL syntax for RTS Split Skill Report
- The URL syntax for Multi Agent Add Skill
- The URL syntax for Multi Agent Delete Skill
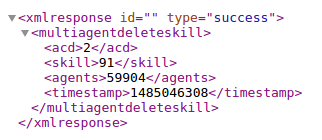
- The URL syntax for Multi Agent Modify Skill
- http://clintSVRIP:8088/multiagentmodifyskill?acd=2¤tskill=91&newskill=461&level=1&agents=59904
- Hint: Change from one skill to another skill

- http://clintSVRIP:8088/multiagentmodifyskill?acd=2¤tskill=91&newskill=91&level=2&agents=59904
- Hint: Change skill level only

- http://clintSVRIP:8088/multiagentmodifyskill?acd=2¤tskill=91&newskill=461&level=1&agents=59904


Logging real time data to Database
- The following configuration is for MySQL only
- Create database and user
-
mysql -u root -p -
> create database clintrtdb; -
> create user 'tcpgate'@'localhost' identified by 'tcpgate'; -
> grant all on clintrtdb.* to 'tcpgate'@'localhost'; -
> grant all on clintrtdb.* to 'tcpgate'@'%'; -
> flush privileges; -
> quit -
mysql -h localhost -u tcpgate -p clintrtdb < clintrtdb.sql
- For Windows installation, open ODBC Setting, create a System DSN called CLINTRTDBCFG for MySQL database
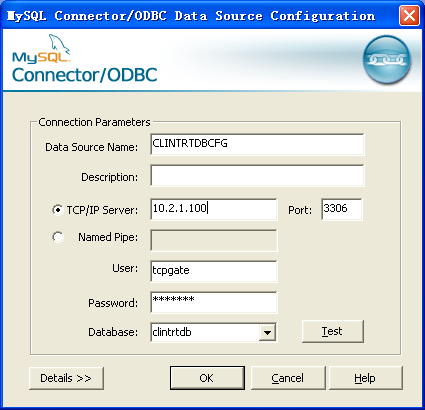
- For CentOS installation, copy the following to /etc/odbc.ini file

-
[CLINTRTDBCFG]
MySQL connection to clintRTDB
Driver = MySQL
Server = localhost
Port = 3306
Database = clintrtdb
- Open clintSVR.mdb file and edit the following parameters
- cs_rtdb_dsn
- Hint: The ODBC System DSN, enter the value is CLINTRTDBCFG
- cs_rtdb_username
- Hint: The username used to connect the database, enter the value tcpgate
- cs_rtdb_passwd
- Hint: The encrypted password of the database users, enter the value 9wkWfxiBlM1L9qsJaDWwAA==
- cs_rtdb_table
- Hint: One of the table for real time data, enter the value tAgentGroup by default
- cs_rtdb_dsn
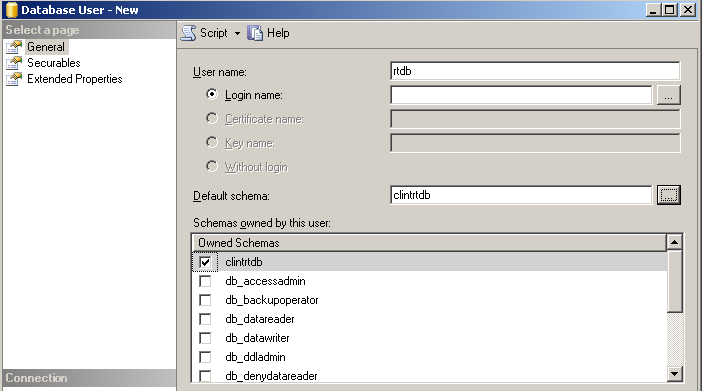
- For MSSQL, please set the default Schema of the database user
WebSocket Interface
- To enable WebSocket interface, enter the following command in the program console
- add tcp 6060 * * custom clintws
- Hint: 6060 is the port number for WebSocket interface, choose one that fits your environment
- add tcp 6060 * * custom clintws
- The JSON message for AgentGroup report is
- {“id”: “12345678”, “request”: “agentgroup”, “acd”: 1, “groupname”: “Apple”}
- The JSON message for AgentReport report is
- {“id”: “12345678”, “request”: “agentreport”, “acd”: 1, “skill”: “1”}
- The JSON message for EventCountSummary report is
- “id”: “12345678”, “request”: “eventcountsummary”, “acd”: 1, “skill”: “1”}
- The JSON message for QueueAgentStatus report is
- {“id”: “12345678”, “request”: “queueagentstatus”, “acd”: 1, “skill”: “1”}
- The JSON message for QueueAgentSummary report is
- {“id”: “12345678”, “request”: “queueagentsummary”, “acd”: 1, “skill”: “1”}
- The JSON message for QueueTopAgentStatus report is
- {“id”: “12345678”, “request”: “queuetopagentstatus”, “acd”: 1, “skill”: “1”}
- The JSON message for SplitSkillAuxReport report is
- {“id”: “12345678”, “request”: “splitskillauxreport”, “acd”: 1, “skills”: “1;2”}
- The JSON message for SplitSkillCallProfile report is
- {“id”: “12345678”, “request”: “splitskillcallprofile”, “acd”: 1, “skill”: “1”}
- The JSON message for SplitSkillReport report is
- {“id”: “12345678”, “request”: “splitskillreport”, “acd”: 1, “skills”: “1;2”}
- The JSON message for SplitSkillStatus report is
- {“id”: “12345678”, “request”: “splitskillstatus”, “acd”: 1, “skill”: “1”}
- The JSON message for SplitSkillTopAgent report is
- {“id”: “12345678”, “request”: “splitskilltopagent”, “acd”: 1, “skills”: “1;2”}
- The JSON message for SplitSkillTopAgentStatus report is
- {“id”: “12345678”, “request”: “splitskilltopagentstatus”, “acd”: 1, “skill”: “1”}
- The JSON message for TrunkGroupReport report is
- {“id”: “12345678”, “request”: “trunkgroupreport”, “acd”: 1, “trunkgroup”: “10”}
- The JSON message for VdnCallProfile report is
- {“id”: “12345678”, “request”: “vdncallprofile”, “acd”: 1, “vdn”: “10000”}
- The JSON message for VdnReport report is
- {“id”: “12345678”, “request”: “vdnreport”, “acd”: 1, “vdns”: “10000;10001;10002”}
- The JSON message for VdnSkillPreference report is
- {“id”: “12345678”, “request”: “vdnskillpreference”, “acd”: 1, “vdns”: “10000;10001;10002”}
- The JSON message for CustomRTA report is
- {“id”: “12345678”, “request”: “customrta”, “acd”: 1, “skills”: “1-999;1000-2000”}
- The JSON message for AgentRTA report is
- {“id”: “12345678”, “request”: “agentrta”, “acd”: 1, “agentid”: “51234”}
- The JSON message for DeviceRTA report is
- {“id”: “12345678”, “request”: “devicerta”, “acd”: 1, “deviceid”: “61234”}
- The JSON message for HisSplitSkillSummaryInterval report is
- {“id”: “12345678”, “request”: “hissplitskillsummaryinterval”, “acd”: 1, “skill”: “1”, “date”: “yesterday”}
- The JSON message for HisTgBusyHour report is
- {“id”: “12345678”, “request”: “histgbusyhour”, “acd”: 1, “trunkgroups”: “10;11”, “date”: “yesterday”}
- The JSON message for QueueTopAgentStatus report is
- {“id”: “12345678”, “request”: “hisvdninterval”, “acd”: 1, “vdn”: “10000”, “date”: “yesterday”}
C++ API Interface
- To enable C++ API interface, enter the following command in the program console
- add tcp 5050 * * custom clintapi
- Hint: 5050 is the port number for the C++ API interface, choose one that fits your environment
- add tcp 5050 * * custom clintapi
- Sample code is provided
//
// clintApp.cpp
//

#include "clint.h"
#include <string>
#include <vector>
#include <iostream>
using namespace std;

int main(int argc, char** argv)
{
    CLINT_HANDLE handle;
    CLINTLogin_t login;
    CLINTSplitSkillStatus_t splitSkillStatus;
    CLINTSplitSkillReport_t splitSkillReport;
    CLINTSplitSkillCallProfile_t splitSkillCallProfile;
    CLINTSplitSkillTopAgent_t splitSkillTopAgent;
    CLINTSplitSkillTopAgentStatus_t splitSkillTopAgentStatus;
    CLINTAgentReport_t agentReport;
    CLINTAgentGroup_t agentGroup;
    CLINTVDNReport_t vdnReport;
    CLINTVDNSkillPreference_t vdnSkillPreference;
    CLINTVDNCallProfile_t vdnCallProfile;
    CLINTQueueAgentStatus_t queueAgentStatus;
    CLINTQueueTopAgentStatus_t queueTopAgentStatus;
    CLINTQueueAgentSummary_t queueAgentSummary;
    CLINTTrunkGroupReport_t trunkGroupReport;
    CLINTEventCountSummary_t eventCountSummary;
    CLINTCustomRTA_t customRTA;
    CLINTDeviceRTA_t deviceRTA;
    CLINTAgentRTA_t agentRTA;
    CLINTHisTrunkGroupBusyHour_t tgBusyHour;
    CLINTHisSplitSkillSummaryInterval_t spskSummaryInterval;
    CLINTHisVDNInterval_t vdnInterval;
    unsigned int bufferSize;

    memset(&login, 0x00, sizeof(CLINTLogin_t));
    strcpy(login.username, "app");
    strcpy(login.passwd, "app");
    if (ClintLogin(&handle, "127.0.0.1", 5050, &login)==CLINTRC_SUCC) {
        // Event Count Summary
        memset(&eventCountSummary, 0x00, sizeof(CLINTEventCountSummary_t));
        eventCountSummary.acd = 2;
        strcpy(eventCountSummary.skill, "541");
        if (ClintEventCountSummary(handle, &eventCountSummary, &bufferSize)==CLINTRC_SUCC) {
            vector<unsigned char> buffer(bufferSize);
            if (ClintGetResultXML(handle, &buffer[0], bufferSize)==CLINTRC_SUCC) {
                cout << &buffer[0] << endl;
            }
        }
        // Trnk Group Report
        memset(&trunkGroupReport, 0x00, sizeof(CLINTTrunkGroupReport_t));
        trunkGroupReport.acd = 2;
        strcpy(trunkGroupReport.trunkGroup, "34");
        if (ClintTrunkGroupReport(handle, &trunkGroupReport, &bufferSize)==CLINTRC_SUCC) {
            vector<unsigned char> buffer(bufferSize);
            if (ClintGetResultXML(handle, &buffer[0], bufferSize)==CLINTRC_SUCC) {
                cout << &buffer[0] << endl;
            }
        }
        // Split Skill Status
        memset(&splitSkillStatus, 0x00, sizeof(CLINTSplitSkillStatus_t));
        splitSkillStatus.acd = 2;
        strcpy(splitSkillStatus.skill, "514");
        if (ClintSplitSkillStatus(handle, &splitSkillStatus, &bufferSize)==CLINTRC_SUCC) {
            vector<unsigned char> buffer(bufferSize);
            if (ClintGetResultXML(handle, &buffer[0], bufferSize)==CLINTRC_SUCC) {
                cout << &buffer[0] << endl;
            }
        }
        // Split Skill Report
        memset(&splitSkillReport, 0x00, sizeof(CLINTSplitSkillReport_t));
        splitSkillReport.acd = 2;
        strcpy(splitSkillReport.skills, "514;541");
        if (ClintSplitSkillReport(handle, &splitSkillReport, &bufferSize)==CLINTRC_SUCC) {
            vector<unsigned char> buffer(bufferSize);
            if (ClintGetResultXML(handle, &buffer[0], bufferSize)==CLINTRC_SUCC) {
                cout << &buffer[0] << endl;
            }
        }
        // Split Skill Call Profile
        memset(&splitSkillCallProfile, 0x00, sizeof(CLINTSplitSkillCallProfile_t));
        splitSkillCallProfile.acd = 2;
        strcpy(splitSkillCallProfile.skill, "541");
        if (ClintSplitSkillCallProfile(handle, &splitSkillCallProfile, &bufferSize)==CLINTRC_SUCC) {
            vector<unsigned char> buffer(bufferSize);
            if (ClintGetResultXML(handle, &buffer[0], bufferSize)==CLINTRC_SUCC) {
                cout << &buffer[0] << endl;
            }
        }
        // Split Skill Top Agent
        memset(&splitSkillTopAgent, 0x00, sizeof(CLINTSplitSkillTopAgent_t));
        splitSkillTopAgent.acd = 2;
        strcpy(splitSkillTopAgent.skills, "541;514");
        if (ClintSplitSkillTopAgent(handle, &splitSkillTopAgent, &bufferSize)==CLINTRC_SUCC) {
            vector<unsigned char> buffer(bufferSize);
            if (ClintGetResultXML(handle, &buffer[0], bufferSize)==CLINTRC_SUCC) {
                cout << &buffer[0] << endl;
            }
        }
        // Split Skill Top Agent
        memset(&splitSkillTopAgentStatus, 0x00, sizeof(CLINTSplitSkillTopAgentStatus_t));
        splitSkillTopAgentStatus.acd = 2;
        strcpy(splitSkillTopAgentStatus.skill, "541");
        if (ClintSplitSkillTopAgentStatus(handle, &splitSkillTopAgentStatus, &bufferSize)==CLINTRC_SUCC) {
            vector<unsigned char> buffer(bufferSize);
            if (ClintGetResultXML(handle, &buffer[0], bufferSize)==CLINTRC_SUCC) {
                cout << &buffer[0] << endl;
            }
        }
        // Agent Report
        memset(&agentReport, 0x00, sizeof(CLINTAgentReport_t));
        agentReport.acd = 2;
        strcpy(agentReport.skill, "514");
        if (ClintAgentReport(handle, &agentReport, &bufferSize)==CLINTRC_SUCC) {
            vector<unsigned char> buffer(bufferSize);
            if (ClintGetResultXML(handle, &buffer[0], bufferSize)==CLINTRC_SUCC) {
                cout << &buffer[0] << endl;
            }
        }
        // Agent Group
        memset(&agentGroup, 0x00, sizeof(CLINTAgentGroup_t));
        agentGroup.acd = 3;
        strcpy(agentGroup.groupName, "Apple");
        if (ClintAgentGroup(handle, &agentGroup, &bufferSize)==CLINTRC_SUCC) {
            vector<unsigned char> buffer(bufferSize);
            if (ClintGetResultXML(handle, &buffer[0], bufferSize)==CLINTRC_SUCC) {
                cout << &buffer[0] << endl;
            }
        }
        // VDN report
        memset(&vdnReport, 0x00, sizeof(CLINTVDNReport_t));
        vdnReport.acd = 3;
        strcpy(vdnReport.vdns, "25512;25513");
        if (ClintVDNReport(handle, &vdnReport, &bufferSize)==CLINTRC_SUCC) {
            vector<unsigned char> buffer(bufferSize);
            if (ClintGetResultXML(handle, &buffer[0], bufferSize)==CLINTRC_SUCC) {
                cout << &buffer[0] << endl;
            }
        }
        // VDN Skill Preference
        memset(&vdnSkillPreference, 0x00, sizeof(CLINTVDNSkillPreference_t));
        vdnSkillPreference.acd = 3;
        strcpy(vdnSkillPreference.vdns, "25512;25513");
        if (ClintVDNSkillPreference(handle, &vdnSkillPreference, &bufferSize)==CLINTRC_SUCC) {
            vector<unsigned char> buffer(bufferSize);
            if (ClintGetResultXML(handle, &buffer[0], bufferSize)==CLINTRC_SUCC) {
                cout << &buffer[0] << endl;
            }
        }
        // VDN Call Profile
        memset(&vdnCallProfile, 0x00, sizeof(CLINTVDNCallProfile_t));
        vdnCallProfile.acd = 3;
        strcpy(vdnCallProfile.vdn, "25512");
        if (ClintVDNCallProfile(handle, &vdnCallProfile, &bufferSize)==CLINTRC_SUCC) {
            vector<unsigned char> buffer(bufferSize);
            if (ClintGetResultXML(handle, &buffer[0], bufferSize)==CLINTRC_SUCC) {
                cout << &buffer[0] << endl;
            }
        }
        // QueueAgentStatus
        memset(&queueAgentStatus, 0x00, sizeof(CLINTQueueAgentStatus_t));
        queueAgentStatus.acd = 2;
        strcpy(queueAgentStatus.skill, "541");
        if (ClintQueueAgentStatus(handle, &queueAgentStatus, &bufferSize)==CLINTRC_SUCC) {
            vector<unsigned char> buffer(bufferSize);
            if (ClintGetResultXML(handle, &buffer[0], bufferSize)==CLINTRC_SUCC) {
                cout << &buffer[0] << endl;
            }
        }
        // QueueTopAgentStatus
        memset(&queueTopAgentStatus, 0x00, sizeof(CLINTQueueTopAgentStatus_t));
        queueTopAgentStatus.acd = 2;
        strcpy(queueTopAgentStatus.skill, "541");
        if (ClintQueueTopAgentStatus(handle, &queueTopAgentStatus, &bufferSize)==CLINTRC_SUCC) {
            vector<unsigned char> buffer(bufferSize);
            if (ClintGetResultXML(handle, &buffer[0], bufferSize)==CLINTRC_SUCC) {
                cout << &buffer[0] << endl;
            }
        }
        // QueueAgentSummary
        memset(&queueAgentSummary, 0x00, sizeof(CLINTQueueAgentSummary_t));
        queueAgentSummary.acd = 2;
        strcpy(queueAgentSummary.skill, "541");
        if (ClintQueueAgentSummary(handle, &queueAgentSummary, &bufferSize)==CLINTRC_SUCC) {
            vector<unsigned char> buffer(bufferSize);
            if (ClintGetResultXML(handle, &buffer[0], bufferSize)==CLINTRC_SUCC) {
                cout << &buffer[0] << endl;
            }
        }
        // customRTA
        memset(&customRTA, 0x00, sizeof(CLINTCustomRTA_t));
        customRTA.acd = 2;
        strcpy(customRTA.skills, "1-999;1000-2000");
        if (ClintCustomRTA(handle, &customRTA, &bufferSize)==CLINTRC_SUCC) {
            vector<unsigned char> buffer(bufferSize);
            if (ClintGetResultXML(handle, &buffer[0], bufferSize)==CLINTRC_SUCC) {
                cout << &buffer[0] << endl;
            }
         }
         // deviceRTA
         memset(&deviceRTA, 0x00, sizeof(CLINTDeviceRTA_t));
         deviceRTA.acd = 2;
         strcpy(deviceRTA.deviceID, "69948");
         if (ClintDeviceRTA(handle, &deviceRTA, &bufferSize)==CLINTRC_SUCC) {
             vector<unsigned char> buffer(bufferSize);
             if (ClintGetResultXML(handle, &buffer[0], bufferSize)==CLINTRC_SUCC) {
                 cout << &buffer[0] << endl;
             }
          }
          // agentRTA
          memset(&agentRTA, 0x00, sizeof(CLINTAgentRTA_t));
          agentRTA.acd = 2;
          strcpy(agentRTA.agentID, "51170");
          if (ClintAgentRTA(handle, &agentRTA, &bufferSize)==CLINTRC_SUCC) {
              vector<unsigned char> buffer(bufferSize);
              if (ClintGetResultXML(handle, &buffer[0], bufferSize)==CLINTRC_SUCC) {
                  cout << &buffer[0] << endl;
              }
          }
          // historical trunk group busy
          memset(&tgBusyHour, 0x00, sizeof(CLINTHisTrunkGroupBusyHour_t));
          tgBusyHour.acd = 2;
          strcpy(tgBusyHour.tgs, "26;27");
          strcpy(tgBusyHour.date, "yesterday");
          if (ClintHisTrunkGroupBusyHour(handle, &tgBusyHour, &bufferSize)==CLINTRC_SUCC) {
              vector<unsigned char> buffer(bufferSize);
              if (ClintGetResultXML(handle, &buffer[0], bufferSize)==CLINTRC_SUCC) {
                  cout << &buffer[0] << endl;
              }
          }
          // historical split skill summary interval
          memset(&spskSummaryInterval, 0x00, sizeof(CLINTHisSplitSkillSummaryInterval_t));
          spskSummaryInterval.acd = 2;
          strcpy(spskSummaryInterval.skill, "541");
          strcpy(spskSummaryInterval.date, "yesterday");
          if (ClintHisSplitSkillSummaryInterval(handle, &spskSummaryInterval, &bufferSize)==CLINTRC_SUCC) {
              vector<unsigned char> buffer(bufferSize);
              if (ClintGetResultXML(handle, &buffer[0], bufferSize)==CLINTRC_SUCC) {
                  cout << &buffer[0] << endl;
              }
          }
          // historical vdn interval
          memset(&vdnInterval, 0x00, sizeof(CLINTHisVDNInterval_t));
          vdnInterval.acd = 2;
          strcpy(vdnInterval.vdn, "45712");
          strcpy(vdnInterval.date, "today");
          if (ClintHisVDNInterval(handle, &vdnInterval, &bufferSize)==CLINTRC_SUCC) {
              vector<unsigned char> buffer(bufferSize);
              if (ClintGetResultXML(handle, &buffer[0], bufferSize)==CLINTRC_SUCC) {
                  cout << &buffer[0] << endl;
              }
          }
          ClintLogout(handle);
     }
     return 0;
}
XMPP Connection
- Modify the following parameters in clintSVR.mdb in order to enable XMPP feature
- cs_xmpp_jid
- jid such as “yourname@company.com”
- cs_xmpp_username
- use this if jid is not used for authentication
- cs_xmpp_passwd
- use the utility encryptpasswd.exe to generate your encrypted password
- cs_xmpp_server
- xmpp server IP or hostname
- cs_xmpp_port
- xmpp server port
- cs_xmpp_saslmethod
- authentication methods such as plain, digestmd5 and crammd5
- cs_xmpp_jid
- Supported XMPP servers
- Openfire 3.91.
Splunk Connection
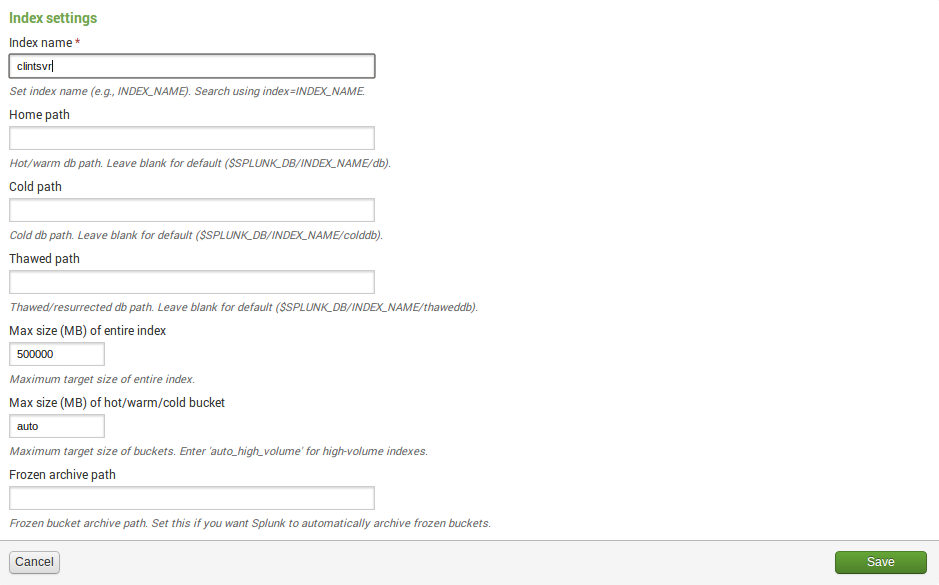
- Create index for clintSVR

- Create TCP input for clintSVR

- Login clintSVR program console and update two parameters
- update parameter cs_splunkhost 10.10.10.123
- Hint: 10.10.10.123 is the IP address of Splunk
- update parameter cs_splunkport 14011
- Hint: 14011 is the port number that defined in Spunk for CMS real time data
- reload
- update parameter cs_splunkhost 10.10.10.123
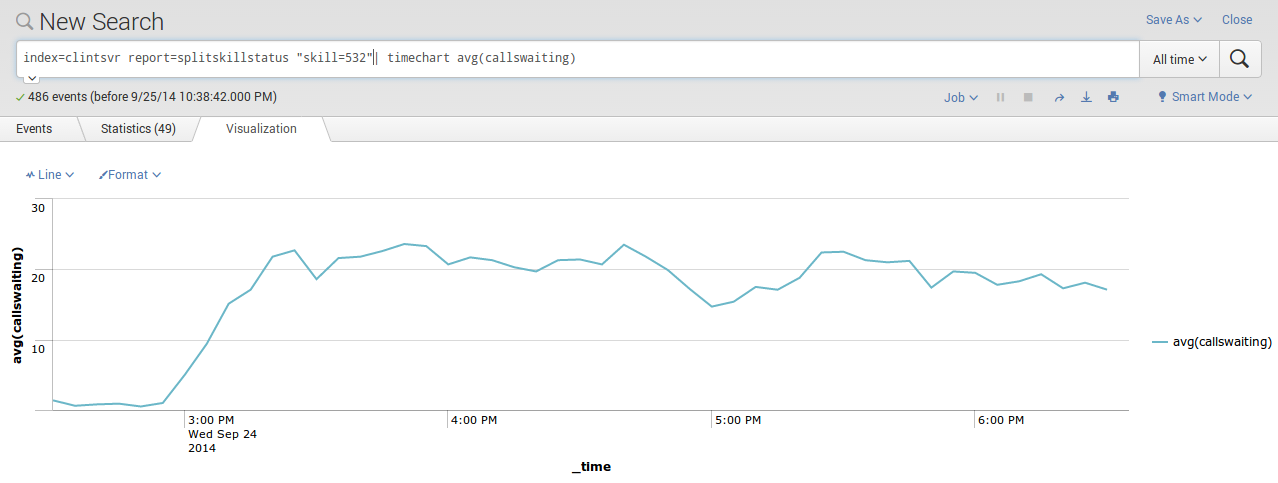
- Search the reports in Splunk

- Graphs can be plotted easily using the report data, for example


Splunk Integration using HTTP Event Collector
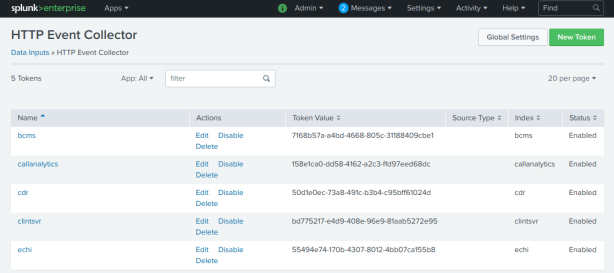
- Follow this guide to enable HTTP Event Collector in Splunk
- Create a token specific for clintSVR application, copy the token after its creation, it is suggested to create a token for each specific application and link the token to it’s index
- Update the parameter cs_splunk_hectoken using the newly created token
- update parameter cs_splunk_hectoken new_created_token
- Update the parameter cs_splunk_hecurl using your site specific Splunk url
- update parameter cs_splunk_hecurl https://input-SPLUNKCLOUDHOST:PORT/services/collector
- Hint: Reference this guide to find out the Splunk HEC url
- Update the parameter cs_splunk_protocol to use HTTP Event Collector
- update parameter cs_splunk_protocol hec
- Update the parameter cs_splunk_hecchannel using the newly create token
- update parameter cs_splunk_hecchannel new_created_token
- Update the parameter cs_splunk_dataformat to use JSON format
- update parameter cs_splunk_dataformat json
- Reload the configuration
- reload
System Notification Email
- The program sends email notification when error occurred. Errors included DB down, DB resume, etc.
- Edit the value of parameter tg_emailserverip to define the IP address of your email server.
- Edit the value of parameter tg_emailsmtpport to define the SMTP port number of your email server. The default value is 25.
- Edit the value of parameter tg_emailusername to define the username of email agent which is responsible to send notification emails.
- Telnet to localhost and port number 14011, enter username tcpgate and password tcpgate01 to access the program console. Type genpass in the program console to generate an encrypted password string for the email agent, copy the string for later use.
- Edit the value of parameter tg_emailpasswd to define the password of the email agent. The password should be in encrypted format, you can use console command genpass to generate the encrypted password.
- Edit the value of parameter tg_emailsenderdisplay to define the display name of the email agent.
- Edit the value of parameter tg_emailauth to define whether authentication is required between your clintSVR machine and the email server. When your email server trust your machine, set it to false, otherwise set it to true.
- Edit the value of parameter tg_emailssl to define whether SSL communication is required for the SMTP session. The default value is false, set it to true when SSL is required.
- Enter the following command in the program console to add your email address
- add email service@upinget.com
- Hint: Replace your email address for notification
- Enter the following command to test the configuration
- test email
Know Problem
- Users feedback that they can add report successfully but without data returned. This problem is probably caused by the wrong login shell for the CMS user which provided to clintSVR. The shell /usr/bin/cms is for standard CMS Supervisor, please use standard shell such as /bin/ksh.
- Users feedback that the AgentGroup Report did not refresh with new added agents. This problem is well known to CLINT and you need to delete the report and add it back for the updated report. a console command “rerun” is provided to refresh the report.
- The clintSVR may not compatible with new version of putty, please use Windows “telnet” program in case you encounter this problem. This is fixed by version 1.2.6.
- When real time report contains non-ASCII characters, the browser cannot display the XML content correctly.
- Agent name is truncated when length exceed CLINT tool’s standard size. This can be workaround by using the dictionary feature.
- Multiple skill or vdn objects are accepted for some reports and each object should be separated by “;”. Please limit the total length of the “objects” string to 255 characters because CMS CLINT is malfunction when the object length exceed this limit.
- Multiple skill or vdn objects are accepted for some reports and range can be specified by character “-“. However, when the number of input and output object mismatched, the skill number or vdn number will be missing in the result XML because the original raw report without the skill or vdn number and the clintSVR cannot match that number from the input and output objects when they are mismatched.
- During the restart process of Splunk, clintSVR is unable to send raw data to Splunk and missing data will be anticipated.
- A user feedback that agent ID and skill ID is displayed as ***** and *** when they use 6 digits agent ID and 3 digits skill ID. This appeared in the SplitSkillStatus report. Solution was found and modification of CLINT report template/cms/db/gem/rt_rpts/sk_stat_eac is required. Please change the digit length from 5 to 6 according to the following screen dump.

- Custom report is supported by implementation of customized DLL. However, the dictionary feature is not supported currently.
Support and License
- Please contact upinget.com for support and license
AstLogger 1.3.6 just released. This release has a some enhancements and bug fixings:
- KEY and UCID are searching items.
- Customer number is now clickable so you can call the customer directly if your PC supports callto protocol. You can try ScreenPop which is created for this purpose.
- To ensure properly hangup of the Asterisk recording station, the program sends FastAGI hangup command to terminate the call between Asterisk and Avaya.
- For new version of Asterisk, the answer event from OOH323 trunk is slower and a parameter called “al_waitloggeranswer” is introduced. If answer event is obtained within 3 s, set it to 3.
24 September 2013 AvayaCDR 1.3.2 just released, it fixed some bugs in the sftp module. Blacklist country code can be defined using the + sign. For details, please reference the AvayaCDR web page. Thanks Brian Norrgard, you helped me to identify the sftp user authentication problem.
15 September 2013 AvayaCDR 1.3.1 just released, it supports scanning of blacklisted number or country code from CDR data and sends alert email to administrator. It is easier for administrator to find out unauthorized dialing when it happened. Enjoy! For details, please reference the AvayaCDR web page.
Introduction
27 Feb 2015, ScreenPop 1.4.0 just released. This release supports WebSocket interface which enables the call control integration with web browser directly. We can develop JQuery softphone using this WebSocket interface.
2 Aug 2014, ScreenPop 1.3.7 just released. This release supports sending and retrieval of user data by provided DLL and fixed some bugs in acd login and acd auto answer features.
5 Feb 2014, ScreenPop 1.3.6 just released. This release provides OCX control for CTI application development, both call control and event notification are supported. Moreover, a data server called uuiSVR.exe is provided for passing of user data between applications. An API to query user’s extension is also provided.
3 January 2014, ScreenPop 1.3.5 just released. This release supports license management via a license server. Moreover, it supports Alternate call control and auto answer for one-x communicator when one-x has ACD logon.
16 Dec 2013, ScreenPop 1.3.4 just released. This release supports passing AGENTID to web application. Moreover, web application can perform call controls using CGI interface.
19 Nov 2013, 1.3.3 just released, this release supports ACD and DTMF functions. Moreover, a pass through prefix can be defined so ScreenPop will pass the number directly to PBX without any manipulation. The UI of calltoui is updated as follow:

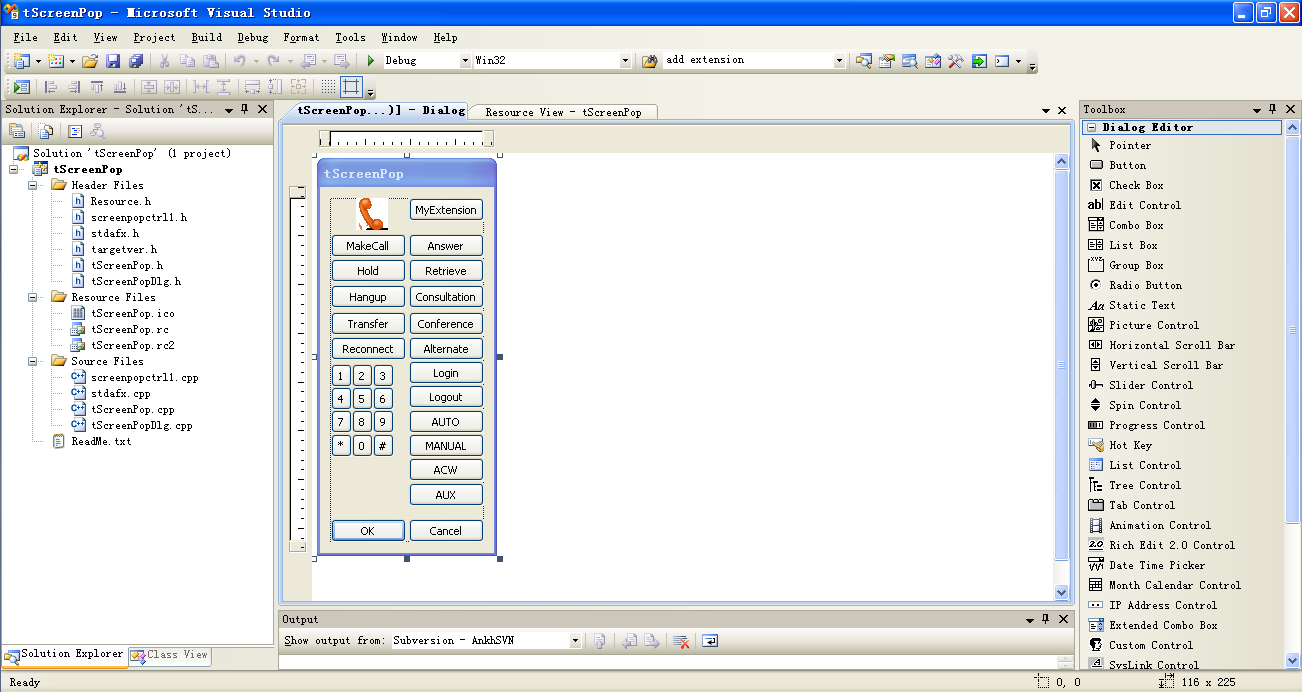
8 Jul 2013, 1.3.0 is released, this release supports callto with user interface and additional call controls such as hold, retrieve, answer, hangup, consultation, reconnect, transfer and conference. The user interface looks like this
17 Jun 2013, 1.2.0 is released, this release supports callto protocol so you can make call directly from web page. I reference this page and thanks WaiHung for the direction.
Background of ScreenPop
I attended OTRS training last week. OTRS is a ticketing system which is very useful for IT Service Desk. I think it would be very useful if the OTRS phone ticket can be created and popped up automatically with customer information when a call comes in, it will save a lot of time for Service Desk especially the time for searching customer information. It triggers me to implement this ScreenPop application. The ScreenPop application is a Windows service which is installed in agent’s PC, it monitors agent’s extension and do the screen pop when there is incoming call. The software supports screen pop of web application, of course telephony data such as CLI, DNIS, UCID, SPLIT and UED can be passed to the web application.
Preparation and Password Encryption
- A access MDB file called screenpop.mdb which stores the the username and password of AE server. For security reason, a tool called encryptpasswd.exe is provided to generate encrypted password for the installation and configuration of the software
- Execute the program, generate the encrypted password for the user of AE server, then paste the encrypted password to parameter ag_tlink. For example, the encrypted password for “p@ssword” is “R3NIw1yJMLlnPFzEQtuh2A==”
Installation
- Download the TSAPI client for Windows 32-bit from Avaya web site, it contains the library files. You need to register DevConnect before you can access the download page.
- Download the ScreenPop zip file here or backup site.
- Follow the installation steps below to install the software.
- Extract all the files into directory c:\program files\screenpop
- Open Windows Command Prompt, enter the following commands to register the program as Windows Service
- cd c:\program files\screenpop
- screenpop -i
- Open ODBC Setting, create System DSN called SCREENPOPCFG for Microsoft Access Driver and point to screenpop.mdb which is located in the directory c:\program files\screenpop
- Open the Access file, edit the value of parameters sp_tlink_01 and sp_tlink_02 to the TLINK of your AES servers in the tParameter table
- Edit the value of parameter sp_popmode to define screen pop in ACD or Extension mode. If agent login is required for screen pop, the value is “acd”, otherwise “extension”
- Start the Windows Service screenpop
- Telnet to localhost and port number 14010, enter username tcpgate and password tcpgate01 to access the program console
- Enter the following command in the program console to add extensions for screenpop
- add extension 61101
- Hint: 61101 is agent extension
- Enter the following command in the program console to add screen pop URL
- add vdnspliturl 10001 http://www.google.com
- Hint: 10001 is VDN or split number, when call comes in by this number, the web browser pops the specified URL
- Hint: Telephony data can be specified in the URL, they are:
- {CLI} Caller Line Identification
- {DNIS} Dialed Number Identification Service
- {UCID} Avaya UCID
- {SPLIT} Avaya split or hunt group number
- {UED} Avaya user entered digit
- {UUI} Avaya uui data, only ASCII data is supported now
- {AGENTID} Avaya Agent ID
- {CUSTDATA} user data which passing from other CTI application
- Enter the following command in the program console, you will receive debug information
- trace on asc
- Enter the following command in the program console, you will get the help message
- help
- The following is for installation of License Server
- Open Windows Command Prompt, enter the following commands to register the program as Windows Service
- cd c:\program files\screenpop
- licSVR -i
- Open ODBC Setting, create System DSN called LICSVRCFG for Microsoft Access Driver and point to licSVR.mdb which is located in the directory c:\program files\screenpop
- Edit the parameter ls_licensekey with your license key
- Start the service LicSVR
- Telnet to the program console with username tcpgate and password tcpgate01
- telnet localhost 14013
- Add your endpoint by the following command
- add endpoint 10.10.1.10
- Hint: 10.10.1.10 is authorized and will consume 1 license
- Open Windows Command Prompt, enter the following commands to register the program as Windows Service
- The following is for ScreenPop license server parameter configuration
- Edit the parameter called sp_licsvr, e.g. 10.10.1.2,5005
- Hint: The license server IP is 10.10.1.2 and port number 5005
- The following is for installation of uuiSVR
- Open Windows Command Prompt, enter the following commands to register the program as Windows Service
- cd c:\program files\screenpop
- uuiSVR -i
- Open ODBC Setting, create System DSN called UUISVRCFG for Microsoft Access Driver and point to uuiSVR.mdb which is located in the directory c:\program files\screenpop
- Start the service uuiSVR
- Open Windows Command Prompt, enter the following commands to register the program as Windows Service
- The following is for ScreenPop uuiSVR parameter configuration
- Edit the parameter called sp_uuisvr, e.g. 10.10.1.2,5100
- Hint: The uuiSVR server IP is 10.10.1.2 and port number is 5100
Installation for Click to Dial (callto URL)
- ScreenPop 1.2.0 supports callto:// URL make call
- License key is required to activate this feature, contact me for a FREE license key
- Once you have the license key, edit the following parameters in the screenpop.mdb file
- sp_calltolicensekey
- Hint: paste the license key for this parameter
- sp_dialoutlength
- Hint: the digit length of destination number will be compared to this value, sp_dialoutprefix will be inserted for outgoing call
- sp_dialoutprefix
- Hint: the dial out prefix inserted before the destination number, the default value is 9
- sp_plustreatment
- Hint: the treatment for the plus sign which normally represents international calling, you can specify the following treatment methods
- retain
- no treatment for the plus sign
- replace,00
- replace the plus sign by the number followed. E.g. replace the plus sign by 00
- remove
- remove the plus sign
- retain
- Hint: the treatment for the plus sign which normally represents international calling, you can specify the following treatment methods
- sp_calltolicensekey
- A program called callto.exe is included in the zip file
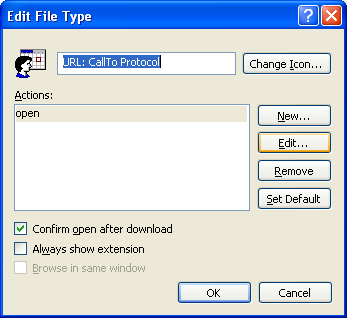
- Follow the screen dumps below to change the calto URL file type mapping:
- Click “Folder Option” in Windows Explorer

- Click Advanced button

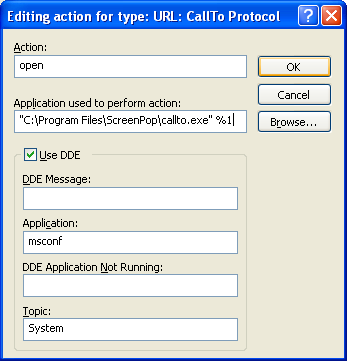
- Click Edit button

- Select the callto.exe from directory c:\Program files\screenpop\
- Select the calltoui.exe if you want to have user interface and additional call controls
- Click OK to finish the configuration
- For testing, you can install a firefox plugin called “Telify” which converts telephone numbers into clickable links for use with CTI applications.
- For Windows 8, please follow this link as workaround to create callto and tel protocol association.

Configuration for OTRS Screen Pop
- Follow the link to install Znuny4OTRS-CTI Add-On first
- Telnet the program console and add the vdnspliturl as follow
- add vdnspliturl 10001 http://otrs-serverip/otrs/index.pl?Action=AgentTicketPhoneCTI;CallerID={CLI}
- Hint: 10001 is VDN or split number
- For click to dial, modify the ZCTI.pm which is located at /opt/otrs/Kernel/Config/Files, this enable the phone and mobile numbers clickable, the code is follow:

Configuration for SalesForce Screen Pop
- Telnet the program console and add the vdnspliturl as follow
- add vdnspliturl 10001 https://xxx.salesforce.com/_ui/search/ui/UnifiedSearchResults?searchType=2&str={CLI}
- Hint: 10001 is VDN or split number
- For click to dial, follow the steps below:
- Salesforce->Setup->Customize->Fields
- Click New under “Contact Custom Fields & Relationships”

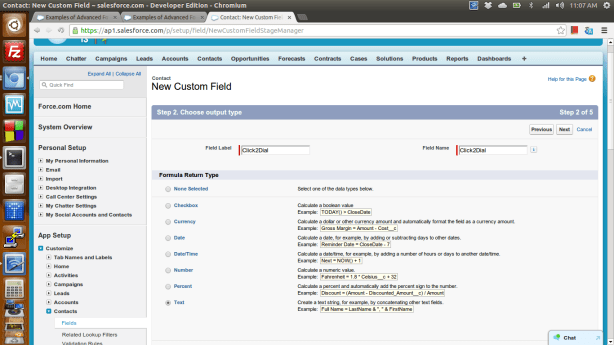

- If you don’t want popup another window, enter the following:

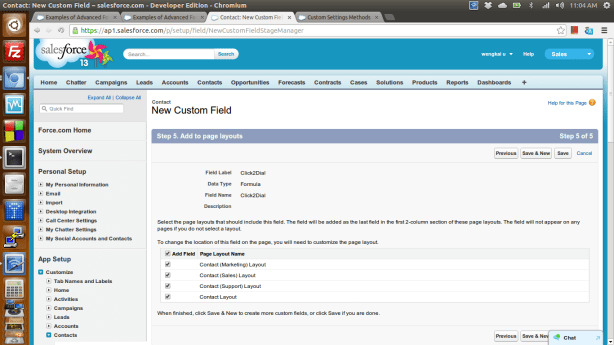


Installation for ScreenPop OCX interface
- The ScreenPop package provides an OCX for application development, you can use the OCX to perform call control for the ScreenPop extension
- Enter the following command in program console to add TCP port for ScreenPop OCX interface
- add tcp 5134 * * custom spocx
- Enter the following command in Windows Prompt to register the screenpop.ocx
- regsvr32 screenpop.ocx
- A sample c++ program is provided, you can program call control functions in just few lines of code

Installation for REST interface Call Control
- Enter the following command in program console to add REST interface port
- add tcp 80 * * custom spcgi
- The syntax to make call is
- The syntax to hold or retrieve call is
- The syntax to hangup call is
- The syntax to drop party is
- The syntax to answer call is
- The syntax to make consultation call is
- The syntax to reconnect call is
- The syntax to transfer call is
- The syntax to conference call is
- The syntax to send DTMF is
- The syntax to login ACD is
- The syntax to logout ACD is
- The syntax to set ACD state is
- http://localhost/setstate?state=manual|auto|acw|aux&reasoncode=[0-9]
- You can set reason code for AUX mode only
- http://localhost/setstate?state=manual|auto|acw|aux&reasoncode=[0-9]
Installation for WebSocket interface Call Control
- Enter the following command in program console to add a WebSocket interface port
- add tcp 9001 * * custom spws
- WebSocket interface accepts JSON request, and returns JSON response and delivers unsolicited JSON events
- The JSON strings for make call request and response are
- {id: “12345678”, request: “makecall”, destination: “67896789”, data: “hello world”}
- {msgtype: “response”, id: “12345678”, result: “success”, callid: “12345”}
- The JSON strings for hold or retrieve call request and response are
- {id: “12345678”, request: “holdretrieve”}
- {msgtype: “response”, id: “12345678”, result: “success”, error: “”}
- The JSON strings for hold call request and response are
- {id: “12345678”, request: “hold”}
- {msgtype: “response”, id: “12345678”, result: “success”, error: “”}
- The JSON strings for retrieve call request and response are
- {id: “12345678”, request: “retrieve”}
- {id: “12345678”, request: “retrieve”, destination: “T1234#1”}
- {msgtype: “response”, id: “12345678”, result: “success”, error: “”}
- The JSON strings for hangup call request and response are
- {id: “12345678”, request: “hangup”, data: “hello world”}
- {msgtype: “response”, id: “12345678”, result: “success”, error: “”}
- The JSON strings for drop party call request and response are
- {id: “12345678”, request: “dropparty”, party: “12345”, data: “hello world”}
- {msgtype: “response”, id: “12345678”, result: “success”, error: “”}
- The JSON strings for answer call request and response are
- {id: “12345678”, request: “answer”, destination: “67896789”}
- {msgtype: “response”, id: “12345678”, result: “success”, error: “”}
- The JSON strings for make consultation request and response are
- {id: “12345678”, request: “consultation”, destination: “67896789”, data: “hello world”}
- {msgtype: “response”, id: “12345678”, result: “success”, primarycallid: “123”, secondarycallid: “456”}
- The JSON strings for reconnect call request and response are
- {id: “12345678”, request: “reconnect”}
- {msgtype: “response”, id: “12345678”, result: “success”, error: “”}
- The JSON strings for transfer call request and response are
- {id: “12345678”, request: “transfer”, destination: “67896789”}
- {msgtype: “response”, id: “12345678”, result: “success”, error: “”}
- The JSON strings for conference call request and response are
- {id: “12345678”, request: “conference”, destination: “67896789”}
- {msgtype: “response”, id: “12345678”, result: “success”, error: “”}
- The JSON strings to send DTMF request and response are
- {id: “12345678”, request: “dtmf”, dtmf: “1”}
- {msgtype: “response”, id: “12345678”, result: “success”, error: “”}
- The JSON strings for ACD login request and response are
- {id: “12345678”, request: “login”, agentid: “12345”, passwd:”67890″}
- {msgtype: “response”, id: “12345678”, result: “success”, error: “”}
- The JSON strings for ACD logout request and response are
- {id: “12345678”, request: “logout”, agentid: “12345”, passwd:”67890″}
- {msgtype: “response”, id: “12345678”, result: “success”, error: “”}
- The JSON strings to set ACD state request and response are
- {id: “12345678”, request: “setstate”, state: “aux”, reasoncode:”1″}
- {id: “12345678”, request: “setstate”, state: “acw”}
- {id: “12345678”, request: “setstate”, state: “manual”}
- {id: “12345678”, request: “setstate”, state: “auto”}
- {msgtype: “response”, id: “12345678”, result: “success”, error: “”}
- The JSON string for incoming Call Offer event is
- {msgtype: “event”, eventtype: “offer”, origcalling: “101”, origcalled: “102”, calling: “101”, called: “102”, alerting: “102”, ucid: “00001094861421138402”, uui: “”, uec: “”, split: “”, custdata: “”, time:1424044800, trunkgroup: “10”, trunkmember: “12”, lastredirection: “”, callid: 123}
- The JSON string for outgoing Call Alert event is
- {msgtype: “event”, eventtype: “alert”, origcalling: “101”, origcalled: “102”, calling: “101”, called: “102”, alerting: “102”, ucid: “00001094861421138402”, uui: “”, custdata: “”, time:1424044800, trunkgroup: “10”, trunkmember: “12”, callid: 123}
- The JSON string for Call Connect event is
- {msgtype: “event”, eventtype: “connect”, origcalling: “101”, origcalled: “102”, calling: “101”, called: “102”, answering: “102”, ucid: “00001094861421138402”, uui: “”, uec: “”, split: “”, custdata: “”, time:1424044800, trunkgroup: “10”, trunkmember: “12”, lastredirection: “”, callid: 123}
- The JSON string for Call Fail event is
- {msgtype: “event”, eventtype: “fail”, failing: “101”, called: “102”, cause: 23, time:1424044800, callid: 123}
- The JSON string for Call Hold event is
- {msgtype: “event”, eventtype: “hold”, holding: “101”, time:1424044800, callid: 123}
- The JSON string for Call Retrieve event is
- {msgtype: “event”, eventtype: “retrieve”, retrieving: “101”, time:1424044800, callid: 123}
- The JSON string for Call Disconnect event is
- {msgtype: “event”, eventtype: “disconnect”, releasing: “101”, uui: “”, cusdata: “”, time:1424044800, callid: 123}
- The JSON string for Call Transfer event is
- {msgtype: “event”, eventtype: “transfer”, transferring: “101”, transferred: “102”, ucid: “00001094861421138402”, uui: “”, cusdata: “”, time:1424044800, trunkgroup: “10”, trunkmember: “12”, primarycallid: 123, secondarycallid: 124, party1: “101”, party2: “102”, party3: “”, party4: “”, party5: “”, party6: “”}
- The JSON string for Call Conference event is
- {msgtype: “event”, eventtype: “conference”, controller: “101”, addedparty: “102”, ucid: “00001094861421138402”, uui: “”, cusdata: “”, time:1424044800, trunkgroup: “10”, trunkmember: “12”, primarycallid: 123, secondarycallid: 124, party1: “101”, party2: “102”, party3: “”, party4: “”, party5: “”, party6: “”}
- The JSON string for Call Idle event is
- {msgtype: “event”, eventtype: “idle”, time: 1424044800}
Support and License
- Please contact upinget.com for support and license
Background
Some outbound programs required agent to play a voice file (Terms and Conditions) together with his/her customer during the call. This is a mandatory requirement for selling insurance or finance products in some countries. I’m looking for this solution quite a long time. When I read this Asterisk post that a patch was added to provide fine control of a playback using Asterisk Manager Interface (AMI), I believe I can make such solution in my Avaya platform. The work is so simple, barge-in the agent phone using TSAPI, conference the Asterisk extension which plays the voice file, then have the fine control using AMI.
I finally implemented the server module (TcPlayer) and the API (TcAPI32). The API is in the form of DLL and OCX, great!
Thanks Matt Jordan.
Introduction
The TcPlayer is a server module that barge-in an agent’s call with an Asterisk extension which is response for the playing of Terms and Conditions voice file, the software also provides API to control the playback. By using the API, you can PLAY, PAUSE, STOP, RESTART, FORWARD and REWIND of your voice file. This is very useful for outbound selling in call center.
The TcPlayer server module uses TSAPI library for the barge-in function, please make sure you meet the following requirements before installation of this software:
- CVCT or AE Server installed
- Avaya CM with AVAYA ASAI CTI STATION SFTW LIC
- Avaya CM with AVAYA ASAI PHANTOM CALLS SFTW LIC
- Asterisk Server (specific version) installed and tie with Avaya, check with your vendor how to tie Asterisk with Avaya
Preparation and Password Encryption
- The access MDB file stored the the username and password of AE and Asterisk servers. For security reason, a tool called encryptpasswd.exe is provided to generate encrypted password for the installation and configuration of the software
- Execute the program, generate the encrypted passwords for users of AE and Asterisk server, then paste the encrypted password to parameter tc_tlink and tc_ami. For example, the encrypted password for “p@ssword” is “R3NIw1yJMLlnPFzEQtuh2A==”
64 bit Windows System
- For 64 bit Windows system, please follow the steps below
- Download and install the Microsoft Visual C++ 2005 Service Pack 1 Redistributable Package MFC Security Update, http://www.microsoft.com/en-us/download/details.aspx?id=26347
- Configure ODBC System DSN using
C:\Windows\SysWOW64\odbcad32.exe - Stop the Windows firewall because it enables by default and I don’t have time to figure out what ports are required to open, you need to find it out yourself.
Installation
- Download the TSAPI client for Windows 32-bit from Avaya web site, it contains the library files. You need to register DevConnect before you can access the download page.
- Download the TcPlayer zip file here.
- Follow the installation steps below to install the software.
- Extract all the files into directory c:\program files\tcplayer
- Open Windows Command Prompt, enter the following commands to register the program as Windows Service
- cd c:\program files\tcplayer
- tcplayer -i
- Open ODBC Setting, create a System DSN called TCPLAYERCFG for Microsoft Access Driver and point the DB to tcplayer.mdb which is located in the directory c:\program files\tcplayer
- Open the Access file, edit the value of parameters tc_tlink_01 and tc_tlink_02 to the TLINK of your AE servers in the tParameter table, take care the encrypted password for AE server
- Edit the value of parameters tc_ami_01 and tc_ami_02 to define IP address, port number, username and encrypted password of your Asterisk Manager Interface, take care the encrypted password for Asterisk Manager Interface
- Edit the value of parameter tc_extprefix to define the Asterisk extension prefix for T&C voice files
- Edit the value of parameter tc_appendphantomext to define appending of phantom extension number to the T&C extension, the default value is true
- Edit the value of parameter tc_phantomdigits to define the number of digits of phantom device
- Start the Windows Service TcPlayer
- Telnet to localhost and port number 14009, enter username tcpgate and password tcpgate01 to access the program console
- Enter the following command to add one phantom device
- add phantom 41101
- Hint: 41101 is a phantom extension, we use phantom device for the barge-in function, it only takes 1-2 seconds to perform the barge-in function, so 10 phantom devices can serve 100+ call center agents
- Or, enter the following command to add a range of phantom devices
- bulkadd phantom 41101-41110
- Hint: this command add 10 phantom devices
- Enter the following command in the program console, you will receive debug information.
- trace on asc
- Enter the following command in the program console, you will get the help message
- help
Asterisk Configuration
- You need specific version of Asterisk until the patch mentioned in the background section merged into the Asterisk main stream. Please follow the steps to download that specific version of Asterisk.
- svn checkout -r 379830 http://svn.digium.com/svn/asterisk/trunk asterisk
- Follow the Asterisk compilation procedure to install your Asterisk
- Edit the extension_custom.conf file to include the following dialplan.

- 45141 is the extension prefix for T&C player, create each of your T&C extension in Asterisk and upload your voice file to the default voicemail location. My Asterisk T&C extension is 8 digits length, so you see the ${EXTEN:0:8} in the dialplan.
- I don’t want agent or caller can control the playback via DTMF, so I specify invalid DTMF tone ‘a’, ‘b’, ‘c’, ‘d’ and ‘e’ in the dialplan.
- Edit the manager_custom.conf to add your username and password for TcPlayer. For example, username astapi is added. Consult Asterisk system administrator to add AMI user. Only call read and write privilege is required.


TcAPI32
- TcAPI32 is for application development, we provide C++ header, DLL and OCX files
- Sample application is also provided, it contains sample source code, header files and libraries, follow this link to download the zip file
Redundancy Configuration
- To setup multiple TcPlayer servers and using LVS as the load balancer, each TcPlayer need to have its own set of Phantom devices
- TcPlayer supports multiple AE and Asterisk servers for redundancy purpose. You need to define multiple tc_tlink and tc_ami parameters to enable this feature
- You also need to configure Avaya routing to hunt multiple ties with the Asterisk servers
Uninstallation
- Stop the Window Service TcPlayer
- Open Windows Command Prompt, enter the following commands to uninstall the program from Windows Service
- cd c:\program files\tcplayer
- tcplayer -u
Introduction
The TCPGate SOCKS (tgSOCKS) is a SOCKS4 and SOCKS5 server, it is built using the core modules of TCPGate. It supports the following features:
- SOCKS4, SOCKS4a CONNECT and BIND commands
- SOCKS5 CONNECT, BIND and UDP ASSOCIATE commands
- Authentication by SOCKS5 Username/Password
- Authentication by TCPGate white list and black list filtering
64 bit Windows System
- For 64 bit Windows system, please follow the steps below
- Download and install the Microsoft Visual C++ 2005 Service Pack 1 Redistributable Package MFC Security Update, http://www.microsoft.com/en-us/download/details.aspx?id=26347
- Configure ODBC System DSN using
C:\Windows\SysWOW64\odbcad32.exe - Stop the Windows firewall because it enables by default and I don’t have time to figure out what ports are required to open, you need to find it out yourself.
Installation of tgSOCKS
- Download the tgSOCKS zip file here.
- Follow the steps below to install the software.
- Extract all the files into directory c:\program files\tgSOCKS
- Open Windows Command Prompt, enter the following commands to register the program as Windows Service
- cd c:\program files\tgSOCKS
- tgSOCKS -i
- Open ODBC Setting, create a System DSN called TGSOCKSCFG for Microsoft Access Driver and point to tgSOCKS.mdb which is located in the directory c:\program files\tgSOCKS

- Start the Windows Service tgSOCKS
- Telnet to localhost and port number 14007, enter username tcpgate and password tcpgate01 to access the program console
- Enter the following command if you want to enable socks4
- update parameter ss_v4_enabled true
- Hint: you may experience a lot of traffic from unauthorized machines if you turn on this feature
- Enter the following command if you want to enable no authentication in socks 5
- update parameter ss_v5_no_auth_enabled true
- Hint: you may experience a lot of traffic from unauthorized machines if you turn on this feature
- update parameter ss_v5_no_auth_enabled true
- Enter the following command to reload the configuration once you have made the change
- reload
- Enter the following command in the program console, you will receive debug information.
- trace on asc
- Enter the following command to add user
- add socksuser
- Hint: the program will prompt you username, password and full name of the user.
- Enter the following command to display user information
- disp socksuser all
- Enter the following command in the program console, you will get the help message.
- help

Uninstallation
- Stop the Window Service tgSOCKS
- Open Windows Command Prompt, enter the following commands to uninstall the program from Windows Service
- cd c:\program files\tgSOCKS
- tgSOCKS -u
Introduction
The Avaya Asterisk Logger (AstLogger) is a server application that triggers call recording on Asterisk side for Avaya CM. The software uses Avaya TSAPI library, it makes Single Step Conference (SSC) call to an Avaya agent extension and bridges the voice path between Avaya and Asterisk. After the voice path is established, Asterisk is responsible for call recording. Call details information is stored in MySQL database, a web based software called AstLoggerWeb is developed for searching of call records based on information such as calling number, called number, agent ID, etc. The software can also act as an auto-greeting server for call center agents, multiple greetings can be defined for an agent.
Before installation of the software, you need to make sure a IP trunk is setup between Avaya and Asterisk. I have tested successfully using Asterisk 11 and OOH323 or SIP trunks between Asterisk and Avaya. Moreover, ask your Avaya administrator the dialing prefix to access Asterisk from Avaya, normally it is the combination of AAR FAC plus the route pattern.
Prerequisites
Please make sure you have the following Avaya features and systems enabled or installed:
- AVAYA ASAI CTI STATION SFTW LIC or few idle phones as phantom devices
- AVAYA ASAI PHANTOM CALLS SFTW LIC or few idle phones as phantom devices
- MySQL Database Server
- Asterisk Server
System Architecture

- AstLogger triggers the bridging of voice path between Avaya and Asterisk via TSAPI and FastAGI.
- Asterisk is responsible for call recording.
- Asterisk writes all voice files to a distributed network file system such as MooseFS so voice files can be consolidated in one place such as data center and the files can be shared among different application. For example, AstLoggerWeb.
- AstLogger writes call details information and business data (via AstLogger API) to MySQL database.
- AstLoggerWeb retrieves call records based on user provided data such as calling number, called number, agent ID, etc.
- The architecture supports multiple Asterisk servers for redundancy and load sharing.
Preparation and Password Encryption
- A Microsoft Access MDB file is used to store the username and password of Avaya AES for this software. For security reason, a tool called encryptpasswd.exe is provided to generate encrypted password for the installation and configuration of the software.
- Execute the program, generate the encrypted password for the CTI user of Avaya AES, then use the encrypted password keyword for parameter al_tlink_01 and al_tlink_02. For example, the encrypted password for “p@ssword” is “R3NIw1yJMLlnPFzEQtuh2A==”.
64 bit Windows System
- For 64 bit Windows system, please follow the steps below
- Configure ODBC System DSN using
C:\Windows\SysWOW64\odbcad32.exe - Stop the Windows firewall because it enables by default which may block the communication between Asterisk and AstLogger.
- Configure ODBC System DSN using
OVA File for Testing
We also create a OVA file which you can deploy it to VirtualBox or VMware Workstation or Player for testing. After deploying the OVA file, please modify the following for your own environment
- IP address of the VM
- Edit /usr/lib/tslibrc, change 127.0.0.1 to the IP address of your Avaya AES
- Telnet to AstLogger console port 14005, update the parameters called al_tlink_01, al_tlink_02 and other parameters
- Once the changes are completed, reboot the VM
The username and password of the OVA VM is
- OS : root/P@ssw0rd
- MySQL: root/P@ssw0rd
- AstLogger console: tcpgate/tcpgate01
- uuiSVR console: tcpgate/tcpgate01
- alarchived console: tcpgate/tcpgate01
Windows Installation Procedure
- Download and install the TSAPI client for Windows 32-bit from Avaya web site, it contains the TSAPI run-time library files. You need to register DevConnect before you can access the download page.
- Download the Avaya Asterisk Logger zip file here or backup site.
- Follow the installation steps below to install the AstLogger software.
- Extract all files into a directory c:\program files\astlogger
- Open Windows Command Prompt, enter the following commands to register the program as Windows Service
- cd c:\program files\astlogger
- astlogger -i
- Open ODBC Setting, create a System DSN called ASTLOGGERCFG for Microsoft Access Driver and point to astlogger.mdb which is located in the directory c:\program files\astlogger

- Open the tParameter table of the Microsoft Access database, edit the value of parameters al_tlink_01 and al_tlink_02 to the TLINK names exported by your Avaya AES. If you have only one Avaya AES, modify the parameter al_tlink_01 only, leave al_tlink_02 blank.
- Edit the value of parameter al_phantomdigits to define the number of digits of your phantom device. If your Avaya use 5 digits dialing plan, the value is 5.
- Edit the value of parameter al_phantomthreadsize to define the number of threads that are responsible to trigger call recording simultaneously, the default value is 10.
- Edit the value of parameter al_recordformat to define the call recording format such as wav, mp3 or ogg, etc. The mp3 and ogg format is now supported if you compiled sox with mp3 and ogg supported. Edit the parameter al_cmdsoxmp3 when your SOX UNIX path is different than the default “/usr/local/bin/sox -r 8000 -c 1“. Also edit the parameter al_cmdrm because Asterisk will record voice file in .wav format first, then convert it to mp3 or ogg and finally delete the .wav file. The default value for al_cmdrm is “/bin/rm“. Or you can use the lame command directly for al_cmdsoxmp3 parameter, the parameter value is “/usr/bin/lame –silent” by default.
- Edit the value of parameter al_cmdchownchmod enable other application such as apache reads the stored voice files. The command will be executed after a record file is created, the default value is “/bin/chmod o+r“.
- Edit the value of parameter al_recordmode to define the technology such as Single Step Conference (ssc) or Service Observation (so) is used to trigger call recording. Only ssc is support currently.
- Edit the value of parameter al_appendphantomvdnprefix to append the phantom device extension number to the record vdn prefix (dialing prefix to Asterisk) when callerid and callername variables can not be exchanged between Avaya and Asterisk, the phantom device extension number will be used as a bridge for information exchange between Avaya and Asterisk. The default value is “yes“.
- Edit the value of parameter al_fagiport to define the port number for FastAGI interface, the default value is 4573. To increase the FAGI worker and buffer size, edit the parameters al_fagiworkersize and al_fagibuffersize.
- Edit the value of parameter al_ueventbuffersize to define the internal TSAPI Unsolicited Event buffer size, the default value is 256.
- Edit the value of parameter al_ueventworkersize to define the internal TSAPI Unsolicted Event worker size, the default value is 10.
- Edit the value of parameter al_greetingenable to enable or disable auto-greeting module, the default value is “no“.
- Edit the value of parameter al_greetingtimelimit to limit the time to trigger auto greeting. The default value is 2 seconds.
- Edit the value of parameter al_greetingpath to define the path where agent greeting voice files are stored, the default value is “/var/spool/asterisk/voicemail/device/“.
- Edit the value of parameter al_uuisvr to define uuiSVR IP and listening port. The default value is “127.0.0.1,5100“.
- Follow the section Installation of AstLogger Database to install the call record database.
- Follow this link to download MySQL ODBC driver and install the ODBC driver.
- Open ODBC Setting, create a System DSN called ASTLOGGERCINFOCFG for MySQL ODBC Driver, MySQL is used to store call details information such as calling number, called number, record path, etc. User is “astlogger” and Password is “astavaya”. If you want to use different DSN, username and password. Edit the three parameters follow:
- al_callinfodsn, this is the name of the ODBC System DSN.
- al_callinfousername, this is the username used to connect the AstLogger Database.
- al_callinfopasswd, this is the password used to connect the AstLogger Database.
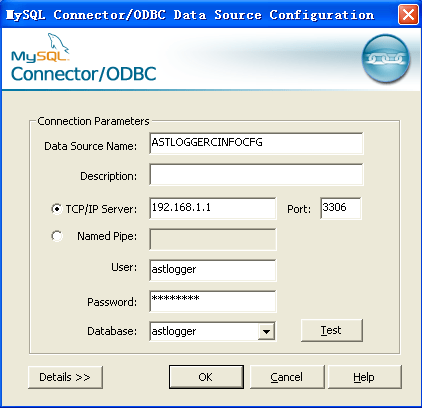
- Start the Windows Service astlogger
- Telnet to localhost and port number 14005, enter username tcpgate and password tcpgate01 to access the program console
- Enter the following command in the program console to add monitored ACD number. E.g. 10001 is split number
- add acd 10001
- Enter the following command to add phantom device which is responsible to trigger call recording. E.g. 20001 is phantom device number
- add phantom 20001
- Enter the following command to add your target agent extension for call recording. E.g. 30001 is agent extension
- add extension 30001
- Enter the following command to add dialing prefix to access Asterisk for specific Avaya VDN or split numbers. E.g. 40001 is VDN number in Avaya and 459 is dialing prefix to access Asterisk dialplan X for program X.
- add recordvdnprefix 40001 459 469
- Hint: 469 is secondary prefix which will be used when an emergency split has login agent. To specify the emergency split, assign a split to the parameter al_emergencysplit
- Enter the following command to add call recording location for specific Avaya VDN or split number. E.g. 40001 is VDN number and all record files stored in location “/tmp/X/“.
- add recordpath 40001 /tmp/X/
- Enter the following command to define Music On Hold mapping. E.g. 40001 is VDN number and use music on hold class orange.
- add moh 40001 orange
- Enter the following command in the program console, you will receive debug information.
- trace on asc
- Enter the following command in the program console, you will get the help message.
- help
- Enter the following command in the program console, you will get current recording information.
- disp callinfo
- Follow the installation steps below to install the uuiSVR software.
- Open Windows Command Prompt, enter the following commands to register the program as Windows Service
- cd c:\program files\astlogger
- uuiSVR -i
- Open ODBC Setting, create System DSN called UUISVRCFG for Microsoft Access Driver and point to uuiSVR.mdb which is located in the directory c:\program files\astlogger
- Start the service uuiSVR
- Open Windows Command Prompt, enter the following commands to register the program as Windows Service


RedHat/CentOS 6.x Installation Procedure

- The following is for RedHat/CentOS 6 32bit only, other Linux distributions are not supported
- Avaya provides only 32bit version of TSAPI SDK, the executable filename provided by AstLogger is called “uuiSVR” and “AstLogger”.
- Login as root and execute the following commands
- Install the following packages for 64bit OS
-
yum install yum install libstdc++.i686 expat.i686 openssl.i686 unixODBC.i686 mysql-libs.i686 -
wget http://mirror.centos.org/centos/6/os/i386/Packages/mysql-connector-odbc-5.1.5r1144-7.el6.i686.rpm -
rpm -ivh mysql-connector-odbc-5.1.5r1144-7.el6.i686.rpm - Download Avaya Aura AE Services 7.0 TSAPI Client for RHEL 6 from DevConnect
- chmod +x tsapi-client-linux-7.0.0-131.bin
- Execute the installation file tsapi-client-linux-7.0.0-131.bin
- ./tsapi-client-linux-7.0.0-131.bin
- Edit /usr/lib/tslibrc, change 127.0.0.1 to the IP address of your Avaya AES
- Install the following packages for 32bit and 64bit OS
-
yum install mysql-server mysql -
yum install mysql-connector-odbc unixODBC - Config and start MySQL
-
chkconfig mysqld on -
service mysqld start - Create database and user
-
mysql -u root -p -
> create database astlogger; -
> create database uuisvr; -
> create database alarchived; -
> create user 'tcpgate'@'localhost' identified by 'tcpgate'; -
> create user 'astlogger'@'localhost' identified by 'astavaya'; -
> grant all on astlogger.* to 'tcpgate'@'localhost'; -
> grant all on astlogger.* to 'astlogger'@'localhost'; -
> grant all on uuisvr.* to 'tcpgate'@'localhost'; -
> grant all on alarchived.* to 'tcpgate'@'localhost'; -
> flush privileges; -
> quit -
mysql -h localhost -u astlogger -p astlogger < astlogger.sql -
mysql -h localhost -u tcpgate -p uuisvr < uuisvr.sql -
mysql -h localhost -u tcpgate -p alarchived < alarchived.sql
- Copy the following to /etc/odbc.ini file
- [ASTLOGGERCFG]
Description = MySQL connection to AstLogger
Driver = MySQL
Server = localhost
Port = 3306
Database = astlogger - [ASTLOGGERCINFOCFG]
Description = MySQL connection to AstLogger
Driver = MySQL
Server = localhost
Port = 3306
Database = astlogger - [ALARCHIVEDCFG]
Description = MySQL connection to AstLogger Archive Daemon
Driver = MySQL
Server = localhost
Port = 3306
Database = alarchived - [UUISVRCFG]
Description = MySQL connection to uuiSVR
Driver = MySQL
Server = localhost
Port = 3306
Database = uuisvr
- [ASTLOGGERCFG]
- Create user and copy files
-
mkdir /usr/local/astlogger -
cp AstLogger /usr/local/astlogger -
cp alarchived /usr/local/astlogger -
cp uuiSVR /usr/local/astlogger -
chmod +x /usr/local/astlogger/AstLogger
-
chmod +x /usr/local/astlogger/uuiSVR
-
chmod +x /usr/local/astlogger/alarchived
-
chown -R asterisk.asterisk /usr/local/astlogger -
mkdir -p /var/log/astlogger -
mkdir -p /var/log/uuisvr -
mkdir -p /var/log/alarchived -
chown -R asterisk.asterisk /var/log/astlogger -
chown -R asterisk.asterisk /var/log/uuisvr -
chown -R asterisk.asterisk /var/log/alarchived - Auto start the daemon after server reboot
-
echo "rm /tmp/astlogger.log" >> /etc/rc.local -
echo "su asterisk -c '/usr/local/astlogger/AstLogger'" >> /etc/rc.local -
echo "rm /tmp/uuisvr.log" >> /etc/rc.local -
echo "su asterisk -c '/usr/local/astlogger/uuiSVR'" >> /etc/rc.local -
echo "rm /tmp/alarchived.log" >> /etc/rc.local -
echo "su asterisk -c '/usr/local/astlogger/alarchived'" >> /etc/rc.local
Advanced Features
- To enable call log centralization, assign IP address and listening port of the centralized log server for the parameter al_callloghost and al_calllogport.
- To enable trunk side record, assign “yes” to parameter al_trunkrecording.
- To enable scanning of configuraiotn database for addition or deletion of devices, assign “yes” to parameter al_scandbconfig and al_scandbconfiginterval by interval of seconds.
Asterisk Configuration for Default Recording Mode
- Add a dialplan under the context of the trunk that you setup between Avaya and Asterisk, e.g.

- For FastAGI host, enter the IP address of the AstLogger machine. For example, the IP address 10.10.1.111.
- Next to the IP address is the FastAGI network_script, the AstLogger called it application. Enter “recording” for default recording mode.
- Next to the application name is the target extension number of this dialplan. Phantom device extension is appended in case callerid or callername variables cannot be exchange between Avaya and Asterisk.

Asterisk Configuration for Meeting Recording Mode
- Add a dialplan under the context of the trunk that you setup between Avaya and Asterisk, e.g.

- For FastAGI host, enter the IP address of the AstLogger machine. For example, the IP address 10.10.1.111.
- Next to the IP address is the FastAGI network_script, the AstLogger called it application. Enter “meeting” for meeting recording mode.
- Next to the application name is the target extension number of this dialplan. Phantom device extension is appended in case callerid or callername variables cannot be exchange between Avaya and Asterisk.

Installation of AstLogger Database
- Download the Avaya Asterisk Logger zip file, unzip it and there is a SQL script file called astlogger.sql
- Follow the steps below to create the required database and user
- Create a database called “astlogger”, the SQL statement as follow:
-
CREATE DATABASE astlogger;
- Create a user called “astlogger” and password “astavaya”
-
CREATE USER 'astlogger'@'localhost' IDENTIFIED BY 'astavaya'; -
CREATE USER 'astlogger'@'%' IDENTIFIED BY 'astavaya'; -
GRANT ALL ON astlogger.* TO 'astlogger'@'localhost'; -
GRANT ALL ON astlogger.* TO 'astlogger'@'%'; -
FLUSH PRIVILEGES; - Use mysql to import table definitions
-
mysql -h localhost -u astlogger -p astlogger < astlogger.sql
AstLogger API
- AstLogger API is for logging of application data related to a voice record, 10 data fields are supported. API is provided as OCX and DLL formats, the library files and sample applications are provided in the zip file.
- To enable API support, enter the following command in the program console
- add tcp 5002 * * custom alapi
- Hint: API server will be listen on port 5002.
- Call info record will be deleted immediately after agent call hangup, to enable agent write application data after call end, edit the parameter al_recorddeletedelay in the astlogger.mdb. If you want agent can write record in 30 seconds after call hangup, set the value to 30.
AstLogger REST interface
- AstLogger REST interface is for Web application integration
- To add REST interface port, enter the following command
- add tcp 5003 * * custom alrest
- The URL for querying of device status is
- The URL for listing of all device status is
- The URL for saving application data is
- The URL for supervisor silent monitoring is
- The URL for playback of voice record using Avaya phone is
- http://server.port/playback?extension=12346&recordkey=12345.6789
- Hint: parameter al_playbackprefix is required for AstLogger to access the asterisk
- Hint: parameter al_playbackwaitanswer is defined as the maximum wait seconds the AstLogger waits for playback device answer
- Hint: The Asterisk dialplan for playback is

- The playback function is only supported for Asterisk 13 or above
- The URL for control playback of voice record after playback start
- http://server.port/controlplayback?extension=12346&recordkey=12345.6789&action=stop
- http://server.port/controlplayback?extension=12346&recordkey=12345.6789&action=restart
- http://server.port/controlplayback?extension=12346&recordkey=12345.6789&action=pause
- http://server.port/controlplayback?extension=12346&recordkey=12345.6789&action=forward
- http://server.port/controlplayback?extension=12346&recordkey=12345.6789&action=reverse
- Hint: The control playback is only supported for Asterisk 13 or above
- Hint: The control playback function use Asterisk AMI, please define the AstLogger parameters “al_amiip“, “al_amiport“, “al_amiusername“, “al_amipasswd” and “al_amioptions“. Please assign default value “Events: off” to parameter “al_amioptions” to have a AMI stream without event notification.
- Hint: You can use the keypad of Avaya phone to control the playback. For example,
- * is reverse
- # is forward
- 7 is restart
- 8 is pause
- 9 is stop
- The URL for pause recording
- The URL for unpause recording

AstLogger WebSocket interface
- AstLogger WebSocket interface is for Web application integration
- To add WebSocket interface port, enter the following command
- add tcp 9090 * * custom alws
- WebSocket interface accepts JSON request, returns JSON response and delivers unsolicited JSON evens
- The JSON strings for Connect request and response are
- {id: “1”, request: “connect”, extension: “12345”, agentid: “56789”}
- {msgtype: “response”, id: “1”, result: “success”}
- The JSON strings for Disconnect request and response are
- {id: “2”, request: “disconnect”}
- {msgtype: “response”, id: “2”, result: “success”}
- The JSON strings for SaveData request and response are
- {id: “3”, request: “savedata”, extension: “12345”, recordkey: “12345.6789”, data0: “hello”, data9: “world”}
- {msgtype: “response”, id: “3”, result: “success”}
- The JSON string for RecordStart event is
- {msgtype: “event”, eventtype: “recordstart”, extension: “12345”, recordkey: “12345.6789”, ucid: “00001094861421138402”, calling: “12345”, called: “12346”}
- The JSON string for RecordEnd event is
- {msgtype: “event”, eventtype: “recordend”, extension: “12345”, recordkey: “12345.6789”}
AstLogger Web
- AstLogger Web is a web based application for searching of call recording based on parameters such as date time, extension number, agent ID, calling number, etc.
- AstLogger Web 1.3 is released. The screen dump is follow:

- Follow the steps below for the installation and configuration of AstLogger Web for CentOS. The steps for other Linux distribution are similar.
- yum install httpd
- chkconfig httpd on
- service httpd start
- Hint: if you do not install httpd before
- cp astlogger.tar.gz /var/www/html
- Hint: the astlogger.tar.gz is within the astlogger-x.x.rar file
- cd /var/www/html
- tar xzvf astlogger.tar.gz
- cd /var/www/html/astlogger
- ln -sf /mnt .
- Hint: to symbolic link voice record directory to AstLogger Web directory
- chown -R asterisk.asterisk /var/www/html/astlogger
- Hint: change the ownership to asterisk
- yum install php
- yum install php-mysql
- service httpd restart
- vi config.php
- Hint: change the $mysqlHost in config.php to the ip address of your sql server
- http://ip-of-astlogger-web/astlogger/
- Hint: default admin username is admin and password P@ssw0rd
AstLogger Desktop
- Follow this link to find the details of the application
Monitor AstLogger Status
- AstLogger supports monitoring of AstLogger status via the AstLogger Web
- In the program console of AstLogger, enter the following command to enable this feature
- add tcp 5002 * * custom alxml
- From the AstLogger Web, select the Add Logger

- After the logger is added, select the Logger Status from menu to view the logger status
CentOS 6.x AstLogger Archive Daemon Installation
- Prerequisite
- The AstLogger uses MySQL configuration database instead of astlogger.mdb.
- The AstLogger configuration database should be installed on the same MySQL that used by AstLogger Archive Daemon.
- The AstLogger Archive Daemon is for archiving of voice files to backup directory and deletion of voice files which over retention period set by the program.
- The executable file of AstLogger Archive Daemon 32bit version is “alarchived”, the 64bit version is “alarchived64”.
- Install the following packages
-
yum install mysql-server mysql
-
yum install mysql-connector-odbc unixODBC
- Config and start MySQL
-
chkconfig mysqld on
-
service mysqld start
- Create database and user
-
mysql -u root -p
-
create database alarchived;
-
create user 'tcpgate'@'localhost' identified by 'tcpgate';
-
grant all on alarchived.* to 'tcpgate'@'localhost';
-
flush privileges;
-
quit
-
mysql -h localhost -u tcpgate -p alarchived < alarchived.sql
- Copy the following to /etc/odbc.ini file
- [ASTLOGGERCINFOCFG]
Description = MySQL connection to AstLogger
Driver = MySQL
Server = localhost
Port = 3306
Database = astlogger - [ALARCHIVEDCFG]
Description = MySQL connection to AstLogger Archive Daemon
Driver = MySQL
Server = localhost
Port = 3306
Database = alarchived
- [ASTLOGGERCINFOCFG]
- Create user and copy files
-
mkdir /usr/local/astlogger
-
cp alarchived /usr/local/astlogger
-
chmod +x /usr/local/astlogger/alarchived
-
chown -R asterisk.asterisk /usr/local/astlogger
-
mkdir -p /var/log/alarchived
-
chown -R asterisk.asterisk /var/log/alarchived
- Auto start the daemon after server reboot for 32bit version
-
echo "rm -f /tmp/alarchived.log" >> /etc/rc.local
-
echo "su asterisk -c '/usr/local/astlogger/alarchived'" >> /etc/rc.local
- Auto start the daemon after server reboot for 64bit version
-
echo "rm -f /tmp/alarchived64.log" >> /etc/rc.local
-
echo "su asterisk -c '/usr/local/astlogger/alarchived64'" >> /etc/rc.local
- Telnet to the program console, the console port number is 14020, enter username tcpgate and password tcpgate01
- If your archive directory mount point is /archive/, execute the following command to add archive directory
- add archivepath /archive/
- Hint: make sure the /archive/ directory is writable by user asterisk
- Hint: archiving interval can be fine tuned by a parameter called al_archiveschedulerinterval which the default value is 30 seconds.
- The program monitors the recordpath usage and deletes voice files in the record paths automatically when the usage reached a defined level. The threshold parameter is called al_hddthreshold, by default it it set to 90 percent, meaning of deletion old files when the usage level reached 90%. The monitor interval can be fine tuned by a parameter called al_hddcleanerinterval which the default value is 10 seconds. Also, a parameter called al_purgewithoutarchive to control file deletion can be performed without archiving, the default value is “no”.
- If you have retention period requuirement on recordpath or archivepath, execute the following command to add retention rule. Please pay attention to this command because voice files may be deleted before they are archived when the archiving function is failed longer than the retention period.
- add retentiondir /mnt/ 90 90DaysRetentionPeriod
- Hint: the program deletes files in directory /mnt/ when its creation time is over 90 days
- Hint: retention thread execution interval can be fine tuned by a parameter called al_retentionschedulerinterval, the default value is 30 seconds.
Alarm Notification
- Alarm notification via email is supported, you need to config the following parameters:
- al_emailserverip, this is the IP address of your email server.
- al_emailsmtpport, this is the smtp port of email server, default value is 25.
- al_emailusername, the uesrname to login email server.
- al_emailpasswd, the encrypted password. The database only store encrypted password due to security reason, to generate an encrypted password, enter the following command in the program console and paste the encrypted password for the parameter al_emailpasswd.
- genpass yourpasswordfollow
- al_emailsenderaddress, the email address used to send notification emails.
- al_emailauth, if authentication is required, set the value to “yes“. The default value is “no” when your mail server trust your astlogger server.
- al_emailauth, if SSL is required, set the value to “yes“. The default value is “no“.
- Enter the following command to add email address for the receive of alarm notification, e.g.
- add email service@upinget.com
Known Issues
- The AstLogger triggers call recording via Avaya AES. When Avaya AES down, there will be no recording. Please provide at least two TLINK(s) so AstLogger can re-established the Avaya AES link as quickly as possible. The parameter to configure multiple TLINK(s) is called “al_tlink_xx“.
- When using Avaya Single Step Conference to bridge Avaya and Asterisk for call recording, three parties conference will be established between agent, customer and Asterisk. When agent holds the call, the music on hold is triggered by AstLogger and played by Asterisk instead of Avaya. Please follow the Music On Hold section to configure your music source for different VDN or split number.
- When agent initiates a consultation call during the call recording, the agent will have two calls on Avaya side (one is OLD call, the other is NEW call). There is no recording for the NEW call until the agent complete the conference.
- If your Asterisk version > 1.6 and using OOH323 trunk, the Asterisk answers call is longer than default 2 seconds, please adjust the parameter al_waitloggeranswer and set a value longer than default 2 seconds
- If your Asterisk SIP trunk with Avaya sometimes timeout because of network issue, please adjust the parameter al_waitloggerretry with value “yes” for retry connection between Avaya and Asterisk.
- The Single Step Conference failed when agent extension connected to an announcement. This explains the root cause of the problem.
- The calling number display of Avaya phone is replaced by a word “conference 2” after recording is started. This is produced by the phantom device which bridge the Avaya and Asterisk.
Music On Hold
- The Music On Hold class is defined and mapped by Avaya VDN or SPLIT numbers. Use the following command to map the music on hold class. E.g. 40001 is VDN number and use music on hold class orange.
- add moh 40001 orange
- Please follow your Asterisk manual to add music on hold files. For example, follow this music on hold to add the music on hold files.
- For a BPO company, this feature is useful because you can play different music on hold for different company.
Support and License
- Please contact upinget.com for support and license
Introduction
This tool use Avaya TSAPI library, it registers itself as call routing server for Avaya VDNs. When there is call comes in, Avaya sends the request to this routing server and asks for routing decision. Currently, the routing server supports the features below:
- Blocks calls when WHITELIST table is not empty and calling numbers are not defined in the table
- Blocks calls or route the calls to a default destination when calling numbers are defined in the BLACKLIST table
- Routes calls based on User Entered Digits which defined in the UED table
- Routes calls directly to a specific agent based on calling number or called number which is defined in the DAC table, routes calls to agent mailbox when he/she is unavailable
- Routes calls based on calling number or called number which defined in the MAIN table
- Routes calls based on Asterisk queue object and value which defined in the AMI table
Wish List
- Routes calls based on user provided SQL statement and trigger condition
Preparation and Password Encryption
- The access MDB file stored the the username and password of Avaya AES. For security reason, a tool called encryptpasswd.exe is provided to generate encrypted password for the installation and configuration of the software
- Execute the program, generate the encrypted password for the user of Avaya AES, then enter the encrypted password for parameter rm_tlink_01. For example, the encrypted password for “p@ssword” is “R3NIw1yJMLlnPFzEQtuh2A==”
64 bit Windows System
- For 64 bit Windows system, please follow the steps below
- Download and install the Microsoft Visual C++ 2005 Service Pack 1 Redistributable Package MFC Security Update, http://www.microsoft.com/en-us/download/details.aspx?id=26347
- Configure ODBC System DSN using
C:\Windows\SysWOW64\odbcad32.exe - Stop the Windows firewall because it enables by default and I don’t have time to figure out what ports are required to open, you need to find it out yourself.
Installation
- Download the TSAPI client for Windows 32-bit from Avaya web site, it contains the run-time library files to access the Avaya AES. You need to register DevConnect before you can access the download page.
- Download the Avaya Route Manager zip file here.
- Follow the installation steps below to install the software.
- Extract all the files into directory c:\program files\routemgr
- Open Windows Command Prompt, enter the following commands to register the program as Windows Service
- cd c:\program files\routemgr
- routemgr -i
- Open ODBC Setting, create System DSN called ROUTEMGRCFG for Microsoft Access Driver and point to routemgr.mdb which is located in the directory c:\program files\routemgr
- Open the Access file, assign the TLINK of your AES servers to parameters rm_tlink_01 and rm_tlink_02 which can be found in the tParameter table. E.g.
- AVAYA#AVAYA_ECS#CSTA#XXXXXX,username,encrypted_password
- Start the Windows Service routemgr
- Telnet to localhost and port number 14005, enter username tcpgate and password tcpgate01 to access the program console
- Enter the following command, you will receive debug information
- trace on asc
- You can get help by the following command
- help
- You can add vdn and calling number to the WHITELIST table
- add route whitelist 11100 12345678
- Hint: VDN 11100 will be monitored and calling number 12345678 will not be blocked
- You can add vdn, calling number and route destination to the BLACKLIST table
- add route blacklist 11100 12345678 ENDCALL
- Hint: Blocks the number 12345678 from VDN 11100
- You can add vdn, user entered digits and route destination to the UED table
- add route ued 11100 123 22200
- Hint: Routes call to destination 22200 when user entered 123 digits for VDN 11100
- You can add vdn, calling/called number, agent ID and mailbox to the DAC table
- add route dac 11100 12345678 68001 3145168001
- Hint: Routes call for calling/called number 12345678 to available agent 68001 when it reached VDN 11100
- Hint: The call will be routed to 3145168001 (mailbox) when the agent is unavailable
- You can add vdn, calling/called number and route destination to the MAIN table
- add route main 11100 12345678 22200
- Hint: Routes call for calling/called number 12345678 to VDN 22200 when the it reached VDN 11100
Uninstallation
- Stop the Window Service routemgr
- Open Windows Command Prompt, enter the following commands to uninstall the program from Windows Service
- cd c:\program files\routemgr
- routemgr -u
